EPG: Difference between revisions
(→MC20+) |
(→MC20+) |
||
| Line 224: | Line 224: | ||
[[image:EPG Scheduling.png]] |
[[image:EPG Scheduling.png]] |
||
From top to bottom: |
|||
*''Clear Program Guide'' |
*''Clear Program Guide'' |
||
This should be self explanatory. The instruction on the window is sufficient enough. |
|||
Self explanatory. |
|||
*''Automatically load program guide every day in the background'' |
*''Automatically load program guide every day in the background'' |
||
Revision as of 13:21, 8 July 2015
An EPG (Electronic Program Guide) provides a schedule of shows for each TV channel. MC can read XMLTV data files. MC17+ now provides a semi-automated way of creating and populating an EPG. This is partly based on mc2xml. It is no longer necessary to install this separately.
Pre MC17
For those of you with a version prior to MC17, these are the instructions for installing mc2xml:
You can add an EPG to J. River Media Center. Here are the steps:
2. Unpack it by running it. Save it anywhere, but remember the location.
3. In MC, under Drives & Devices > Television, choose Configure/Load Program Guide
4. Follow the on-screen instructions until you see this screen:
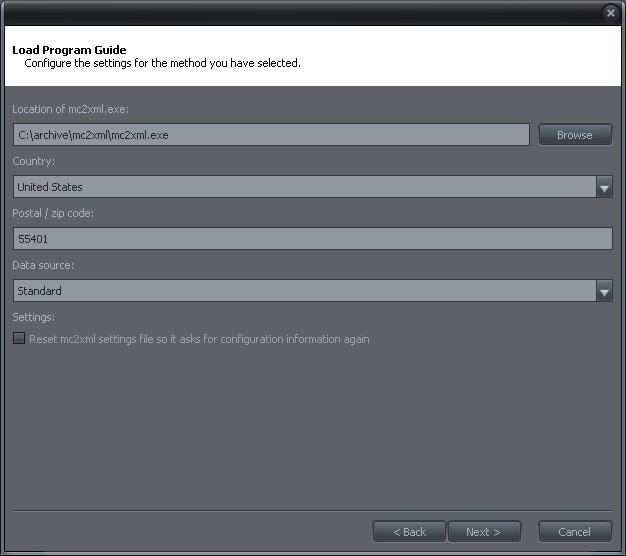
5. On that screen, enter the location of the mc2xml.exe file, your country, postal code, and choose "standard" for data source.
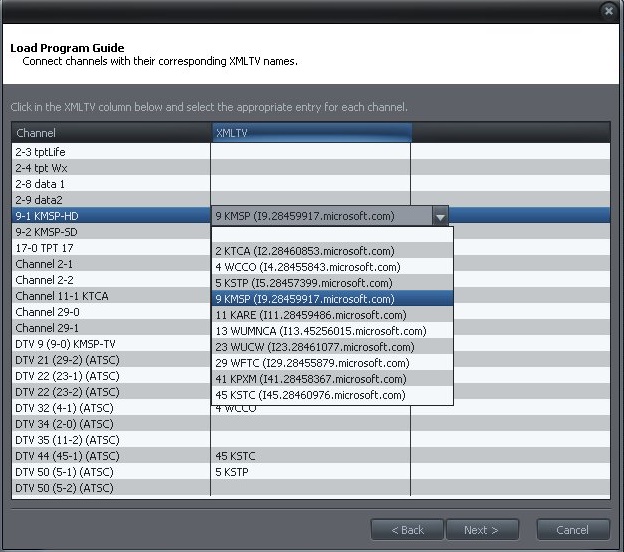
6. When you choose Next, the mc2xml file will get data from the Internet. After it finishes, you will see this screen:
7. This screen lets you choose an EPG channel for each channel in MC. One, at a time, click in the second column, next to the channel you wish to change.
Once you've finished this, you should see the schedule for each channel.
MC17 - MC19
For those of you with MC17 through MC19, there is now a semi-automated process.
Basic Guide Set-up
1. In the left pane in Standard View, select Drives & Devices > Television
2. Select "TV Options" at the bottom left of the main pane. Select "Load Program Guide".
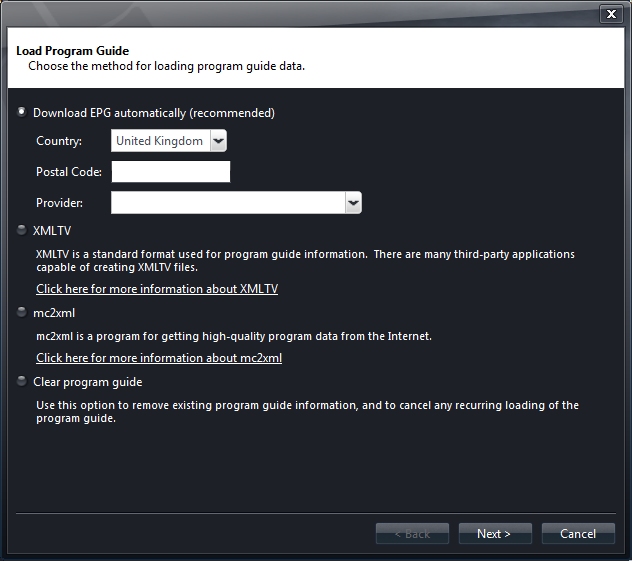
3. Select the default option - "Download EPG automatically (recommended)" and select your Country, Postal Code and the Provider of the EPG data. The Provider needs to be chosen depending on the type of tuner you are using. The options offered will have been selected based on your location. Now click "Next".
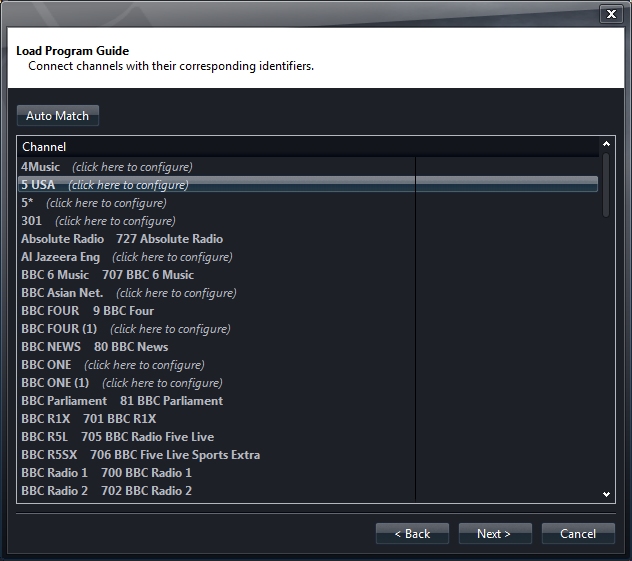
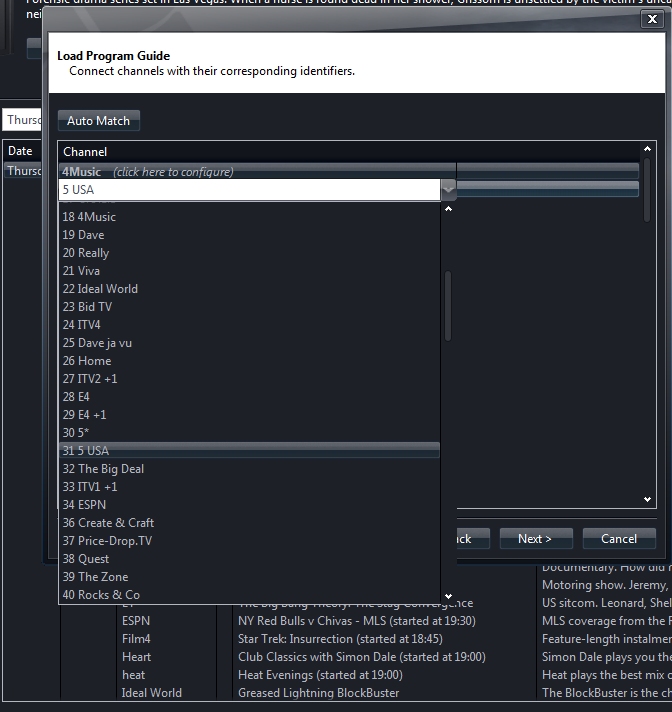
4. The Load Program Guide channel matching window will pop up. The purpose of this step is to match the channels you have found during the scan to the channel names used in the guide data. Some names will match automatically. If you see "(click here to configure") against a Channel name, a match was not found. This may be because the names differ slightly or there is no guide data available for this channel from the Provider.
5. Near the top of the window is an Auto Match button. At the time of writing, it is unclear whether it is necessary to click this button. If you do, you will be asked: "If an identifier is already associated with a channel, do you want to keep the existing identifier or use the newly matched identifier?" Imagine you had set up the guide but had a number of channels where no guide data was found. If you run the process again with a different Provider, you might find the data available. In order that you don't change the associations you already have, choose "Keep Existing". If this is the first time you have run the process, choose "Use New".
6. For each channel where it says "(click to configure)", click on that text and search down the list which pops up and select a channel name which you believe ties up with the scanned channel.
When you have completed this for each missing match, click "Next".
7. Make sure that the check box next to the "Automatically load" option is checked. This will ensure that your EPG is kept up to date. Click "Finish".
You will now see the EPG load then the guide data will show in the pane against the channels.
Now that the EPG is set up, your TV channels will show in Theater View under Video > Guide.
Advanced Guide Set-up
The standard guide feature provides only one way of selecting channels using the Favorites marking in the "Edit Channel List" option. A number of users felt some more flexibility was required to have multiple Guide listings with particular types of channels such as Radio and TV or Sports or Kids. In order to achieve this, a new field was added and some work is required by the user. Don't be put off! Taken step by step this is achievable by any user and the results are well worth the effort.
Channels are simply database records, just like audio and video files. This means it's possible to tag them like anything else. The idea is to tag channels with keywords. You can give any channel any number of keywords. Imagine tagging your favorite channels with 'Favorites', music channels with 'Music', and your kids' channels with 'Kids'.
Then, you could configure the television guide to show only entries for a particular keyword. So on the top roller inside Guide in Theater View, you could have 'All', 'Favorites', 'Music', 'Kids', etc.
If you play from one of those views, only the channels in the view will be in the channel up / channel down queue. In other words, if you play from the 'Favorites' list, channel up and channel down will only loop your favorite channels.
So, to set this up, follow these steps:
1. Create a Smartlist of the scanned TV Channels. If you haven't done the channel scan yet, go to the instructions in Television. If you created the TV Channels Smartlist there, ignore this step. Right click on Playlists in the left pane of Standard View and select "Add Smartlist". Name it, e.g. TV Channels and, under Rules, set Media Type is TV. Remember to uncheck Audio which is the default. Now all your channels will be listed in the main pane. To make sure your smart list is setup correctly, you can check the "Filename" for each entry. They have filename extension "tvlb". The filenames all begin with "TV Channel" and ends with "([tuner type])", like
"TV Channel xxxxxxxxxx (ATSC).tvlb" "TV Channel xxxxxxxxxx (Set Top Box).tvlb"
2. Right click on the fields title bar and check "Keywords" so that this field will show in the list.
3. Choose a name for the Guide listing you require. Suppose it is Movies. Scroll down the channel list and decide which channels you want in this Guide. Hold the CTRL key and click on each of these channels to select them. Point to the Keywords field for any of the selected channels and right click and select "Rename". A pop-up containing a field labelled "Add". Type Movies in this field. Hit Return and Movies will appear in the list box below with a check mark. Hit Return again and now Movies should show in all channels selected.
4. Repeat step 3 for all other Guide types you want. It is possible to have more than one Keyword for any channel so that channel will appear in each nominated Guide.
5. We now need to set up Theater View so that these guides are included. In Tools > Options > Theater View > Items to Show, scroll down to Video > Guide and click on Guide. Click "Add" then "Library Item". Name it 'Movies' or whatever you want your new guide to be called.
6. Click 'Set rules for file display...' and click "Import/Export". Copy and paste this rule into the box - (thanks Matt):
[TVTime]=#TVGuideStartDate-7d [=TVInfo(ChannelKeywords)&DataType=[list]]=[Movies]
Click "OK". Two custom rules will have been set up. Click "Apply" then "OK".
In the rule above, replace Movies with the Keyword you have used to identify the channels you want included in this Guide.
7. Repeat steps 5. and 6. for each of the Guides you want - one for each different Keyword.
8. In Theater View, navigate to your new view. Use More > Toggle List Style to find the style you prefer (grid, list, etc.).
Now you have your own set of personalised EPGs.
Remember that only channels which have a XMLTV ID associated with them will show up in your guides.
Including a Clock on the Guide Page
It is useful to have a clock displayed when making decisions related to the Guide. Unfortunately, the current Guide page does not show a clock. This can be resolved by making a change to the Theater View Skin definition. If you have already customised your skin, the change is simple. If not, you will need to create your own Skin folder.
1. Check which Theater View skin you are using - go to Tools > Options > Theater View > Appearance > Skin. Remember the name.
2. In Windows Explorer, find Program Files\J River\Media Center 17\Skins\Theater View. You should see a folder with the name of your current skin. Copy and paste this folder into the Theater View folder and rename it with a name of your choice.
3. Open the folder and find the main.xml file. If you are familiar with editing XML files, you may wish to use an XML editor, otherwise open it with Notebook. Near the top of the file, you will see an entry beginning with <SKIN Name=. Change the name in quotes to the name you chose for your skin.
4. Near the bottom of the file you may find an entry beginning with <TEXT>. If so, insert this line just above the </TEXT> label (Thanks Sean):
<Item Text="[Time]" Location="***" TextColor="ffffff" Rect="72,00,96,05" Capitalization="0" Alignment="1" Alpha="50" Size="[Large Text Height]" />
5. If there is no existing <TEXT> entry, insert the following 3 lines immediately beforethe line containing </MJFS>
 <TEXT>
   <Item Text="[Time]" Location="***" TextColor="ffffff" Rect="72,00,96,05" Capitalization="0" Alignment="1" Alpha="50" Size="[Large Text Height]" />
 </TEXT>
6. In Theater View Guide, you should now see a clock in the top right corner.
MC20+
Starting with MC20, there is a Setup wizard for setting up TV channels and EPG. The entire wizard is best described in another article. Here only the steps that involve EPG will be described.
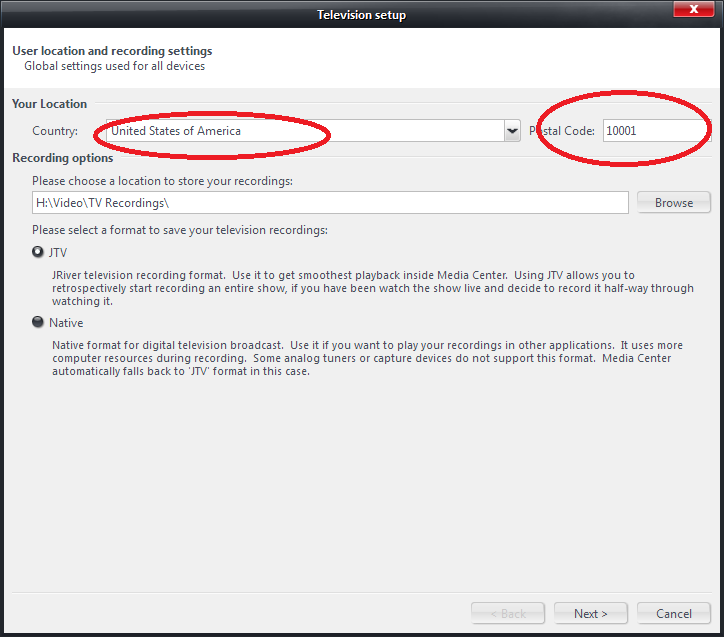
1. Country and Postal Code
On the first page of the TV Setup wizard, make sure you select your country from the list, and type your postal code correctly.
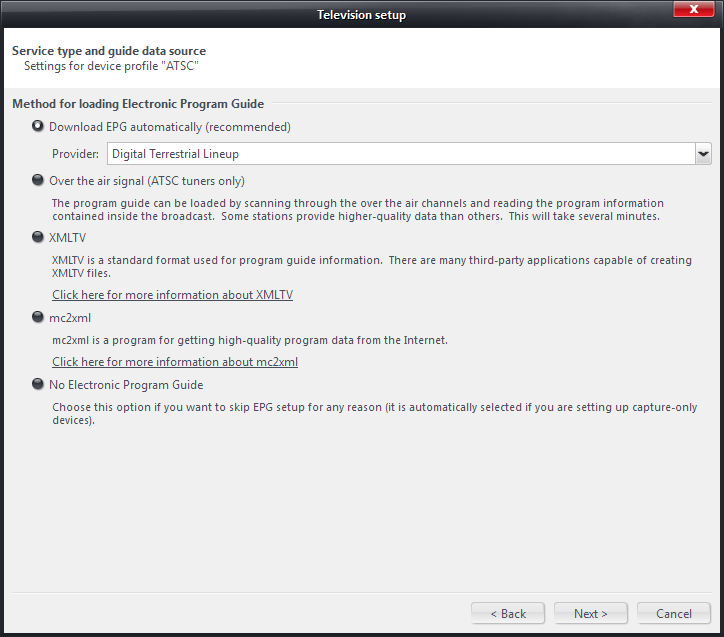
2. A few pages later in the wizard, you will reach this page:
This is where you pick your mode of obtaining EPG data. The number of options available on this page depends on other settings you have chosen so far in the wizard. The picture above shows all available choices.
- Download EPG Automatically (recommended)
This option is not available in all countries. Where it is not available, it is not shown on the wizard page. If you do not see this option, but believe it should be available, you should first make sure that the country and postal code data are entered correctly, as described in step 1 above. If you still do not get the option, it maybe due to bad network condition that prevents data from being downloaded properly. You can quit the wizard and try again at a later time. Countries and regions in which this option is known to be available include, United States, Canada, Japan, India, Taiwan, etc.
When this option is available, you are presented with a list of "providers". Basically this is a list of cable TV and satellite TV providers. Selecting a provider will allow MC to download EPG data for all channels that the selected provider offers in its channel lineup. For people who do not subscribe to cable or satellite TV, but only use over-the-air services, an important entry in the "Provider" list is "Digital Terrestrial Lineup". Choosing this one allows MC to download EPG data only for your local OTA channels. This is not available in all locations. For example, it is not available in some Canadian cities. If you do not find "Digital Terrestrial Lineup" from the listed providers, try looking for something with a different name, but has similar meaning, such as "Over the Air Lineup". If this also fails, then you can simply choose a cable provider (even though you are not a subscriber to cable!), because most cable providers do offer OTA channels in their lineup (at least in the USA anyway). Choosing a cable provider when you only need data for OTA channels has a down side. MC would have to download large amount of data that correspond to cable channels. But at least you will be able to get data for your OTA channels.
- Over the air signal (ATSC only)
This option is currently only available for ATSC users. It will not be shown if you have not configured any tuner to be ATSC type. With this option, MC scans EPG data contained in the OTA stream, using an actual tuner. This method is not very reliable. MC sometimes would not pick up any data for a given channel, or for a certain time period. It is therefore recommended that you use other mode of obtaining EPG data, unless it is absolutely necessary to use this method. If you use this method, it helps if you schedule MC to do more than one loading per day (for example, you can set up MC to load EPG every 6 hours). Please note that even though you are using only ATSC OTA channels, it does not mean that you have to use OTA EPG mode. These are two independent concepts. You can definitely use other on-line EPG mode with your ATSC channels.
- XMLTV
You can use many third-party applications to download EPG data in XMLTV format. The quality of data varies from application to application. There are two ways of using the data inside MC. See next section for details.
Here are some Interact threads discussing the subject.
Season, Episode number and zap2it
Additional set up procedure for this option will be discussed in section 3 below.
- mc2xml
mc2xml is a program that downloads EPG data from the Internet. If you choose this option, MC will run this third-party application and load EPG data that it downloads.
Additional info on setting up this option is in the next section.
3a. Additional setup details for XMLTV
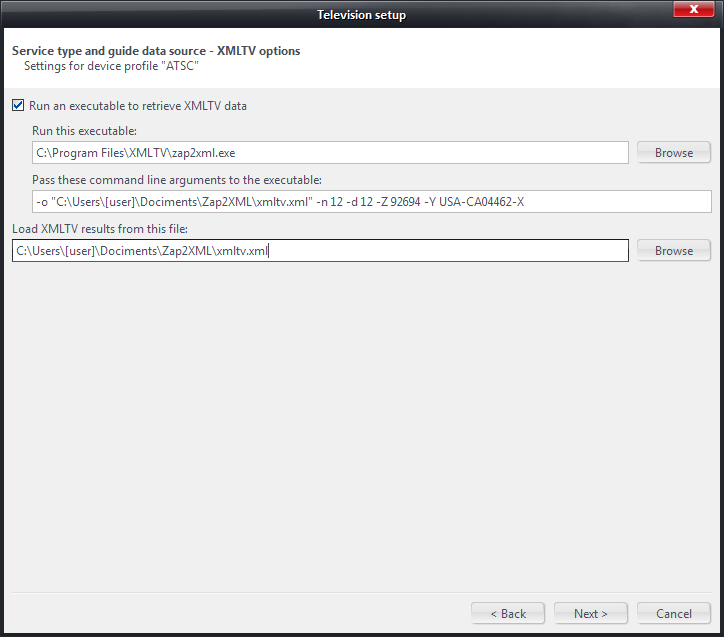
If you choose "XMLTV" option in step 2, you will get the following screen upon clicking the Next button:
There are two ways to execute a third-party XMLTV program: inside MC or outside of MC.
To run the program inside MC, check the checkbox "Run an executable to retrieve XMLTV data", and fill in all boxes below it. Under "Run this executable:", choose the executable file of the third-party program that you have installed. Under "Pass these command line arguments to the executable:" enter parameters for the program. You should also fill in the box under "Load XMLTV results from this file:", to tell MC which data file to load info from. Zap2xml is used as an example in the screenshot above.
If you uncheck the checkbox "Run an executable to retrieve XMLTV data", MC will not run the third-party program on your behalf. Instead, you can schedule for it to be executed using Windows Scheduler. Then schedule MC to load the output file produced by it, using the box under "Load XMLTV results from this file:".
See the following Interact thread for discussion on command line parameters used by zap2it, and how to schedule it in Windows scheduler:
Season, Episode number and zap2it
3b. Additional setup details for mc2xml
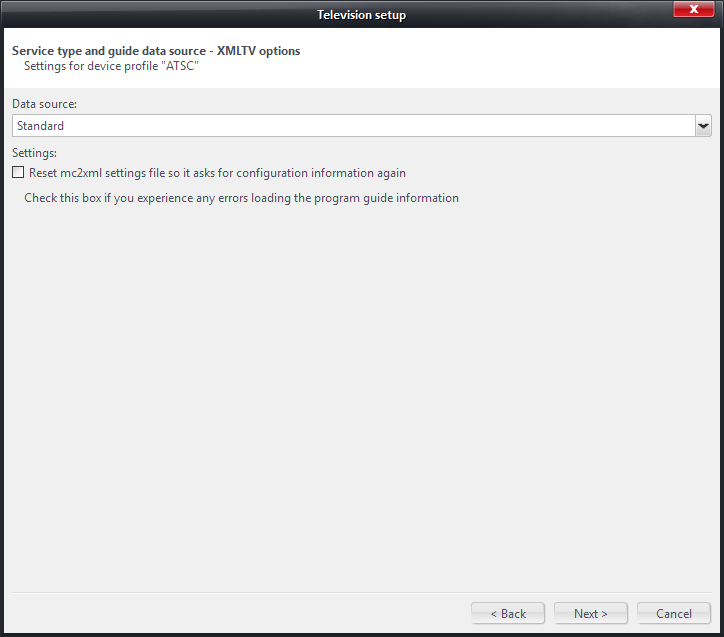
If you choose "mc2xml" option in step 2, you will get the following screen upon clicking the Next button:
This is similar to what is described under "Pre MC17", except that Country and postal code are already collected, as described in step 1, and that you do not need to specify the location of the mc2xml executable.
4. Multiple guide sources.
You can setup using multiple guide sources. It is useful if you have multiple types of tuners that require you to set up multiple types of channels.
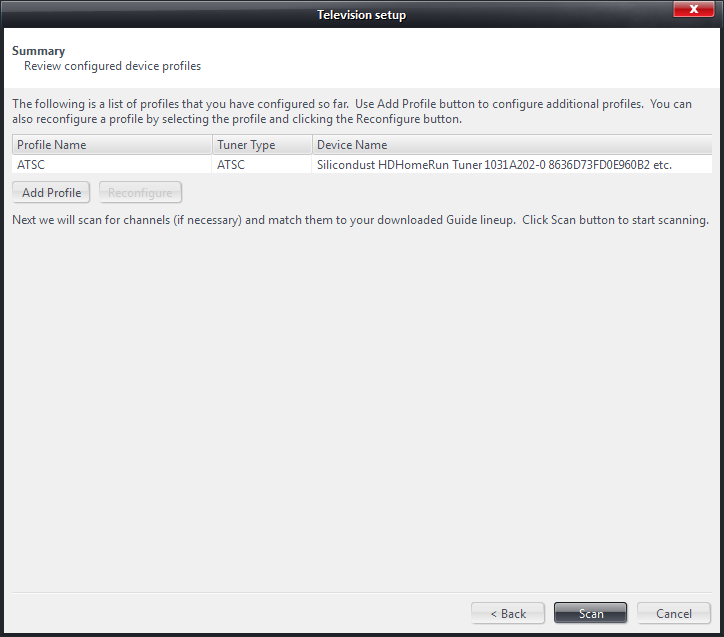
When you click Next on the Setup wizard, you will arrive at a summary page as shown below.
The screenshot shows one device profile ("ATSC") already setup in the process. You can add more device profiles (also called "tuner type profiles") by clicking the "Add Profile" button. Each profile is associated with one tuner type.
Each profile may be associated with up to one (i.e. one or none) EPG loading mode. For example, you may use "Download EPG automatically (recommended)" mode with a provider choice that corresponds to your cable company channel lineup (e.g. "Minneapolis, Comcast (digital)") for your CableCARD channels, and use "Download EPG automatically (recommended)" mode with provider choice "Digital terrestrial lineup" for your ATSC OTA channels.
Please note, however, that it is not beneficial to associate identical EPG mode with different channel types. In Theater View's Guide grid, each program entry is associated with one channel. If an program entry is associated with more than one channel, the second channel will not appear in the grid. The EPG modes given as examples above are not considered identical because the provider choices are different. If you have multiple types of channels that need to use the same EPG source (with identical channel lineup, such as your STB channels for your cable lineup, and your CableCARD channels from the same cable company). the correct way is to group the two types of channels. Even if your two channel types do not have identical lineup, it is still advisable to group the overlapping channels. For example, you should group your ATSC OTA channels with the corresponding cable channels. This way you will not even need to obtain EPG data from two sources.
5. Final step
When you click "Scan" button on the summary page shown above, MC starts to scan for channels, running all profiles you set up one by one. After that, MC starts to load EPG, according to your profile setup. MC will run non-OTA EPG modes first, and OTA EPG mode last. When you run non-OTA loading modes, a EPGChannelID-to-channel mapping page will appear. Examine the page and make sure the channels are associated with XMLTV IDs. This mapping allows each downloaded EPG program entry to be associated with the correct channel. It may be necessary to manually make some maps (see "Note 1" below however).
The screenshot is similar to what is shown under the heading "MC17 - MC19". Please read sections 4, 5, and 6, under "MC17 - MC19" for more details.
Note 1: if you set up multiple types of channels with multiple EPG loading modes, do not be alarmed when you find some of your channels not associated with an EPGChannelID. For example, suppose you have cable subscription and you also use ATSC OTA channels, and you use two EPG modes used as examples above (with providers "Minneapolis, Comcast (digital)" and "Digital terrestrial lineup"), then the EPGChannelID-to-Channel mapping page will appear twice. If your cable channel 5 is your local NBC channel, and the corresponding ATSC channel is channel 5-1, then the first time the page appears, channel 5-1 may not be associated with any ID, because the association is for the cable channels. When the page appears the second time, it will be for ATSC channels, and all your cable channels will not have any association shown.
Note 2: There is no EPGChannelID-To-Channel mapping page showing for OTA EPG scanning. OTA EPG scanning will be done after all other EPG methods are complete, and will happen in the background.
6. After initial setup
When Setup wizard finish, EPG should have been set up for you correctly. You should be able to see programming entries in either Theater View or Standard View. MC automatically schedule all your EPG loading every 24 hours in the background.
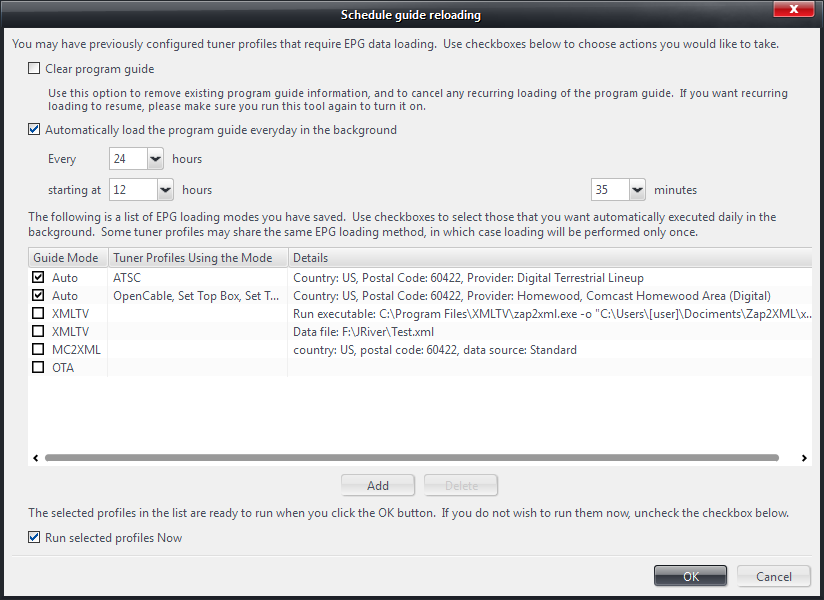
You can modify the scheduling by going to TV Options > General > Load Program Guide... The following window appears:
From top to bottom:
- Clear Program Guide
This should be self explanatory. The instruction on the window is sufficient enough.
- Automatically load program guide every day in the background
This is checked by default. You can select the frequency of EPG loading (6, 8, 12, or 24 hours for example). You can also set at what time (hour and minute) MC should try. MC will try loading EPG after the set time, or as soon as possible thereafter. The top entry in the "Hour" drop list is "Default", which means "24 hours (or whatever number of hours you choose) after it was run the last time".
- List of EPG loading modes
The list contains all EPG loading modes that you have setup. Those with the checkbox checked are the ones that will be run automatically. You may choose to delete those that you no longer need, by selecting them, and clicking the "Delete" button. You may also add new EPG mode by clicking "Add" button. EPG modes added this way are not actually associated with any particular tuner type profiles. That does not really matter.
- Run selected profiles now
If this checkbox is checked (checked by default), the selected EPG loading methods will be executed after you click "OK" button. Unckeck the checkbox if you do not want it to happen.
EPG for Australia
There are useful discussions on this here on Interact. And again here and here.
