Acquire Images: Difference between revisions
No edit summary |
No edit summary |
||
| (7 intermediate revisions by the same user not shown) | |||
| Line 1: | Line 1: | ||
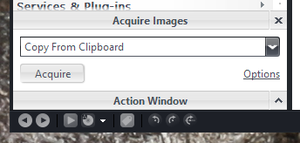
[[File:Acquire Images-Copy from Clipboard.png|thumb|right|300px|Media Center can also capture images from your clipboard and other sources.]] |
|||
The Acquire Images function allows you to quickly move or copy jpg or mpg files directly from your camera or scanner to your drive, while automatically importing the files. Read the manual that came with your camera or scanner for instructions on how to connect the device to your computer. |
|||
The Acquire Images (or Camera) [[Action Window]] allows you to quickly move or copy jpg or mpg files directly from your camera or scanner to your drive, and then to automatically import these files into MC. |
|||
To access Acquire Images, select ''Camera'' in the [[Action Window]]. Select the image source using the drop down menu and then press the ''Acquire'' button. Click ''Options'' to change the default destination path, to specify file types, and to specify image names, quality and size settings. |
|||
Media Center will automatically detect most digital cameras and scanners attached to your computer, if they have proper drivers installed on your system. Check the manual that came with your camera or scanner for instructions on how to connect the device to your computer and install drivers if needed. |
|||
In addition to cameras and scanners, Media Center can capture images from: |
|||
* the system Clipboard (useful for taking [[screenshots]]) |
|||
* a particular web page |
|||
* a Google Images search for a particular term |
|||
[[Category:Action Windows]] |
|||
[[Category:Tools]] |
|||
[[Category:Images and Photos]] |
|||
Latest revision as of 16:11, 22 February 2015
The Acquire Images (or Camera) Action Window allows you to quickly move or copy jpg or mpg files directly from your camera or scanner to your drive, and then to automatically import these files into MC.
To access Acquire Images, select Camera in the Action Window. Select the image source using the drop down menu and then press the Acquire button. Click Options to change the default destination path, to specify file types, and to specify image names, quality and size settings.
Media Center will automatically detect most digital cameras and scanners attached to your computer, if they have proper drivers installed on your system. Check the manual that came with your camera or scanner for instructions on how to connect the device to your computer and install drivers if needed.
In addition to cameras and scanners, Media Center can capture images from:
- the system Clipboard (useful for taking screenshots)
- a particular web page
- a Google Images search for a particular term
