EPG: Difference between revisions
(→MC21+) |
|||
| (21 intermediate revisions by the same user not shown) | |||
| Line 3: | Line 3: | ||
==MC20 and older== |
==MC20 and older== |
||
The rest of this page applies to MC21 and up. If you use MC20 or older, please read [http://wiki.jriver.com/index.php/EPG_for_MC20_and_Older EPG setup for version 20 and older.] |
|||
== MC21+ == |
== MC21+ == |
||
| Line 77: | Line 77: | ||
For each of the four cases discussed below, you are able to set a "Repeat Loading" parameter. This feature is added in version 23 and is not available for MC21 and MC22. It represents the time between automatic background loads for each EPG loading mode. Under "Repeat Loading" you can select a value from the dropdown list. It ranges from 15 minutes to 24 hours. For most people, 24 hours is a good choice. 15 minutes is not recommended unless you know that your TV stations (for example DVB-T) change program information frequently, and the scan takes less than 15 minutes to complete. Most online data sources update their information two or three times a day. |
For each of the four cases discussed below, you are able to set a "Repeat Loading" parameter. This feature is added in version 23 and is not available for MC21 and MC22. It represents the time between automatic background loads for each EPG loading mode. Under "Repeat Loading" you can select a value from the dropdown list. It ranges from 15 minutes to 24 hours. For most people, 24 hours is a good choice. 15 minutes is not recommended unless you know that your TV stations (for example DVB-T) change program information frequently, and the scan takes less than 15 minutes to complete. Most online data sources update their information two or three times a day. |
||
Note: for MC22 and earlier, "Repeat loading" interval is a global parameter set elsewhere. You can not choose a different value for different epg loading modes. |
|||
| Line 83: | Line 85: | ||
If you choose "mc2xml" option in step 2, you will get the following screen upon clicking the Next button: |
If you choose "mc2xml" option in step 2, you will get the following screen upon clicking the Next button: |
||
[[image:TV setup mc2xml options.png]] |
[[image:TV setup mc2xml options MC23.png]] |
||
This is similar to what is described under "Pre MC17", except that Country and postal code are already collected, as described in step 1, and that you do not need to specify the location of the mc2xml executable. |
|||
| ⚫ | |||
"Data Source" - For most people, Standard should be used. If you use TitanTV, you may try using that option. If you do choose TitanTV, you need to enter the TitanTV ID in the next field. |
|||
| ⚫ | |||
"Provider Token" - This is a unique text string that you should enter, so that you can differentiate between different instances of mc2xml runs with different parameters. The explanation text below the dropdown list should give you a clear idea what this field is used for. |
|||
| ⚫ | |||
"Reset mc2xml settings file so it asks for configuration information again" - this checkbox is deprecate and will be removed in the future. It is simply not needed. |
|||
| ⚫ | |||
3b. Additional setup details for OTA EPG |
|||
If you choose "Over-the-air signal" option in step 2, you get the following page upon clicking the Next button: |
|||
[[image:TV setup OTA options MC23.png]] |
|||
This page shows up only for MC23 since it contains only the "Repeat Loading" dropdown list which is new in MC23. |
|||
| ⚫ | |||
| ⚫ | |||
| ⚫ | |||
"Repeat Loading" (MC23 and up only) - select a time interval between repeated background EPG loading. |
|||
| Line 115: | Line 137: | ||
There are two dropdown |
There are two dropdown lists on this page: |
||
| ⚫ | |||
| ⚫ | |||
"Repeat Loading" (MC23 and up only) - select a time interval between repeated background EPG loading. |
|||
| ⚫ | |||
===4. Multiple guide sources.=== |
===4. Multiple guide sources.=== |
||
| Line 132: | Line 153: | ||
The screenshot shows one device profile ("ATSC") already setup in the process. You can add more device profiles (also called "tuner type profiles") by clicking the "Add Profile" button. Each profile is associated with one tuner type. |
The screenshot shows one device profile ("ATSC") already setup in the process. You can add more device profiles (also called "tuner type profiles") by clicking the "Add Profile" button. Each profile is associated with one tuner type. |
||
Each profile may be associated with up to one (i.e. one or none) EPG loading mode. For example, you may use " |
Each profile may be associated with up to one (i.e. one or none) EPG loading mode. For example, you may use "mc2xml" mode with a provider choice that corresponds to your cable company channel lineup (e.g. "Minneapolis, Comcast (digital)") for your CableCARD channels, and use "mc2xml" mode with provider choice "Digital terrestrial lineup" for your ATSC OTA channels. |
||
Please note, however, that it is not beneficial to associate identical EPG mode with different channel types. In Theater View's Guide grid, each program entry is associated with one channel. If an program entry is associated with more than one channel, the second channel will not appear in the grid. The EPG modes given as examples above are not considered identical because the provider choices are different. If you have multiple types of channels that need to use the same EPG source (with identical channel lineup, such as your STB channels for your cable lineup, and your CableCARD channels from the same cable company). the correct way is to group the two types of channels. Even if your two channel types do not have identical lineup, it is still advisable to group the overlapping channels. For example, you should group your ATSC OTA channels with the corresponding cable channels. This way you will not even need to obtain EPG data from two sources. |
Please note, however, that it is not beneficial to associate identical EPG mode with different channel types. In Theater View's Guide grid, each program entry is associated with one channel. If an program entry is associated with more than one channel, the second channel will not appear in the grid. The EPG modes given as examples above are not considered identical because the provider choices are different. If you have multiple types of channels that need to use the same EPG source (with identical channel lineup, such as your STB channels for your cable lineup, and your CableCARD channels from the same cable company). the correct way is to group the two types of channels. Even if your two channel types do not have identical lineup, it is still advisable to group the overlapping channels. For example, you should group your ATSC OTA channels with the corresponding cable channels. This way you will not even need to obtain EPG data from two sources. |
||
| Line 138: | Line 159: | ||
===5. Final step=== |
===5. Final step=== |
||
When you click "Scan" button on the summary page shown above, MC starts to scan for channels, running all profiles you set up one by one. After that, MC starts to load EPG, according to your profile setup. MC will run non-OTA EPG modes first, and OTA EPG mode last. When you run non-OTA loading modes, a XMLTV ID-to-channel mapping page will appear. Examine the page and make sure the channels are associated with XMLTV IDs. This mapping allows each downloaded EPG program entry to be associated with the correct channel |
When you click "Scan" button on the summary page shown above, MC starts to scan for channels, running all profiles you set up one by one. After that, MC starts to load EPG, according to your profile setup. MC will run non-OTA EPG modes first, and OTA EPG mode last. When you run non-OTA loading modes, a XMLTV ID-to-channel mapping page will appear. Examine the page and make sure the channels are associated with XMLTV IDs. This mapping allows each downloaded EPG program entry to be associated with the correct channel. |
||
Here is the screenshot of XMLTV ID-to-channel mapping window: |
|||
The screenshot is similar to what is shown under the heading "MC17 - MC19". Please read sections 4, 5, and 6, under "MC17 - MC19" for more details. |
|||
[[image:Load program guide XMLTV ID matching MC23.png]] |
|||
| ⚫ | Note 1: if you set up multiple types of channels with multiple EPG loading modes, do not be alarmed when you find some of your channels not associated with an XMLTV ID. For example, suppose you have cable subscription and you also use ATSC OTA channels, and you use two EPG modes used as examples above (with providers "Minneapolis, Comcast (digital)" and "Digital terrestrial lineup"), then the XMLTV ID-to-Channel mapping page will appear twice. If your cable channel 5 is your local NBC channel, and the corresponding ATSC channel is channel 5-1, then the first time the page appears, channel 5-1 may not be associated with any ID, because the association is for the cable channels. When the page appears the second time, it will be for ATSC channels, and all your cable channels will not have any association shown. |
||
Depending on the type of channels you have, most channels should automatically be matched with corresponding xmltv IDs. It may be necessary to manually make some maps (see "Note 1" below however). |
|||
| ⚫ | |||
Near the top of the window is an "Auto Match" button. If you find a lot of unmatched channels, you may try clicking the button and let MC go through its auto-match routine. If you do, you will be asked: "If an identifier is already associated with a channel, do you want to keep the existing identifier or use the newly matched identifier?" Imagine you had set up the guide but had a number of channels where no guide data was found. If you run the process again with a different Provider, you might find the data available. In order that you don't change the associations you already have, choose "Keep Existing". If this is the first time you have run the process, choose "Use New". |
|||
An unmatched channel will appear with the text "(click to configure)". You can attempt to make a match manually by click on that text and search down the list which pops up and select a channel name which you believe ties up with the scanned channel. On the screenshot below you see that the name "11.1 WTTWDT" is selected to match the channel "11-1 WTTW-HD". |
|||
[[image:Load program guide XMLTV ID matching dropdown MC23.png]] |
|||
To help you find the correct match visually, there are two ways of sorting the list in the dropdown - sort by name without the channel number, or sort by name with the channel number. This can be changed by selecting the desired method from the "Sort XMLTV name list by:" drop list right above the main channel list (to the right of the "Auto Match" button"). The screenshot above shows that the xmltv names are sorted by name without the channel numbers that appear before the names. |
|||
| ⚫ | Note 1: if you set up multiple types of channels with multiple EPG loading modes, do not be alarmed when you find some of your channels not associated with an XMLTV ID. For example, suppose you have cable subscription and you also use ATSC OTA channels, and you use two EPG modes used as examples above (with providers "Minneapolis, Comcast (digital)" and "Digital terrestrial lineup"), then the XMLTV ID-to-Channel mapping page will appear twice. If your cable channel 5 is your local NBC channel, and the corresponding ATSC channel is channel 5-1, then the first time the page appears, channel 5-1 may not be associated with any ID, because the association is for the cable channels. When the page appears the second time, it will be for ATSC channels, and all your cable channels will not have any association shown. |
||
| ⚫ | |||
===6. After initial setup=== |
===6. After initial setup=== |
||
When Setup wizard finish, EPG should have been set up for you correctly. You should be able to see programming entries in either Theater View or Standard View. MC automatically schedule all your EPG loading |
When Setup wizard finish, EPG should have been set up for you correctly. You should be able to see programming entries in either Theater View or Standard View. MC automatically schedule all your EPG loading in the background using your specified repeat time interval. |
||
You can modify the scheduling by going to TV Options > General > Load Program Guide... The following window appears: |
You can modify the scheduling by going to TV Options > General > Load Program Guide... The following window appears: |
||
[[image: |
[[image:Load program guide MC23.png]] |
||
| Line 164: | Line 199: | ||
*''Automatically load program guide every day in the background'' |
*''Automatically load program guide every day in the background'' |
||
This is checked by default. You can select the frequency of EPG loading (6, 8, 12, or 24 hours for example). You can also set at what time (hour and minute) MC should try. MC will try loading EPG after the set time, or as soon as possible thereafter. The top entry in the "Hour" drop list is "Default", which means "24 hours (or whatever number of hours you choose) after it was run the last time". |
This is checked by default. You can select the frequency of EPG loading (6, 8, 12, or 24 hours for example). You can also set at what time (hour and minute) MC should try. MC will try loading EPG immediately after the set time, or as soon as possible thereafter. The top entry in the "Hour" drop list is "Default", which means "24 hours (or whatever number of hours you choose) after it was run the last time". |
||
Note that the repeat time interval selected here is the global default value. It is used only if an EPG loading mode does not have the repeat interval specified (for EPG loading modes created prior to MC23). |
|||
*''List of EPG loading modes'' |
*''List of EPG loading modes'' |
||
The list contains all EPG loading modes that you have setup. Those with the checkbox checked are the ones that will be run automatically. You may choose to delete those that you no longer need, by selecting them, and clicking the "Delete" button. You may also add new EPG mode by clicking "Add" button. EPG modes added this way are not actually associated with any particular tuner type profile. That does not really matter. |
The list contains all EPG loading modes that you have setup. Those with the checkbox checked are the ones that will be run automatically. You may choose to delete those that you no longer need, by selecting them, and clicking the "Delete" button. You may also add new EPG mode by clicking "Add" button. EPG modes added this way are not actually associated with any particular tuner type profile. That does not really matter. There is also an Edit button. Clicking it after selecting a particular EPG loading mode brings up the options window appropriate to the selected mode, almost identical to those discussed in the section "3. Additional setup details." |
||
Note that columns 3 and 4 of the list in the screenshot ("Repeat" and "Next Load") are not present in MC22 and older since per-mode repeat interval specification is an MC23 feature. |
|||
*''Run selected profiles now'' |
*''Run selected profiles now'' |
||
| Line 189: | Line 229: | ||
* [[Television Setup]] |
* [[Television Setup]] |
||
[https://wiki.jriver.com/index.php/EPG#MC20_and_older Back to top] |
|||
[[Category: Frequently Asked Questions]] |
[[Category: Frequently Asked Questions]] |
||
[[Category:Television]] |
[[Category:Television]] |
||
Latest revision as of 13:45, 14 June 2018
An EPG (Electronic Program Guide) provides a schedule of shows for each TV channel. MC can read XMLTV data files. Since version 17 MC provides a semi-automated way of creating and populating an EPG. Part of it is based on mc2xml. It is no longer necessary to install mc2xml separately.
MC20 and older
The rest of this page applies to MC21 and up. If you use MC20 or older, please read EPG setup for version 20 and older.
MC21+
Starting with MC20, there is a Setup wizard for setting up TV channels and EPG. The entire wizard is best described in another article [Television Setup]. Here only the steps that involve EPG will be described. Most information on this page apply to versions 21 and up. Some may require version 22 or 23.
1. Country and Postal Code
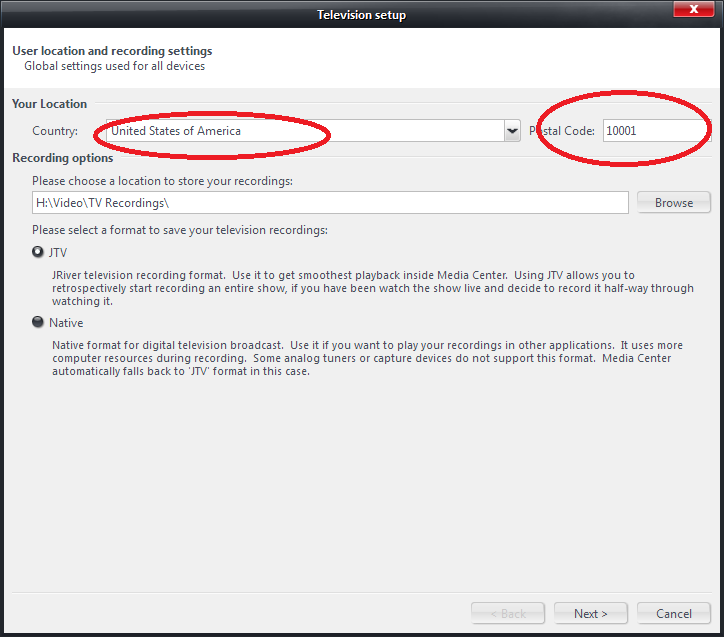
On the first page of the TV Setup wizard, make sure you select your country from the list, and type your postal code correctly.
2. EPG Mode
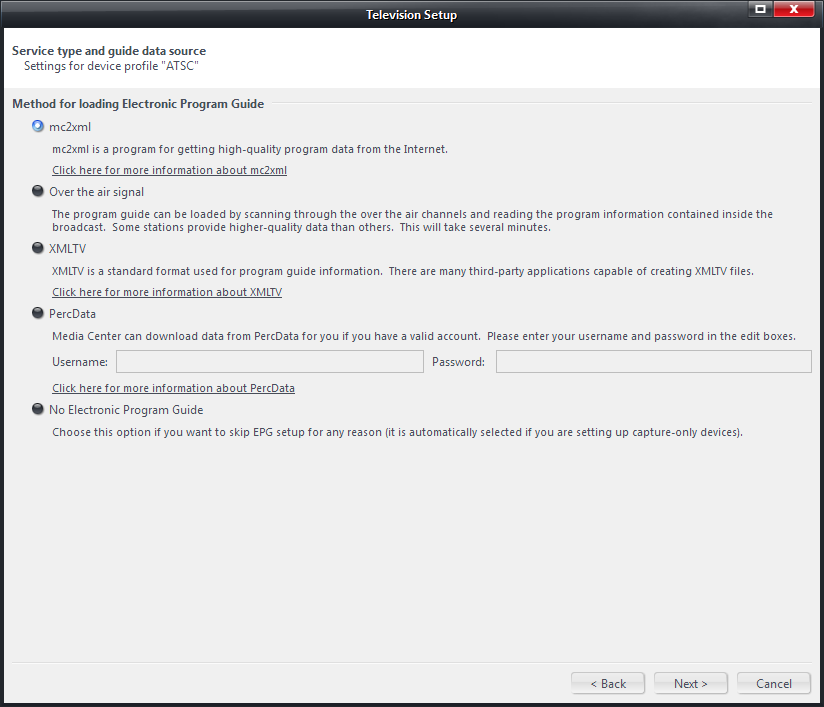
A few pages later in the wizard, you will reach this page:
This is where you pick your mode of obtaining EPG data. The number of options available on this page depends on other settings you have chosen so far in the wizard. The picture above shows all available choices.
- mc2xml
This is now the default option in MC21 and newer. We have integrated mc2xml inside MC since version 21 so it will allow users get EPG data as smoothly as possible. This option is available for users in the USA as well as many other countries.
Additional setup procedure for this option will be discussed in section 3 below.
Here is an excellent Interact thread created by CountryBumkin USA TV Setup. He described in this thread, among other things, how to setup mc2xml. While his thread is titled "USA TV Setup", a lot of it is applicable for users in many other countries.
- Over the air signal
In MC22 and newer this option is available for ATSC as well as DVB users. In MC21 it is only for ATSC. It will not be shown if you have not configured any tuner to be ATSC or DVB type. With this option, MC scans EPG data contained in the OTA stream, using an actual tuner. This method was not very reliable but has become much better since MC22. The EPG data contained in the TV signals are not always complete, and you will get spotty results, especially if the TV signal strength/quality is not high. It is therefore recommended that you use other methods of EPG loading unless you have specific reasons to use OTA EPG. By using OTA scan, usually you can get EPG data for the next 12 to 24 hours for ATSC, but up to a week for DVB. If you use this method, it helps if you schedule MC to do more than one loading per day (for example, you can set up MC to load EPG every 8 hours), especially for ATSC.
Please do not confuse the concept of OTA EPG with OTA TV signal itself. Just because you only watch over-the-air TV channels does not mean you have to use the OTA EPG method. You can use mc2xml or XMLTV method for EPG even if you watch OTA TV channels only.
- XMLTV
You can use many third-party applications to download EPG data in XMLTV format. The quality of data varies from application to application. There are two ways of using the data inside MC. See next section for details.
Here are some Interact threads discussing the subject.
Season, Episode number and zap2xml
Additional setup procedure for this option will be discussed in section 3 below.
- PercData
PercData is a commercially available EPG data source. In MC21 and up PercData is integrated into MC. MC can download EPG from PercData.com if you have an account with them. You can open an account at PercData, and pay for it, and then enter your user name and password in MC.
- No Electronic Program Guide
This option is provided so that you can skip EPG setup. While skipping EPG setup is generally not recommended, there are situations in which this makes sense. This is particularly true if you are setting up "Capture-only" channels. For example you can setup a video capture device to capture video from your camcorder. In this case EPG simply is irrelevant.
3. Additional setup details
For each of the four cases discussed below, you are able to set a "Repeat Loading" parameter. This feature is added in version 23 and is not available for MC21 and MC22. It represents the time between automatic background loads for each EPG loading mode. Under "Repeat Loading" you can select a value from the dropdown list. It ranges from 15 minutes to 24 hours. For most people, 24 hours is a good choice. 15 minutes is not recommended unless you know that your TV stations (for example DVB-T) change program information frequently, and the scan takes less than 15 minutes to complete. Most online data sources update their information two or three times a day.
Note: for MC22 and earlier, "Repeat loading" interval is a global parameter set elsewhere. You can not choose a different value for different epg loading modes.
3a. Additional setup details for mc2xml
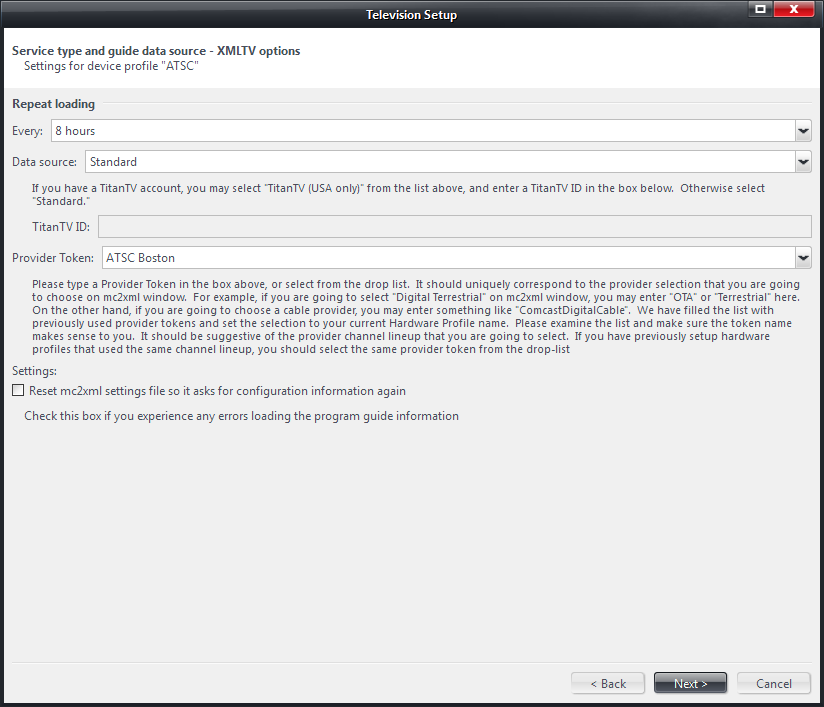
If you choose "mc2xml" option in step 2, you will get the following screen upon clicking the Next button:
"Repeat Loading" (MC23 and up only) - select a time interval between repeated background EPG loading.
"Data Source" - For most people, Standard should be used. If you use TitanTV, you may try using that option. If you do choose TitanTV, you need to enter the TitanTV ID in the next field.
"Provider Token" - This is a unique text string that you should enter, so that you can differentiate between different instances of mc2xml runs with different parameters. The explanation text below the dropdown list should give you a clear idea what this field is used for.
"Reset mc2xml settings file so it asks for configuration information again" - this checkbox is deprecate and will be removed in the future. It is simply not needed.
3b. Additional setup details for OTA EPG
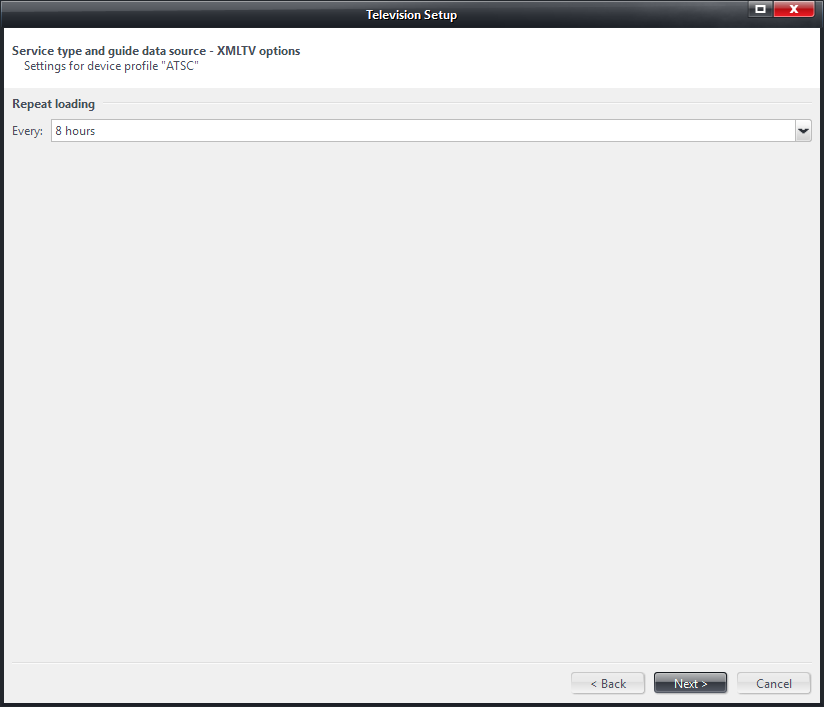
If you choose "Over-the-air signal" option in step 2, you get the following page upon clicking the Next button:
This page shows up only for MC23 since it contains only the "Repeat Loading" dropdown list which is new in MC23.
3c. Additional setup details for XMLTV
If you choose "XMLTV" option in step 2, you get the following page upon clicking the Next button:
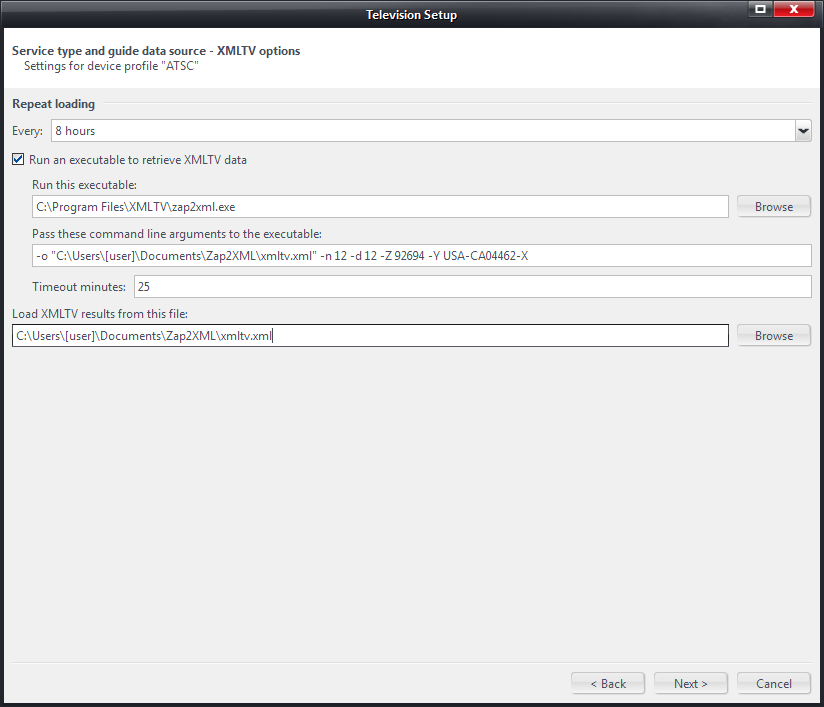
"Repeat Loading" (MC23 and up only) - select a time interval between repeated background EPG loading.
There are two ways to execute a third-party XMLTV program: inside MC or outside of MC.
To run the program inside MC, check the checkbox "Run an executable to retrieve XMLTV data", and fill in all boxes below it. Under "Run this executable:", choose the executable file of the third-party program that you have installed. Under "Pass these command line arguments to the executable:" enter parameters for the program. You should also fill in the box under "Load XMLTV results from this file:", to tell MC which data file to load info from. Zap2xml is used as an example in the screenshot above.
If you uncheck the checkbox "Run an executable to retrieve XMLTV data", MC will not run the third-party program on your behalf. Instead, you can schedule for it to be executed using Windows Scheduler. Then schedule MC to load the output file produced by it, using the box under "Load XMLTV results from this file:".
See the following Interact thread for discussion on command line parameters used by zap2xml, and how to schedule it in Windows scheduler:
Season, Episode number and zap2xml
3d. Additional setup details for PercData
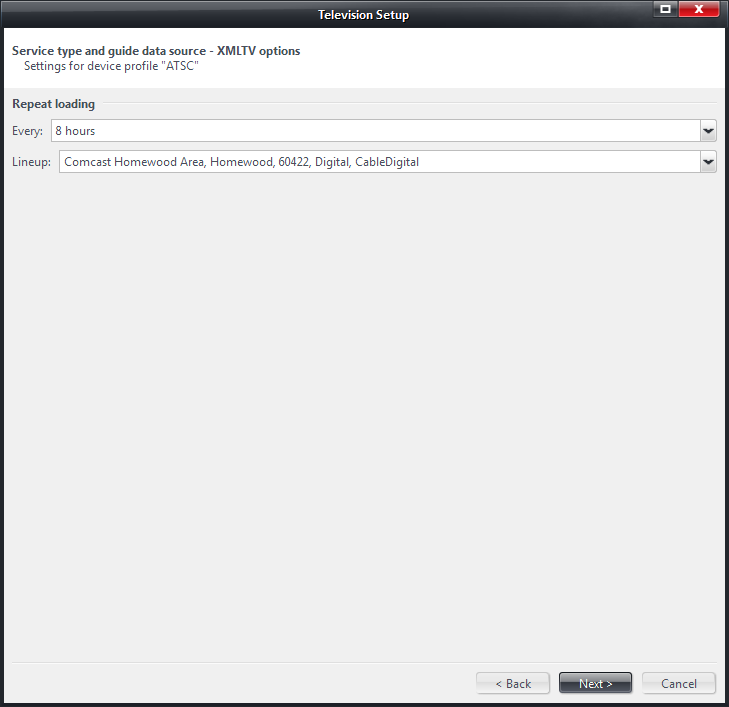
If you choose "PercData" in step 2, you get the following page upon clicking the Next button:
There are two dropdown lists on this page:
"Repeat Loading" (MC23 and up only) - select a time interval between repeated background EPG loading.
"Lineup" - When you subscribe to PercData, you are allowed to set up 4 lineups for your area. For example, you may choose "Comcast Digital", "AT&T UVerse", "DirecTV", and "Local Broadcast" among a number of available lineups. MC can load data for any one of these lineups.
4. Multiple guide sources.
You can setup using multiple guide sources. It is useful if you have multiple types of tuners that require you to set up multiple types of channels.
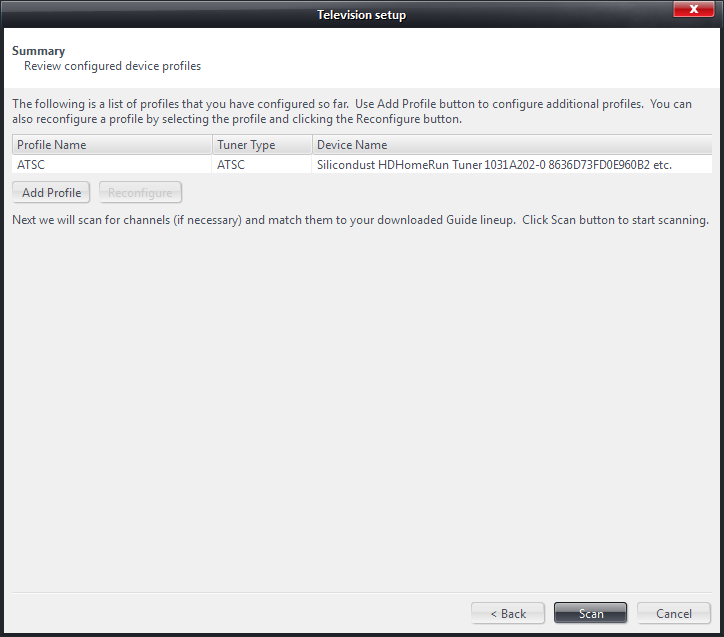
When you click Next on the Setup wizard, you will arrive at a summary page as shown below.
The screenshot shows one device profile ("ATSC") already setup in the process. You can add more device profiles (also called "tuner type profiles") by clicking the "Add Profile" button. Each profile is associated with one tuner type.
Each profile may be associated with up to one (i.e. one or none) EPG loading mode. For example, you may use "mc2xml" mode with a provider choice that corresponds to your cable company channel lineup (e.g. "Minneapolis, Comcast (digital)") for your CableCARD channels, and use "mc2xml" mode with provider choice "Digital terrestrial lineup" for your ATSC OTA channels.
Please note, however, that it is not beneficial to associate identical EPG mode with different channel types. In Theater View's Guide grid, each program entry is associated with one channel. If an program entry is associated with more than one channel, the second channel will not appear in the grid. The EPG modes given as examples above are not considered identical because the provider choices are different. If you have multiple types of channels that need to use the same EPG source (with identical channel lineup, such as your STB channels for your cable lineup, and your CableCARD channels from the same cable company). the correct way is to group the two types of channels. Even if your two channel types do not have identical lineup, it is still advisable to group the overlapping channels. For example, you should group your ATSC OTA channels with the corresponding cable channels. This way you will not even need to obtain EPG data from two sources.
5. Final step
When you click "Scan" button on the summary page shown above, MC starts to scan for channels, running all profiles you set up one by one. After that, MC starts to load EPG, according to your profile setup. MC will run non-OTA EPG modes first, and OTA EPG mode last. When you run non-OTA loading modes, a XMLTV ID-to-channel mapping page will appear. Examine the page and make sure the channels are associated with XMLTV IDs. This mapping allows each downloaded EPG program entry to be associated with the correct channel.
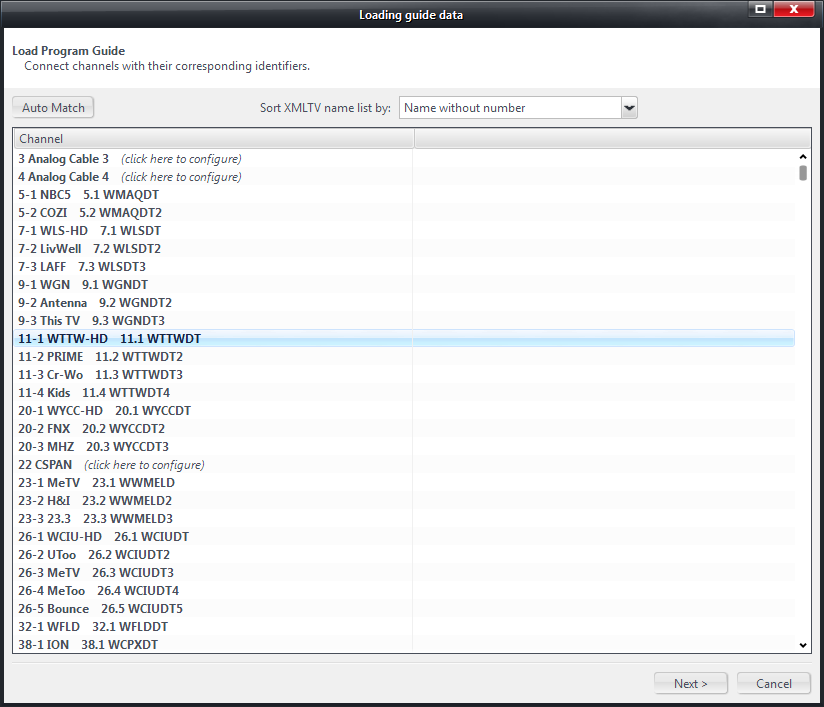
Here is the screenshot of XMLTV ID-to-channel mapping window:
Depending on the type of channels you have, most channels should automatically be matched with corresponding xmltv IDs. It may be necessary to manually make some maps (see "Note 1" below however).
Near the top of the window is an "Auto Match" button. If you find a lot of unmatched channels, you may try clicking the button and let MC go through its auto-match routine. If you do, you will be asked: "If an identifier is already associated with a channel, do you want to keep the existing identifier or use the newly matched identifier?" Imagine you had set up the guide but had a number of channels where no guide data was found. If you run the process again with a different Provider, you might find the data available. In order that you don't change the associations you already have, choose "Keep Existing". If this is the first time you have run the process, choose "Use New".
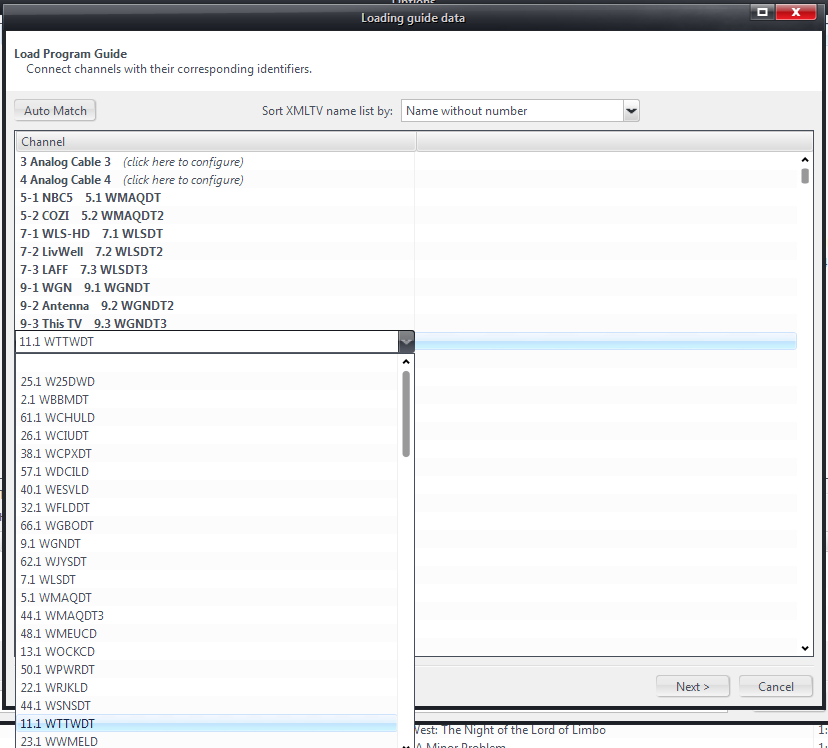
An unmatched channel will appear with the text "(click to configure)". You can attempt to make a match manually by click on that text and search down the list which pops up and select a channel name which you believe ties up with the scanned channel. On the screenshot below you see that the name "11.1 WTTWDT" is selected to match the channel "11-1 WTTW-HD".
To help you find the correct match visually, there are two ways of sorting the list in the dropdown - sort by name without the channel number, or sort by name with the channel number. This can be changed by selecting the desired method from the "Sort XMLTV name list by:" drop list right above the main channel list (to the right of the "Auto Match" button"). The screenshot above shows that the xmltv names are sorted by name without the channel numbers that appear before the names.
Note 1: if you set up multiple types of channels with multiple EPG loading modes, do not be alarmed when you find some of your channels not associated with an XMLTV ID. For example, suppose you have cable subscription and you also use ATSC OTA channels, and you use two EPG modes used as examples above (with providers "Minneapolis, Comcast (digital)" and "Digital terrestrial lineup"), then the XMLTV ID-to-Channel mapping page will appear twice. If your cable channel 5 is your local NBC channel, and the corresponding ATSC channel is channel 5-1, then the first time the page appears, channel 5-1 may not be associated with any ID, because the association is for the cable channels. When the page appears the second time, it will be for ATSC channels, and all your cable channels will not have any association shown.
Note 2: There is no XMLTV ID-To-Channel mapping page showing for OTA EPG scanning. OTA EPG scanning will be done after all other EPG methods are complete, and will happen in the background.
6. After initial setup
When Setup wizard finish, EPG should have been set up for you correctly. You should be able to see programming entries in either Theater View or Standard View. MC automatically schedule all your EPG loading in the background using your specified repeat time interval.
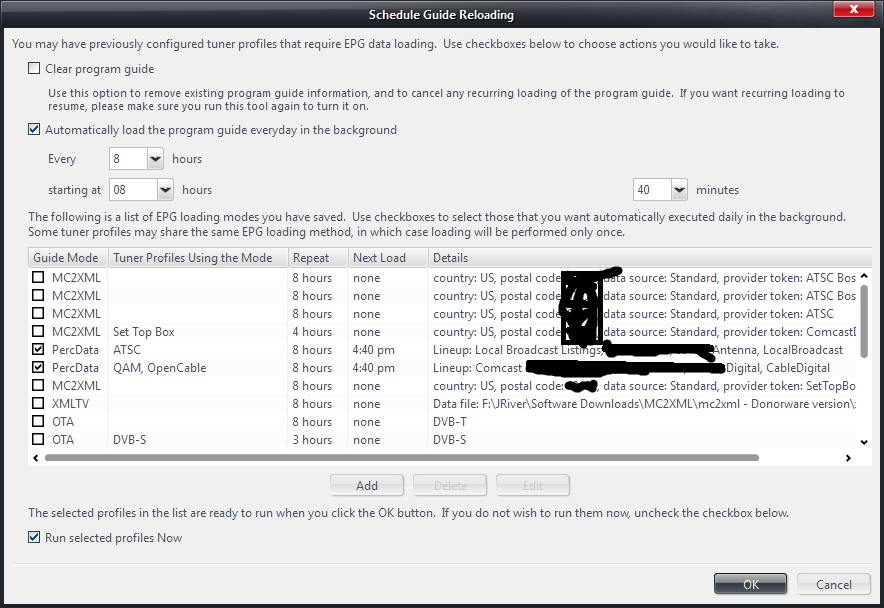
You can modify the scheduling by going to TV Options > General > Load Program Guide... The following window appears:
From top to bottom:
- Clear Program Guide
This should be self explanatory. The instruction on the window is sufficiently clear.
- Automatically load program guide every day in the background
This is checked by default. You can select the frequency of EPG loading (6, 8, 12, or 24 hours for example). You can also set at what time (hour and minute) MC should try. MC will try loading EPG immediately after the set time, or as soon as possible thereafter. The top entry in the "Hour" drop list is "Default", which means "24 hours (or whatever number of hours you choose) after it was run the last time".
Note that the repeat time interval selected here is the global default value. It is used only if an EPG loading mode does not have the repeat interval specified (for EPG loading modes created prior to MC23).
- List of EPG loading modes
The list contains all EPG loading modes that you have setup. Those with the checkbox checked are the ones that will be run automatically. You may choose to delete those that you no longer need, by selecting them, and clicking the "Delete" button. You may also add new EPG mode by clicking "Add" button. EPG modes added this way are not actually associated with any particular tuner type profile. That does not really matter. There is also an Edit button. Clicking it after selecting a particular EPG loading mode brings up the options window appropriate to the selected mode, almost identical to those discussed in the section "3. Additional setup details."
Note that columns 3 and 4 of the list in the screenshot ("Repeat" and "Next Load") are not present in MC22 and older since per-mode repeat interval specification is an MC23 feature.
- Run selected profiles now
If this checkbox is checked (it is checked by default), the selected EPG loading methods will be executed after you click "OK" button. Unckeck the checkbox if you do not want it to happen.
EPG for Australia
There are useful discussions on Interact to set up an EPG in an Australian context. To use epgstream.net look here on Interact. To use EPG Collector and some other options, look here and here.
EPG for the UK
For EPG set up in the UK using EPG Collector, there are useful discussions on this here on Interact.
