Import: Difference between revisions
No edit summary |
No edit summary |
||
| (43 intermediate revisions by 2 users not shown) | |||
| Line 1: | Line 1: | ||
Importing files into Media Center is an automatic process and does not change your files or move them. It creates a record of what you have in MC's database (the [[Library]]). |
|||
| ⚫ | |||
| ⚫ | |||
Here are some of the things you can do with imported files: |
Here are some of the things you can do with imported files: |
||
* View them sorted by any number of fields, including artist, album, genre, size, length, and even your own custom fields. |
* View them sorted by any number of fields, including artist, album, genre, size, length, and even your own custom fields. |
||
* Edit their |
* Edit their metadata tags (and save information with the file itself for supported file types). |
||
* Add custom fields and cover art. |
* Add custom fields and cover art. |
||
* Add them to Playlists and include them in Smartlists. |
* Add them to Playlists and include them in Smartlists. |
||
* Easily find any file quickly. |
* Easily find any file quickly using MC's powerful Search system. |
||
* Organize your media into a flexible collection of media Views, and browse them by tags in almost any configuration you can dream up. |
|||
Much of Media Center's power as a file management system comes from its ability to manage the files in its [[Library]]. Importing is simply the process of telling Media Center about the files, and adding them to this database. Importing is non-destructive to your files, and can even automate the often-tedious process of tagging your files so that they can be easily browsed. |
|||
== Methods for Importing Files == |
== Methods for Importing Files == |
||
| Line 13: | Line 18: | ||
# Automatically when opened with an empty Library |
# Automatically when opened with an empty Library |
||
# Automatically when MC plays the files |
|||
# Via Drag and Drop |
# Via Drag and Drop |
||
# Via the [[Shell Integration]] features (Windows only) |
# Via the [[Shell Integration]] features (Windows only) |
||
# Via the Media Import wizard available at <span style="color:#8B4513">Tools > Import</span>. |
# Via the Media Import wizard available at <span style="color:#8B4513">Tools > Import</span>. |
||
# Via Auto-Import, which can watch directories you specify automatically in the background. |
# Via [[Auto-Import]], which can watch directories you specify automatically in the background. |
||
'''In most cases, using [[Auto-Import]] to automatically watch your media locations on disk is the preferred means of Importing new content.''' The First Use Scan (described below) will automatically configure Media Center to import your media files and monitor those file locations automatically in the background for changes. |
|||
| ⚫ | |||
| ⚫ | |||
| ⚫ | When you open Media Center for the first time, or with a blank Library, it will automatically |
||
| ⚫ | When you open Media Center for the first time, or with a blank Library, it will automatically configure [[Auto-Import]] by analyzing your computer for media in a variety of common locations. This happens in the [[Action Window]] area of MC. You can cancel this if you prefer to adjust the watched directories used by [[Auto-Import]], or import manually. |
||
When you open MC with a blank Library, it will wait '''for 45 seconds''' before running this automatic scan: |
|||
'''If you just want to get going and actually use Media Center, this will be the fastest and simplest route to use.''' If you later want to fine tune your settings, refer to the [[Auto-Import]] page and you can view and adjust all of the automatically detected settings. |
|||
[[File:Import1.jpg|thumb|480px|none]] |
|||
When opened with a ''completely blank Library'', Media Center will wait '''for 45 seconds''', to give you a chance to cancel it if desired, and then it will run this scan automatically. |
|||
[[File:MC19-Import-First Time Scan.png|thumb|400px|none]] |
|||
'''If you miss the countdown timer and Media Center imported content that you did not want included, do not worry!''' The import process is non-destructive to your media, and since this only happens with a default, blank Library, you can easily clear the Library to start over. See the [[Library Manager]] page for details on clearing your Library, making backups, and other related information. |
|||
If you canceled this scan and you want to run it again at a later time, you can initiate it at the command line by using the [[Media_Center_Core_Commands#Tools|MCC_IMPORT command]] (23000) in First Import Mode with the [[Media_Center_Core_Commands#Issuing_a_command_from_the_command_line|MC Command Line launcher]], for example: |
|||
<code>mc20.exe /mcc 23000,2</code> |
|||
== One Time Imports == |
== One Time Imports == |
||
There are a few methods you can use to import files or folders into MC on an individual basis. These are "one-off" imports and don't provide many of the benefits of the Auto-Import system. |
There are a few methods you can use to import files or folders into MC on an individual basis. These are "one-off" imports and don't provide many of the benefits of the [[Auto-Import]] system. |
||
=== Upon Playback === |
|||
Media Center automatically imports any files that you play with it (if they haven't already been imported previously). If you prefer, this option can be disabled at: |
|||
<span style="color:#8B4513">Tools > Options > General > Importing & Tagging > Automatically import files when played</span> |
|||
=== Drag and Drop and Shell Integration === |
=== Drag and Drop and Shell Integration === |
||
You can |
You can import files directly through Windows Explorer. This method will import the files "cleanly" and does not obey any Tagging rules you have defined in your [[Auto-Import]] configuration. |
||
To import from Windows Explorer via shell integration, right click on a file, or a folder full of files, and choose <span style="color:#8B4513">Media Center > Import</span>. |
To import from Windows Explorer via shell integration, right click on a file, or a folder full of files, and choose <span style="color:#8B4513">Media Center > Import</span>. |
||
| Line 48: | Line 70: | ||
[[File:MC19-Import-Wizard-Single Folder Selected.png|thumb|480px|none]] |
[[File:MC19-Import-Wizard-Single Folder Selected.png|thumb|480px|none]] |
||
Once you select this option, you are presented with the Media Import Folder options dialog |
Once you select this option, you are presented with the Media Import Folder options dialog: |
||
[[File:MC19-Import-Configure Folder.png|thumb|360px|none]] |
[[File:MC19-Import-Configure Folder.png|thumb|360px|none]] |
||
The Folder Settings dialog allows you to choose which folder to search, the types of files you want to import, and to optionally apply tags to these files automatically. This dialog is functionally equivalent to the version found in the Auto-Import settings, which is further described here: |
|||
* [[Auto-Import#Folder_Settings|Auto-Import: Folder Settings]] |
|||
Please note that this is a one-time operation, and the settings you enter here aren't easily saved (though it does remember these settings from run-to-run). If you need to repeatedly import files from a fixed set of folders on disk, you will be better served using the Auto-Import system described below. |
Please note that this is a one-time operation, and the settings you enter here aren't easily saved (though it does remember these settings from run-to-run). If you need to repeatedly import files from a fixed set of folders on disk, you will be better served using the Auto-Import system described below. |
||
| Line 59: | Line 85: | ||
== Auto-Import == |
== Auto-Import == |
||
{{See also|Auto-Import}} |
|||
Media Center has a full-featured Auto-Import system. With this system you can: |
Media Center has a full-featured Auto-Import system. With this system you can: |
||
* |
* Create a set of folders that contain media, each of which have separate options defined. |
||
* Manually scan all of your pre-defined folders on demand. |
|||
* Make use of the powerful [[Carnac]] (file name parsing) and [[TV_Shows_-_Series,_Seasons_%26_Episodes|Automatic Metadata Lookup]] features of Media Center |
|||
* Automatically apply tags to the files imported using powerful [[Tag on Import]] rules. |
|||
* Watch the folders automatically in the background for new files, without bogging down disk or network access. |
|||
'''In most cases, using Auto-Import to automatically watch your media locations on disk is the preferred means of Importing new content.''' Media Center turns this feature on by default, and automatically sets itself to to watch the locations found when it completed the automatic [[Import#First_Use_Scan|First-Use Scan]]. If you did not allow it to run this automated scan, then you will need to configure Auto-Import yourself. |
|||
JRiver Media Center can automatically watch certain folders. To configure this, choose Tools > Import > Auto Import. Here you can add or remove directories to watch or to exclude. If you click the small triangle next to Audio, for example, you can edit each one to configure the file types you want imported. |
|||
For information on how to configure Auto-Import, please refer to the [[Auto-Import]] page of the Wiki. |
|||
[[Image:Import2.jpg|480px]] [[Image:Import3.jpg|480px]] |
|||
== More == |
== More == |
||
* [[Import Files]] |
|||
* [[File Import Results]] |
* [[File Import Results]] |
||
* [[Where do imported files go?]] |
* [[Where do imported files go?]] |
||
* [[Import Tag Information]] |
|||
* [[Supported File Types]] |
* [[Supported File Types]] |
||
* [[Acquire Images]] |
* [[Acquire Images]] |
||
[[Category: Frequently Asked Questions]] |
[[Category: Frequently Asked Questions]] |
||
[[Category: Import]] |
|||
[[Category: Tools]] |
|||
[[Category: Linked From MC]] |
|||
Latest revision as of 15:41, 24 August 2020
Importing files into Media Center is an automatic process and does not change your files or move them. It creates a record of what you have in MC's database (the Library).
It provides a highly customizable database of your files for access and viewing. You can easily edit, rename, and organize the files. Say goodbye to opening folders and more folders to find a photo or music file! You can import any of the Supported File Types.
Here are some of the things you can do with imported files:
- View them sorted by any number of fields, including artist, album, genre, size, length, and even your own custom fields.
- Edit their metadata tags (and save information with the file itself for supported file types).
- Add custom fields and cover art.
- Add them to Playlists and include them in Smartlists.
- Easily find any file quickly using MC's powerful Search system.
- Organize your media into a flexible collection of media Views, and browse them by tags in almost any configuration you can dream up.
Much of Media Center's power as a file management system comes from its ability to manage the files in its Library. Importing is simply the process of telling Media Center about the files, and adding them to this database. Importing is non-destructive to your files, and can even automate the often-tedious process of tagging your files so that they can be easily browsed.
Methods for Importing Files
There are a few ways you can import your files into Media Center:
- Automatically when opened with an empty Library
- Automatically when MC plays the files
- Via Drag and Drop
- Via the Shell Integration features (Windows only)
- Via the Media Import wizard available at Tools > Import.
- Via Auto-Import, which can watch directories you specify automatically in the background.
In most cases, using Auto-Import to automatically watch your media locations on disk is the preferred means of Importing new content. The First Use Scan (described below) will automatically configure Media Center to import your media files and monitor those file locations automatically in the background for changes.
Fully Automatic First Use Scan
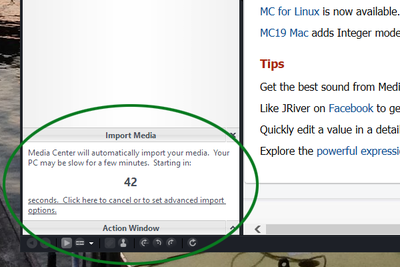
When you open Media Center for the first time, or with a blank Library, it will automatically configure Auto-Import by analyzing your computer for media in a variety of common locations. This happens in the Action Window area of MC. You can cancel this if you prefer to adjust the watched directories used by Auto-Import, or import manually.
If you just want to get going and actually use Media Center, this will be the fastest and simplest route to use. If you later want to fine tune your settings, refer to the Auto-Import page and you can view and adjust all of the automatically detected settings.
When opened with a completely blank Library, Media Center will wait for 45 seconds, to give you a chance to cancel it if desired, and then it will run this scan automatically.
If you miss the countdown timer and Media Center imported content that you did not want included, do not worry! The import process is non-destructive to your media, and since this only happens with a default, blank Library, you can easily clear the Library to start over. See the Library Manager page for details on clearing your Library, making backups, and other related information.
If you canceled this scan and you want to run it again at a later time, you can initiate it at the command line by using the MCC_IMPORT command (23000) in First Import Mode with the MC Command Line launcher, for example:
mc20.exe /mcc 23000,2
One Time Imports
There are a few methods you can use to import files or folders into MC on an individual basis. These are "one-off" imports and don't provide many of the benefits of the Auto-Import system.
Upon Playback
Media Center automatically imports any files that you play with it (if they haven't already been imported previously). If you prefer, this option can be disabled at:
Tools > Options > General > Importing & Tagging > Automatically import files when played
Drag and Drop and Shell Integration
You can import files directly through Windows Explorer. This method will import the files "cleanly" and does not obey any Tagging rules you have defined in your Auto-Import configuration.
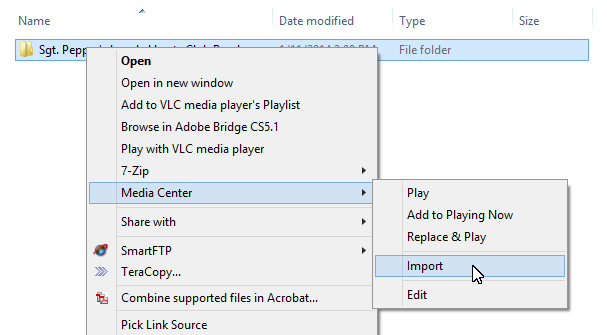
To import from Windows Explorer via shell integration, right click on a file, or a folder full of files, and choose Media Center > Import.
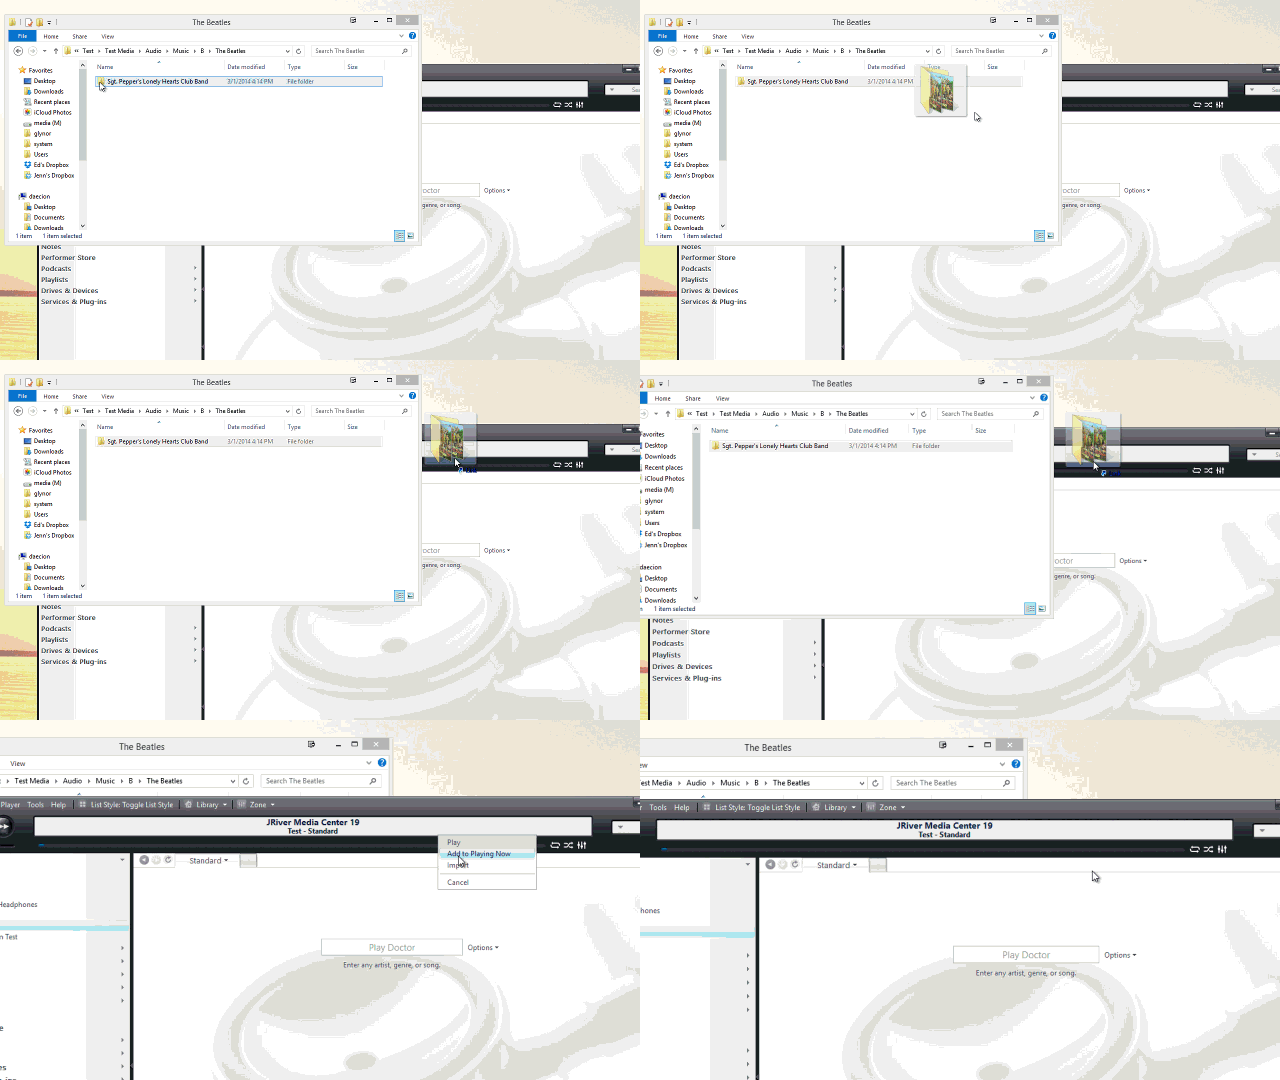
You can also drag-and-drop files from Windows Explorer onto MC:
Importing a Single Folder
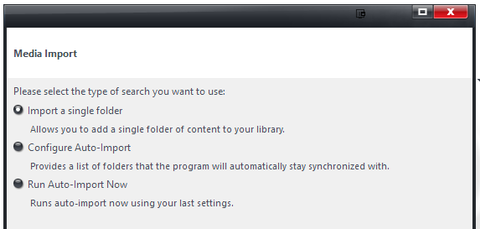
To import a single folder (including any subdirectories) into Media Center, you can use the Import a single folder function of the Media Import wizard. This is accessible via: Tools > Import. The same tool is also available at File > Library > Import, and from within the Library Manager (with the current Library selected).
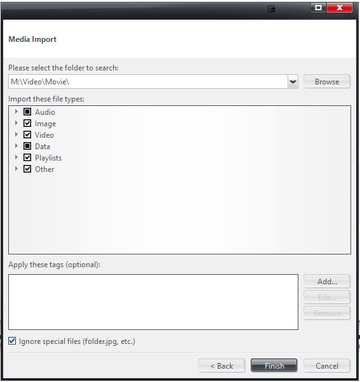
Once you select this option, you are presented with the Media Import Folder options dialog:
The Folder Settings dialog allows you to choose which folder to search, the types of files you want to import, and to optionally apply tags to these files automatically. This dialog is functionally equivalent to the version found in the Auto-Import settings, which is further described here:
Please note that this is a one-time operation, and the settings you enter here aren't easily saved (though it does remember these settings from run-to-run). If you need to repeatedly import files from a fixed set of folders on disk, you will be better served using the Auto-Import system described below.
Importing via Automation
Media Center also includes a command line option for Importing files. Please refer to The Command Line for additional details.
Auto-Import
- See also: Auto-Import
Media Center has a full-featured Auto-Import system. With this system you can:
- Create a set of folders that contain media, each of which have separate options defined.
- Manually scan all of your pre-defined folders on demand.
- Make use of the powerful Carnac (file name parsing) and Automatic Metadata Lookup features of Media Center
- Automatically apply tags to the files imported using powerful Tag on Import rules.
- Watch the folders automatically in the background for new files, without bogging down disk or network access.
In most cases, using Auto-Import to automatically watch your media locations on disk is the preferred means of Importing new content. Media Center turns this feature on by default, and automatically sets itself to to watch the locations found when it completed the automatic First-Use Scan. If you did not allow it to run this automated scan, then you will need to configure Auto-Import yourself.
For information on how to configure Auto-Import, please refer to the Auto-Import page of the Wiki.
