Screenshot: Difference between revisions
No edit summary |
No edit summary |
||
| Line 12: | Line 12: | ||
By default Windows can capture screenshots, but it only copies the screenshot to the [http://en.wikipedia.org/wiki/Clipboard_%28computing%29 clipboard], and doesn't make them into a file on disk. This is tedious and confusing if you don't understand the process. Pressing the Print Screen key on your keyboard does copy an image of everything on your screen to the clipboard, but to make this into a JPG or PNG file on disk you will need to use some other application. |
By default Windows can capture screenshots, but it only copies the screenshot to the [http://en.wikipedia.org/wiki/Clipboard_%28computing%29 clipboard], and doesn't make them into a file on disk. This is tedious and confusing if you don't understand the process. Pressing the Print Screen key on your keyboard does copy an image of everything on your screen to the clipboard, but to make this into a JPG or PNG file on disk you will need to use some other application. |
||
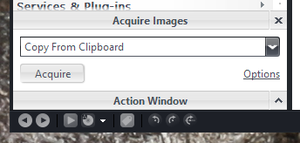
[[File:Acquire Images-Copy from Clipboard.png|thumb|right|300px|Media Center can also capture images from your clipboard and other sources.]] |
|||
However, Media Center itself can help make the process easy. To capture a screenshot, position your windows showing exactly what you'd like to capture (and preferably nothing else). Then: |
However, Media Center itself can help make the process easy. To capture a screenshot, position your windows showing exactly what you'd like to capture (and preferably nothing else). Then: |
||
| Line 25: | Line 27: | ||
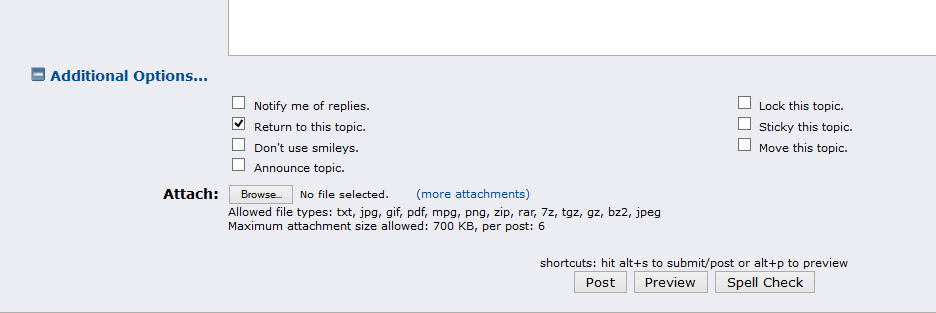
If you have a high enough post count on Interact, you will be able to attach small screenshots to your post directly. When editing a post, click on ''Additional Options'' down at the bottom of the post text entry box, and then click ''Browse'' next to Attach. If you have no Attach section, then you may not have made enough posts on the forum to have this ability yet (sorry, it prevents some kinds of spam). |
If you have a high enough post count on Interact, you will be able to attach small screenshots to your post directly. When editing a post, click on ''Additional Options'' down at the bottom of the post text entry box, and then click ''Browse'' next to Attach. If you have no Attach section, then you may not have made enough posts on the forum to have this ability yet (sorry, it prevents some kinds of spam). |
||
[[File:Interact-Post_Additional_Options.png|frame|none|Media Center can also capture images from your clipboard and other sources.]] |
|||
As an alternative, you can use a free Image hosting service. Media Center actually includes this as well! You can upload the files to [[Pix01]] directly through Media Center once you've imported the screenshots, and it will upload the photos to a web page hosted by JRiver for you. |
As an alternative, you can use a free Image hosting service. Media Center actually includes this as well! You can upload the files to [[Pix01]] directly through Media Center once you've imported the screenshots, and it will upload the photos to a web page hosted by JRiver for you. |
||
Revision as of 04:59, 20 February 2015
Occasionally when troubleshooting, a member of Interact may ask you to take a screenshot of an error message or of the settings in the Tools > Options panel.
If you aren't sure how to capture and post a screenshot, this quick guide will help you.
Capturing Screenshots
Mac OSX:
On Mac OSX taking a screenshot is easy. See Apple's Guide here: How to take a screenshot on your Mac (HT201361)
Windows:
By default Windows can capture screenshots, but it only copies the screenshot to the clipboard, and doesn't make them into a file on disk. This is tedious and confusing if you don't understand the process. Pressing the Print Screen key on your keyboard does copy an image of everything on your screen to the clipboard, but to make this into a JPG or PNG file on disk you will need to use some other application.
However, Media Center itself can help make the process easy. To capture a screenshot, position your windows showing exactly what you'd like to capture (and preferably nothing else). Then:
- Press the Print Screen key on your keyboard. It doesn't look like anything happens, but when you press this key it copies an image of everything you can see on your computer's monitor (or monitors if you have more than one) to the computer's clipboard.
- Open Media Center if it isn't open, and click on the Camera Action Window.
- From the Acquire Images action window, choose Copy From Clipboard as the image source.
- Press Acquire. This will save the clipboard contents to disk and import the file into Media Center.
As an alternative, or if you want more control, you may also want to check out Lightscreen. This capable free application enhances the Windows screenshot system (with many of the same features that are available in Mac OSX). It saves screenshots directly to disk in the location of your choosing. It allows you to capture only a portion of the screen by quickly drawing a square box over the part you'd like, can upload directly to imgur and has a variety of other handy functions.
Posting Screenshots
If you have a high enough post count on Interact, you will be able to attach small screenshots to your post directly. When editing a post, click on Additional Options down at the bottom of the post text entry box, and then click Browse next to Attach. If you have no Attach section, then you may not have made enough posts on the forum to have this ability yet (sorry, it prevents some kinds of spam).
As an alternative, you can use a free Image hosting service. Media Center actually includes this as well! You can upload the files to Pix01 directly through Media Center once you've imported the screenshots, and it will upload the photos to a web page hosted by JRiver for you.
Other popular free image hosting services are:

