WDM Driver
[Note: Recent releases of Windows 10 have made this more difficult. Please see the Problems section at the bottom of this topic.]
JRiver Media Center version 20 for Windows introduced a WDM Driver (a virtual audio driver), which can be used to re-route all windows sound through Media Center. This allows full use of Media Center's DSP stack for web content, and allows better integration with external audio sources, like streaming video services or video games. The driver is currently only available on Windows.
How to Set up the WDM Driver
- In versions of Media Center after 20.0.95 the WDM driver is disabled by default. To enable it go to Options-->General-->Features and check WDM Driver. Then restart Media Center and the driver will install.
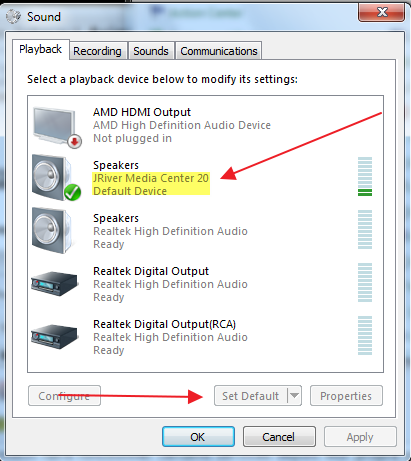
- Once the driver is installed, go to the windows control panel, and then to the Sound menu item. You should see all of the Audio devices on your system listed. Select the one labelled JRiver Media Center and click the Set Default button at the bottom of the menu as shown to the right.
- Make sure that, in Media Center, your setting under Options-->Audio-->Audio Device is not "Default Audio Device." You need to set your audio device to whatever your actual physical output device is. Because the WDM Driver is now the system default, setting Media Center to output to the system default just creates a closed loop.

Note: If JRiver doesn't show up as a Windows Device in Control Panel > Sounds > Playback, try disabling it in MC General > Features. Restart MC and re-enable WDM.
When system audio plays (from web browsers, apps, windows sounds, or video games), it will play to the JRiver Media Center driver. This re-routes the audio through Media Center's DSP stack to whatever output device you have selected as an audio output in Media Center.
Troubleshooting Common Issues
Clicks, Pops, and Static
Clicks, pops, and static are typically caused by buffer underruns. Because the WDM Driver is re-routing sound in real time, it is more sensitive to buffering settings than normal audio playback. There are two buffers that are important to WDM performance:
- The output buffer, found at Options-->Audio-->Device Settings, and
- The input buffer, found at Options-->Audio-->Advanced-->Live Playback Latency
If you are experiencing clicks and pops, try different combinations of settings with these two buffers. It is important to note that a larger buffer will not necessarily work better. Different hardware configurations work best with different combinations of settings, so try different combinations large and small until you find settings that resolve your issue.
Lipsync
Because the WDM driver requires some buffer to function, it necessarily adds some latency to audio. For pure audio applications, this is irrelevant, but for streaming video (or video games), too much latency can cause lipsync issues. If you're experiencing these issues, you can adjust the two buffers listed under Clicks, Pops, and Static above. The total added latency is close to the sum of those two buffers, so you want to try and find the combination of buffer settings that creates the lowest total latency, but doesn't cause audio drop outs as described above.
The recommendation for lipsync in film is about 22ms; the recommendations for television are about 45ms. Most delays below 45ms will not create visible lipsync issues, and higher latency may or may not be noticeable to all viewers. If your combined buffer settings are below this threshold, and you still have noticeable lipsync issues, there may be other factors contributing to your latency other than the WDM Driver, such as that native latency of your audio device or using certain DSP modules (such as Convolution).
"IPC" in Playing Now
The WDM driver's output appears in Media Center's playing now as a library item named IPC. It stands for "inter-process communication." If you see it in your playing now, it's proof that the WDM driver is working.
Problems With Streaming Video Using Media Center's Internal Browser and/or Erasing Playing Now
Because of the way Media Center's Playing Now is structured, the WDM driver can sometimes have unintended consequences, and this section provides some workarounds for those issues.
- For example, if playback is stopped and you're queueing up tracks to play by adding them to playing now, and a windows sound plays (engaging the WDM driver), you may find that the playing now is now suddenly empty except for IPC. That happens because the WDM driver acts just like any other library item that you play, replacing the current playing now.
- Similarly, you may find that if you use Media Center's internal browser to navigate to a streaming video website, when you click play, the WDM driver will engage and steal focus, effectively stopping video playback.
Neither of those situations is desirable, but there's a fix: setup an extra zone to receive WDM input, and setup a zoneswitch rule to automatically route WDM input to that zone. Properly configured, it will protect your playing nows, and also prevent the WDM from stealing focus from web video. Here are step-by-step instructions adapted from the forum:
- Setup the WDM driver as described above
- Go to Player-->Zone-->Add Zone. In the dialog box that pops up name the zone something like loopback, and in the second box choose to copy your current working zone (it may be named "Player" if you haven't edited it). Click "ok"
- Now right click on the new zone under playing now, and click on the "ZoneSwitch" context menu item. If you already have zoneswitch rules, you'll need to add a rule that routes WDM driver output to the new zone; if you've never used zoneswitch before, do this:
- In the dialog box, press the add button. Then name the rule something like "loopback," and enter the following rule
[Name]="IPC". Then tell it to play in the loopback zone and stop playback in your normal zone. - Add a second rule, and name it something like "normal," and enter the following rule
-[Name]="IPC". Then tell that rule to play in your normal zone and stop playback in the loopback zone.
- In the dialog box, press the add button. Then name the rule something like "loopback," and enter the following rule
- Some people have reported that they had to change their Jump on Play (audio) settings under Options-->General-->Behavior to "None" for best results, but it typically works fine without changes to that option.
Once configured, if you try to play a streaming video service from inside Media Center's internal browser it should work fine. Just make sure to start playback from your normal zone, and not the loopback zone.
The primary limitation with this method is that volume control isn't easy to manage because the zone you're playing the video in won't be playing the audio so the normal volume controls may not work as expected. However, you can still adjust volume in the streaming video service's on screen volume control and it should work; it's just Media Center's volume control that can be hard to manage. Another good solution is to make sure to set the default volume in your loopback zone to the volume at which you you normally like to watch streaming content, so it's close to correct by default.
Problems
If JRiver doesn't show up as a Windows Device in Control Panel > Sounds > Playback, try disabling it in MC General > Features. Quit MC and re-enable it.
Please see Hendrik's advice here: https://yabb.jriver.com/interact/index.php/topic,127330.msg883267.html#msg883267