Mini View Skinning Tutorial: Difference between revisions
| Line 7: | Line 7: | ||
You will see that each skin consists of graphic elements, a main.xml file, a main.js file, and a state.xml file. |
You will see that each skin consists of graphic elements, a main.xml file, a main.js file, and a state.xml file. |
||
The first thing you need to do is to decide which skin elements to include: |
'''The first thing you need to do is to decide which skin elements to include:''' |
||
You can create a simple skin with song title, play button and exit button or you can have a more complex skin that includes a visualization window, graphic equalizer, playlist and more. Features such as sliding or popup windows can be set in the skin’s XML file. This file is the “brain” of the skin. It identifies what is included in the skin and where it all goes. |
You can create a simple skin with song title, play button and exit button or you can have a more complex skin that includes a visualization window, graphic equalizer, playlist and more. Features such as sliding or popup windows can be set in the skin’s XML file. This file is the “brain” of the skin. It identifies what is included in the skin and where it all goes. |
||
| Line 22: | Line 22: | ||
[[Image:image001.png]] |
[[Image:image001.png]] |
||
Fig. 1 |
|||
Typical Mini View skin with all windows open |
|||
'''Start by creating the graphic elements for the skin''' |
|||
Graphics can be in gif, bitmap, jpg or other formats, but we strongly recommend png as it is a flexible format with true support for transparency. Programs such as PhotoShop or PaintShop Pro are best for creating graphics, but many simpler and less expensive options are available. |
|||
The graphics that you will need usually include: |
|||
• Main player window (everything is built around this graphic, as it is used to take measurements for button placement and positioning of additional windows). |
|||
• Buttons that appear on the window |
|||
• Sliders that show volume and track progress |
|||
• The Visualization window with close button |
|||
• The Equalizer window with close button |
|||
• The Playlist window with scroll up/down buttons, and close button |
|||
When you create the skin graphics, you need to be aware that some graphics have more than one element or state. For example, each button usually has 3 states (normal state, pressed/activated state, mouseover state). These appear in that order from left to right and are laid out as in the samples below. Each sample represents one button only, but shows the various states. |
|||
[[Image:image003.png]] [[Image:image004.gif]] [[Image:image005.png]] |
|||
Revision as of 19:14, 12 June 2007
J. River MEDIA CENTER Mini View skinning tutorial
The skinning engine for MEDIA CENTER Mini View skins is very flexible and powerful. If can imagine it, you can probably create it. Unlike Standard view skins, Mini View supports freeform skinning, which allows skins of any shape to be created?
If you are new to skinning you may want to modify an existing skin to begin with before attempting one of your own. That way much of the work is done for you and you don’t have to worry too much about the coding that is involved. Once you are familiar with how graphics and coding are used together, you’ll be in better position to add/delete features as you wish. All skin elements for each existing Mini View skin are found in the MiniSkins folder of the MEDIA CENTER program. You can find them by navigating Windows Explorer to C:\Program Files\J River\Media Center 12\MiniSkins
You will see that each skin consists of graphic elements, a main.xml file, a main.js file, and a state.xml file.
The first thing you need to do is to decide which skin elements to include:
You can create a simple skin with song title, play button and exit button or you can have a more complex skin that includes a visualization window, graphic equalizer, playlist and more. Features such as sliding or popup windows can be set in the skin’s XML file. This file is the “brain” of the skin. It identifies what is included in the skin and where it all goes.
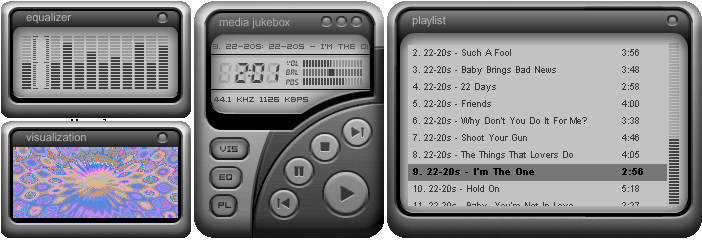
For this tutorial we will discuss the following elements:
• Main window (with track information, volume and progress indicators, playing buttons, and the toggle buttons for visualizations, EQ, and Playlists).
• Equalizer window
• Visualization window
• Playlist window
 Fig. 1
Typical Mini View skin with all windows open
Start by creating the graphic elements for the skin
Graphics can be in gif, bitmap, jpg or other formats, but we strongly recommend png as it is a flexible format with true support for transparency. Programs such as PhotoShop or PaintShop Pro are best for creating graphics, but many simpler and less expensive options are available.
The graphics that you will need usually include: • Main player window (everything is built around this graphic, as it is used to take measurements for button placement and positioning of additional windows). • Buttons that appear on the window • Sliders that show volume and track progress • The Visualization window with close button • The Equalizer window with close button • The Playlist window with scroll up/down buttons, and close button
When you create the skin graphics, you need to be aware that some graphics have more than one element or state. For example, each button usually has 3 states (normal state, pressed/activated state, mouseover state). These appear in that order from left to right and are laid out as in the samples below. Each sample represents one button only, but shows the various states.
