Library Backup
Media Center stores all information about the files you've Imported, the structure and design of your Views, and other information in its own internal database called a Library.
Because this information is critical to all use of MC, it includes a robust backup and restore system for the Library (and other Settings). When you create a Library Backup, it saves a snapshot of your current Library and all other user settings to a ZIP file which can be restored onto other copies of Media Center (to duplicate the setup) or in case of trouble.
The Library portion of a backup contains:
- all imported files and their metadata
- all Playlists and Smartlists
- all Media Views, including those for Theater View and Media Network.
- custom Fields defined in the Library Fields Manager.
The Settings portion of a backup contains:
- all settings and options under Tools > Options, aside from the items referenced above.
- all DSP Settings
- Zones
- the locations of all Libraries added to the Library Manager
When you restore a Library Backup, you can choose to restore just the Library, just the Settings, or both.
| Warning!
The Library Backup does not include your Media Files, only MC's database and settings. If you are moving your Library to another computer, you must transfer the media files over separately. |
How to Make a Library Backup
MC automatically creates Library Backups on a regular basis, approximately every two days. By default, these will be saved to the JRiver folder in the current user's Documents folder. If you'd prefer to save the files on another disk, this can be changed via: Tools > Options > File Location > Program Files > Library Backups
We recommend that you save these files, if possible, on a disk other than your system boot volume.
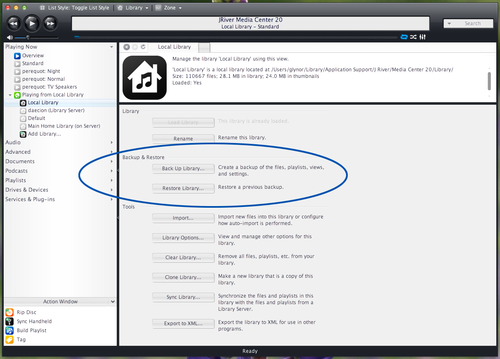
You can also create a Library Backup manually at any time via the Library Manager. This is strongly recommended before you make any major changes to your Library, such as reorganizing files on disk, reorganizing views or Playlists, or tagging changes that apply to many files.
How to Restore a Library Backup
You can restore a Library easily via the Library Manager. When you restore a Library from backup, it replaces the currently loaded Library completely (overwriting the current Library on disk wherever it is stored). Make sure Media Center has the Library you want to overwrite loaded, and then choose the Restore Library button.
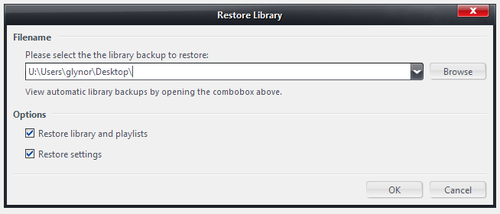
From this dialog, you can choose which Library Backup you'd like to restore. If you click the Browse button, you can navigate your computer's drives and choose any previously created Library Backup zip file. If you click the drop-down arrow instead, MC will show you the contents of the current folder where MC automatically creates backups, and you can choose from any available there.
As described above, when restoring the Library, you have two choices:
- Restore Library and playlists: This restores the entire Library and all of its contents.
- Restore Settings: This restores MC's Options and Settings.
Notes:
- You can restore a Library Backup created by a copy of MC running on a different computer. This will allow you to migrate settings, or your Library, from one computer to another.
- You can restore a Library Backup created in an older version of MC into a newer version of MC. This will allow you to migrate settings to the new version of MC.
- You can choose to restore only the Settings, only the Library, or both at the same time.
- If you choose to restore Settings, then MC will have to restart to apply the changes.

