Id Install Guide
Welcome
Thanks for using the JRiver Id. The name rhymes with "hid", and it is derived from an "imaginary device" that we first discussed a few years ago.
It has 120GB of SSD storage and 2GB of RAM. More specifications are on our wiki.
It works now as an audio player (DLNA / UPnP Renderer). You will play audio to it from a PC or Mac. The PC or Mac needs to run a DLNA Server (JRiver Media Center, for example, with the "Media Network" feature on). Other DLNA Servers should work.
Wiring
Position the Id near your audio amplifier or other audio output. If you don't have a network there, consider using Ethernet over Powerline.
Connect an Ethernet cable (network), USB keyboard, power, and audio output (USB, HDMI, or 1/8" stereo analog).
At this time, an HDMI monitor must also be connected. It is possible to use the Id without a monitor, but it is more difficult to get it running.
Powering
Turn the device on by pressing (not holding) the power button on the top. (See "Power" below if you need a different plug.) This same button is a safe way to shut down the Id (press, not hold).
In about 60 seconds, the Id should be running. If you have a monitor, you should see a text menu.
In another minute or two, the Id will show up under Playing Now in JRiver Media Center, running on your Mac or PC.
Network
The Id uses DHCP to get a network address. It requires a DHCP Server, which is commonly used on home networks.
Options
The first time the Id is run, it defaults to HDMI audio out. You can use the text menu to change this if necessary.
At this time, the Id supports the Dragonfly USB DAC. Other USB DAC's may work if they present themselves as USB Audio Devices.
An option exists to turn on the DLNA Server. This allows you to play files from the Id, on other DLNA devices or in JRiver Media Center. To load files on the Id, use a Mac or PC and find the "Media" directory on the Id through your computer's network. The Id runs a Samba Server.
Updates are also available through this menu.
Menu
1 Analog Output *
2 HDMI *
3 USB DAC *
4 Toggle Media Server *
5 Set User Defined profile
6 Check for Updates *
7 Network Status
8 GUI mode *
9 Headless Text mode *
10 Text Mode *
98 Reboot
99 Shutdown
* Selecting this option will also reboot
Powering Down
The Id uses very little electricity, but if you wish to turn it off, just press (not hold) the power button on the top.
Current Limitations
Though the NUC has capabilities for Wireless Ethernet, Bluetooth, and IR, these aren't available in the Id. They may be added later.
Running in the GUI mode may be less stable than using the text mode.
Remote Control
Gizmo on Android or JRemote on iOS are supported. Other software remotes that work with JRiver Media Center may also work.
Connect to your source first, then choose to play to the Id.
Power
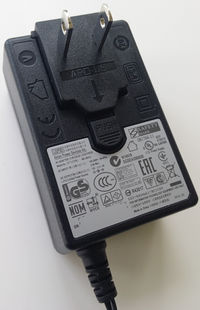
The Id has a switching power supply. It can use 100 to 240 volts and 50 to 60Hz.
It comes with adaptors for all common plugs. In the center of the picture below, there is a button with an arrow pointing to it. Press this button if necessary to exchange the plug for the one you need. You should find it in the Id's original package.
Questions?
Please use this thread on Interact.
