Parametric Equalizer
Overview
Media Center's DSP Studio includes a powerful and flexible parametric equalizer (PEQ) that can be configured with any number of filters. PEQ can be used for simple tasks like equalization and channel routing as well as advanced tasks such as creating a crossover for active speakers, performing bass management and applying a compressor.
This page provides an explanation of how each option works as well as some guidance on typical uses.
Verifying Your DSP Studio Configuration
See Verifying DSP Studio for details of how to measure your configuration.
All graphs in this section were created using the method described in that page.
Use Cases
| Use Case | Description | Link |
|---|---|---|
| Custom Mixing | Allows the user to perform their own custom mixing, e.g. for bass management | Mixing |
Adjust a Frequency
This option creates a "Peaking EQ" filter, such a filter may also be known as:
- a parametric EQ filter
- a notch filter
Such a filter provides a cut or boost which is centred on the specified centre frequency
4 values must be entered by the user:
- Frequency: the centre frequency of the filter
- Bandwidth (Q): specifies the frequency range over which the filter will boost or cut, the higher the Q, the narrower the range over which the filter operates
- Gain: the maximum boost or cut applied by the filter, i.e. the boost or cut applied at the centre frequency
- Channels: the channels to apply the filter to
There is no practical limit to the maximum Q allowed.
What type of peaking filter is used?
MC implements a type of filter known as an RBJ filter after the author Robert Bristow-Johnson who published the EQ Cookbook. This type of filter is also known as a proportional Q filter in rePhase
Understanding Q
Q is defined relative to the centre frequency of the filter, it is the centre frequency divided by the bandwidth of the filter where the bandwidth is defined by the +/-3dB points.
For example, if the centre frequency is 500Hz and the -3dB points are at 450 and 550Hz then we have a bandwidth of 100Hz. Therefore Q = 500/100 = 5
Another example, if the centre frequency is 100Hz but we maintain the same 100Hz bandwidth then Q = 100 / 100 = 1
Examples
Varying Q
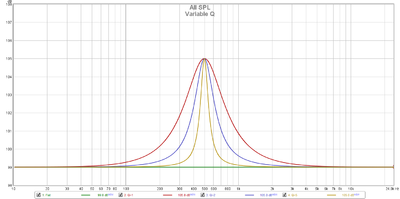
This example shows a series of filters centred at 500Hz with Q of 1, 2 and 5 and a +6dB gain
Stacking Filters
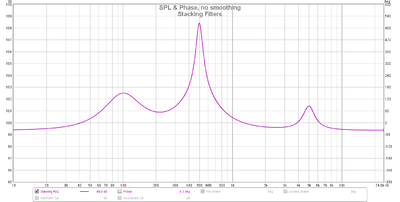
Filters can be stacked to produce complex shapes
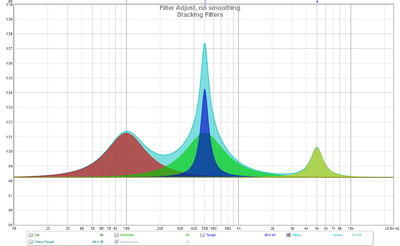
We can break this down visually using REW
- Red: +3dB at 100Hz with Q=1
- Green: +3dB at 500Hz with Q=1
- Blue: +6dB at 500Hz with Q=5
- Yellow: +2dB at 5000Hz with Q=3
- Cyan: the total filter
Adjust high/low frequencies
This option creates a high or low shelf filter.
This type of filter, as the name suggests, has a response that steps ("shelves") the response up or down.
The shape of the shelf is determined by the user specified Q and, as with peaking filters, the higher the Q, the steeper the slope of the shelf.
4 values must be entered by the user:
- Frequency: the centre frequency of the filter, i.e. the point by which half of the shelf gain has been achieved.
- Bandwidth (Q): generally speaking determines the rate at which the change specified by the gain is achieved however see #Q or S for full details
- Gain: the maximum boost or cut applied by the filter, i.e. the level at which the top or bottom of the shelf resides
- Channels: the channels to apply the filter to
The maximum Q allowed is 5 which, given the Q vs S issue described below, effectively equates to a maximum Q of ~1.5
As with the Peaking filter, this filter is defined in the RBJ Cookbook.
Q or S
DSP Studio asks the user to enter a value for Q when entering a shelf filter however it is important to realise this label is incorrect. This value is actually S as per the RBJ cookbook.
It is extremely important (for correct results) to realise this fact as most software that generates such filters will use Q as per its correct definition. You will need to manually calculate S from the given Q instead.
This is straightforward albeit the equation is somewhat intimidating as you need to solve
1/((((1/Q)^2-2)/((10^(d/40))+1/(10^(d/40))))+1)
where
- Q = the actual Q
- d = the required gain
One easy way to solve this is to enter the above equation into an online equation solver such as https://www.mathpapa.com/algebra-calculator.html and then enter the required values
For example, if we want a shelf filter with Q = 0.707 and a gain of +5dB then we need to enter Q = 0.99971 and gain = +5 into DSP Studio
Effect of Changing S
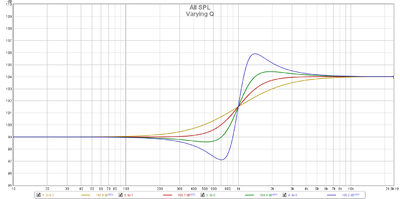
This example shows a series of filters centred at 1000Hz with S of 0.5, 1, 2 and 5 and a +5dB gain
Notice two things
- how each curve crosses the same point at 1000Hz and that this frequency is the centre point of the shelf, i.e. +2.5dB in this example
- how S>1 overshoots
Peaking Shelf Filters
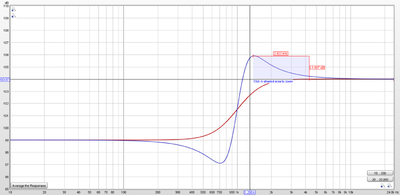
When S > 1 (which typically means a real Q > 0.707), the filter is somewhat unstable in that the shelf will overshoot at both ends of the shelf. This means the maximum boost/cut applied by the shelf filter will be greater than the entered gain.
Ignoring this can lead to clipping in your signal chain due to the (unexpected) excess gain.
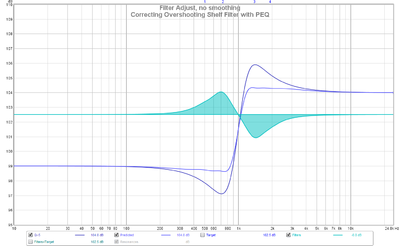
This example compares a +5dB high shelf at 1000Hz with S=1 vs S=5, the S=5 filter overshoots by ~1.9dB at each end
One option to avoid this problem is to use PEQ to correct the overshoot, in this example 2 filters are used to roughly correct each peak
Low vs High Shelf
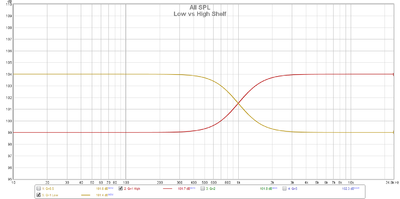
A positive low shelf is a filter whose (magnitude) response increases as frequency decreases. A positive high shelf is a filter whose (magnitude) response increases as frequency increases.
Negative High Shelf Filters
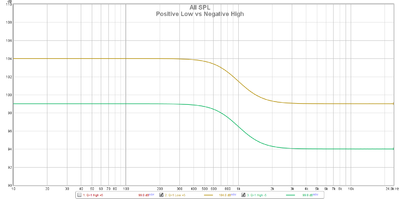
Now compare the positive low shelf to a negative high shelf, the 2 filters have exactly the same shape but the negative high shelf has a maximum value 5dB lower than the positive high shelf.
Put another way, the a negative high shelf achieves the same end result as a positive low shelf with a negative gain (volume) adjustment. This is important when digital signal headroom is limited (which is invariably is).
Adjust the Volume
This option changes the overall level of the signal within the specified channels.
2 values must be entered by the user:
- Gain: the level change in dB
- Channels: the channels to apply the adjustment to
Examples of where this is useful include:
- you have multiple speakers of different varieties in a surround setup and you need to level match them (though note the Room Correction DSP module also has level matching tools)
- you have applied boost via other PEQ filters and need to reduce the level to avoid clipping
Bitdepth Simulator
This option allows you to artificially reduce the bitdepth of the signal inside DSP studio to anything from 2 to 32 bits with or without dither. It is intended for testing purposes and is described in https://yabb.jriver.com/interact/index.php?topic=74999.0
Delay
This options allows you to apply different delays to different channels.
The delay can only be positive which, in distance terms, equates to a speaker which is closer to you, i.e. sound has less distance to travel so must be played later.
The screen allows you to enter arbitrarily precise values (e.g. 10.00001ms) however the actual resolution is dictated by the sample rate, for example approximately 0.02ms at 48kHz (i.e. 1/48000 seconds).
This feature can be useful in numerous scenarios, for example
- you have multiple speakers that are different distances from you (e.g. a surround sound system)
- if you're using an active crossover
- if you apply EQ to multiple subwoofers independently
Room Correction also provides the same functionality but expresses the delay as a distance which may be easier to use if you're just aligning surround channels by distance. However the units are larger in Room Correction so apply delay via DSP Studio if you need fine grained control over the delay or do not use the Room Correction module at all for some reason.
High Pass Filter
Attenuates all frequencies below the set frequency by a continuously increasing amount (as frequency decreases). The slope is the steepness of that attenuation (6dB per octave, 12 dB per octave, etc.). A Low Pass Filter is the exact opposite, it attenuates all frequencies above the set frequency. Here's an illustration of five different butterworth low-pass filters with different slopes (6dB, 12dB, 18dB, 24dB, 30dB) http://en.wikipedia.org/wiki/File:Butterworth_Filter_Orders.svg. The 6dB, 12dB, and 24dB filters in Jriver should look exactly like the illustrated ones (1,2, and 4). Correct use of low pass and high pass filters is kind of complicated, but they are typically used to create speaker crossovers, for protection of vented (ported) loudspeakers, or to interface a subwoofer with existing speakers.
Delay
Reverse Polarity
Reverses the absolute polarity of the selected channel(s). This is useful if your speakers are wired backwards, if you're using an active crossover, or for better subwoofer integration in some room setups. The Room Correction DSP module also has an option to reverse polarity on a speaker by speaker basis. More info about what "polarity" means in this context here: http://en.wikipedia.org/wiki/Absolute_phase#Sound_reproduction
Linkwitz Transform
A filter that boosts low bass performance of a speaker. It is not typically a good idea to use a Linkwitz transform with vented speakers (speakers with ports in them), and isn't necessarily a good idea with sealed speakers (depending on your speakers and the settings you choose). It's generally a more "advanced topic." Here's a very good article on what it does with illustrations: http://sound.westhost.com/linkwitz-transform.htm
Limiters
Prevents sounds that are louder than the limit from playing on the selected channels. They're essentially a method of protecting your speakers if you're concerned that they might get a damagingly loud signal sent to them. This can usually be achieved in other, simpler ways (like turning down the volume on your amp), but there are circumstances where PEQ is the best place to handle that kind of thing.
