Find and Replace Template
- See also: Rename, Move, and Copy Files
The Find & Replace Template is used to alter the existing file path by searching for text in the original filename, and replacing it with new text. It is often most useful when moving large sets of files from one disk or storage location to another. Unlike the Filename and Directories Templates, the Find & Replace Template is used to transform the existing filename.
For example, you might want to:
- move all of the files from Drive E to Drive M, or
- move all of the files from /Users/<USERNAME>/Music over to /Users/Shared/Media/Audio/Music
- copy a set of files from a network drive to a local disk, while preserving the original filename and directory structure
The Find & Replace Template is perfect for these kinds of tasks, where you want to preserve the existing file and folder structure on disk, but alter it in specific ways.
Use
- The Find & Replace Template can be combined with the other Rename, Move, and Copy Files Templates, but usually it is simplest to use it by itself.
- If the Find & Replace Template is not enabled, then only the other Templates will be used.
- Be sure to carefully check the Preview Panel before committing any changes to disk. The Find & Replace Template does exactly what you tell it to do, and you could set it up to overwrite all of the selected files with a single filename.
- Unlike the other Rename, Move, and Copy Files Templates, the Find & Replace Template can be used to alter file extensions. You can search for .mp3 and replace it with .flac for example. This usually works best when combined with the tool's Update database to point to new location mode.
- To use, enter the exact text you'd like to search for in the Find What box, and the exact text you'd like it to be replaced with in the Replace With box. The Preview Panel will show the results immediately in the New column.
- The search is not case sensitive. The case of the replacement text will be preserved.
Examples
The Find & Replace template searches against the existing full filename path, and replaces that text with exactly what you enter in the Replace With box. Like the other Templates, the easiest way to understand how to use the system is with examples.
Moving Files to a Dedicated Media Drive
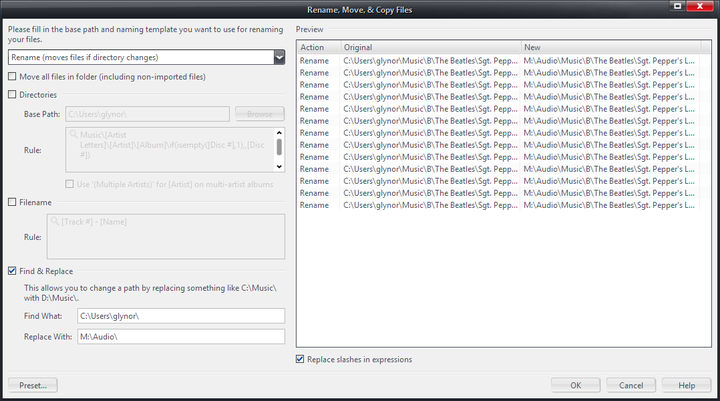
A common use for the Find & Replace Template is to move a large set of files which are already organized nicely, from a system disk to a dedicated media disk (or, perhaps, consolidating many smaller dedicated disks into one). Suppose you'd been storing all of your music files in the regular, default "My Music" location on a Windows computer, but now you want to move them to larger dedicated media driver (or perhaps a NAS).
So, if the originally selected filenames are:
- C:\Users\USERNAME\Music\B\The Beatles\Sgt. Pepper's Lonely Hearts Club Band\01 - Sgt. Pepper's Lonely Hearts Club Band.flac
- C:\Users\USERNAME\Music\B\The Beatles\Sgt. Pepper's Lonely Hearts Club Band\02 - With a Little Help from My Friends.flac
- C:\Users\USERNAME\Music\B\The Beatles\Sgt. Pepper's Lonely Hearts Club Band\03 - Lucy in the Sky with Diamonds.flac
- C:\Users\USERNAME\Music\B\The Beatles\Sgt. Pepper's Lonely Hearts Club Band\04 - Getting Better.flac
And you want to move them to your M drive in the Audio folder, you could enter the following in the template:
- Find What: C:\Users\USERNAME\
- Replace With: M:\Audio\
When applied, the filenames will become:
- M:\Audio\Music\B\The Beatles\Sgt. Pepper's Lonely Hearts Club Band\01 - Sgt. Pepper's Lonely Hearts Club Band.flac
- M:\Audio\Music\B\The Beatles\Sgt. Pepper's Lonely Hearts Club Band\02 - With a Little Help from My Friends.flac
- M:\Audio\Music\B\The Beatles\Sgt. Pepper's Lonely Hearts Club Band\03 - Lucy in the Sky with Diamonds.flac
- M:\Audio\Music\B\The Beatles\Sgt. Pepper's Lonely Hearts Club Band\04 - Getting Better.flac
If the mode is set to one of the Rename or Copy options, then the files will be moved or copied to the new destination, while preserving the existing file and folder structure. When using this tool, it is important to look for a portion of the source filenames that is common to all the files, but which won't appear multiple times. So, in the example above, you wouldn't want to just search for the term "music" because this word might appear in the individual song titles (especially if there are a lot of files selected).
Similarly, if you wanted to move them instead to a UNC-accessible NAS share, you could use something like:
- Find What: C:\Users\USERNAME\
- Replace With: \\myserver.mynetwork.lan\media\Audio\
And you'd end up with:
- \\myserver.mynetwork.lan\media\Audio\Music\B\The Beatles\Sgt. Pepper's Lonely Hearts Club Band\01 - Sgt. Pepper's Lonely Hearts Club Band.flac
- \\myserver.mynetwork.lan\media\Audio\Music\B\The Beatles\Sgt. Pepper's Lonely Hearts Club Band\02 - With a Little Help from My Friends.flac
- \\myserver.mynetwork.lan\media\Audio\Music\B\The Beatles\Sgt. Pepper's Lonely Hearts Club Band\03 - Lucy in the Sky with Diamonds.flac
- \\myserver.mynetwork.lan\media\Audio\Music\B\The Beatles\Sgt. Pepper's Lonely Hearts Club Band\04 - Getting Better.flac
Copying Files From a Network Volume
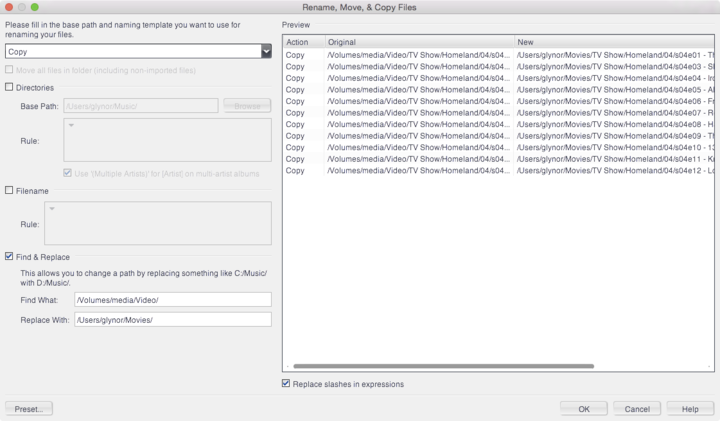
The same system works for other media types, and other types of replacements. Another useful example is making temporary copies of a set of files from a network volume onto a local disk. If, for example, on Mac OSX, you have a bunch of video files stored on a network volume, like these:
- /Volumes/media/Video/TV Show/Homeland/04/s04e01 - The Drone Queen.mkv
- /Volumes/media/Video/TV Show/Homeland/04/s04e03 - Shalwar Kameez.mkv
- /Volumes/media/Video/TV Show/Homeland/04/s04e04 - Iron in the Fire.mkv
- /Volumes/media/Video/TV Show/Homeland/04/s04e05 - About a Boy.mkv
And you want to copy them onto your Macbook's internal hard drive to watch on your upcoming flight, without making a mess of things, you could set the Rename, Move, and Copy Files tool into Copy Mode, and then use:
- Find What: /Volumes/media/Video/
- Replace With: /Users/USERNAME/Movies/
And you'd end up with:
- /Users/USERNAME/Movies/TV Show/Homeland/04/s04e01 - The Drone Queen.mkv
- /Users/USERNAME/Movies/TV Show/Homeland/04/s04e03 - Shalwar Kameez.mkv
- /Users/USERNAME/Movies/TV Show/Homeland/04/s04e04 - Iron in the Fire.mkv
- /Users/USERNAME/Movies/TV Show/Homeland/04/s04e05 - About a Boy.mkv
When applied, would create new copies of the files in your user's Movies folder, so you can easily take them with you on the trip. If desired, you could even set the mode to Copy and update database to point to new location mode, and then the it will create the copies, and "re-point" your Media Center Library to these new files. When you return from the trip, simply select the files in the tool again and:
- Set the Mode to Update database to point to new location (no file rename, move, or copy) mode.
- Use Find What: /Users/USERNAME/Movies/
- Use Replace With: /Volumes/media/Video/
- When done, and you're sure the files are back and working in their original locations, you delete your temporary copies out of the Movies folder.
And you've put them back to the way they were when you started, while preserving all the metadata you might have gained while on the trip (such as Played status).


