Parametric Equalizer: Difference between revisions
No edit summary |
mNo edit summary |
||
| Line 425: | Line 425: | ||
The subwoofer limiter feature was introduced via https://yabb.jriver.com/interact/index.php?topic=62012.0 |
The subwoofer limiter feature was introduced via https://yabb.jriver.com/interact/index.php?topic=62012.0 |
||
<b>WARNING: this feature might be broken, see https://yabb.jriver.com/interact/index.php/topic,114574.0.html for details |
<b>WARNING: this feature might be broken, see https://yabb.jriver.com/interact/index.php/topic,114574.0.html for details</b> |
||
These graphs illustrate how it it behaves |
These graphs illustrate how it it behaves |
||
Revision as of 12:31, 24 February 2018
Overview
Media Center's DSP Studio includes a powerful and flexible parametric equalizer (PEQ) that can be configured with any number of filters. PEQ can be used for simple tasks like equalization and channel routing as well as advanced tasks such as creating a crossover for active speakers, performing bass management and applying a compressor.
This page provides an explanation of how each option works as well as some guidance on typical uses.
Verifying Your DSP Studio Configuration
See Verifying DSP Studio for details of how to measure your configuration.
All graphs in this section were created using the method described in that page.
Use Cases
| Use Case | Description | Link |
|---|---|---|
| Custom Mixing | Allows the user to perform their own custom mixing, e.g. for bass management | Mixing |
Adjust a Frequency
This option creates a "Peaking EQ" filter, such a filter may also be known as:
- a parametric EQ filter
- a notch filter
Such a filter provides a cut or boost which is centred on the specified centre frequency
4 values must be entered by the user:
- Frequency: the centre frequency of the filter
- Bandwidth (Q): specifies the frequency range over which the filter will boost or cut, the higher the Q, the narrower the range over which the filter operates
- Gain: the maximum boost or cut applied by the filter, i.e. the boost or cut applied at the centre frequency
- Channels: the channels to apply the filter to
There is no practical limit to the maximum Q allowed.
What type of peaking filter is used?
MC implements a type of filter known as an RBJ filter after the author Robert Bristow-Johnson who published the EQ Cookbook. This type of filter is also known as a proportional Q filter in rePhase
Understanding Q
Q is defined relative to the centre frequency of the filter, it is the centre frequency divided by the bandwidth of the filter where the bandwidth is defined by the +/-3dB points.
For example, if the centre frequency is 500Hz and the -3dB points are at 450 and 550Hz then we have a bandwidth of 100Hz. Therefore Q = 500/100 = 5
Another example, if the centre frequency is 100Hz but we maintain the same 100Hz bandwidth then Q = 100 / 100 = 1
Examples
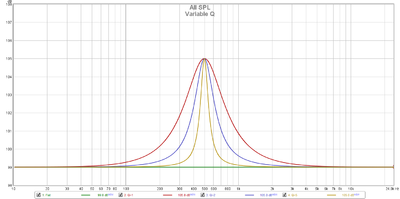
Varying Q
This example shows a series of filters centred at 500Hz with Q of 1, 2 and 5 and a +6dB gain
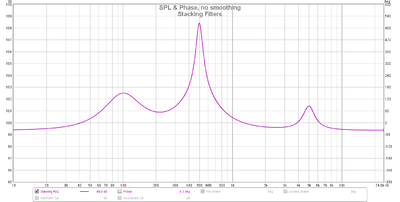
Stacking Filters
Filters can be stacked to produce complex shapes
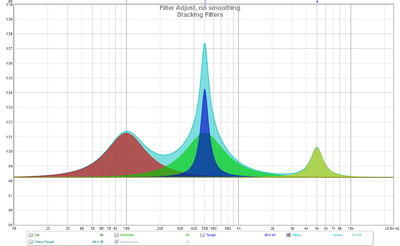
We can break this down visually using REW
- Red: +3dB at 100Hz with Q=1
- Green: +3dB at 500Hz with Q=1
- Blue: +6dB at 500Hz with Q=5
- Yellow: +2dB at 5000Hz with Q=3
- Cyan: the total filter
Adjust high/low frequencies
This option creates a high or low shelf filter.
This type of filter, as the name suggests, has a response that steps ("shelves") the response up or down.
The shape of the shelf is determined by the user specified Q and, as with peaking filters, the higher the Q, the steeper the slope of the shelf.
4 values must be entered by the user:
- Frequency: the centre frequency of the filter, i.e. the point by which half of the shelf gain has been achieved.
- Bandwidth (Q): generally speaking determines the rate at which the change specified by the gain is achieved however see #Q or S for full details
- Gain: the maximum boost or cut applied by the filter, i.e. the level at which the top or bottom of the shelf resides
- Channels: the channels to apply the filter to
The maximum Q allowed is 5 which, given the Q vs S issue described below, effectively equates to a maximum Q of ~1.5
As with the Peaking filter, this filter is defined in the RBJ Cookbook.
Q or S
DSP Studio asks the user to enter a value for Q when entering a shelf filter however it is important to realise this label is incorrect. This value is actually S as per the RBJ cookbook.
It is extremely important (for correct results) to realise this fact as most software that generates such filters will use Q as per its correct definition. You will need to manually calculate S from the given Q instead.
This is straightforward albeit the equation is somewhat intimidating as you need to solve
1/((((1/Q)^2-2)/((10^(d/40))+1/(10^(d/40))))+1)
where
- Q = the actual Q
- d = the required gain
One easy way to solve this is to enter the above equation into an online equation solver such as https://www.mathpapa.com/algebra-calculator.html and then enter the required values
For example, if we want a shelf filter with Q = 0.707 and a gain of +5dB then we need to enter Q = 0.99971 and gain = +5 into DSP Studio
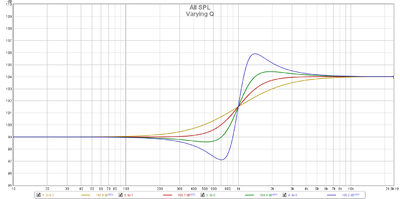
Effect of Changing S
This example shows a series of filters centred at 1000Hz with S of 0.5, 1, 2 and 5 and a +5dB gain
Notice two things
- how each curve crosses the same point at 1000Hz and that this frequency is the centre point of the shelf, i.e. +2.5dB in this example
- how S>1 overshoots
Peaking Shelf Filters
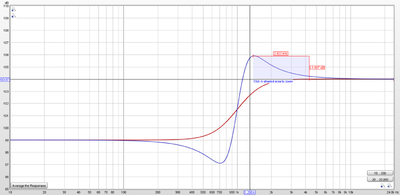
When S > 1 (which typically means a real Q > 0.707), the filter is somewhat unstable in that the shelf will overshoot at both ends of the shelf. This means the maximum boost/cut applied by the shelf filter will be greater than the entered gain.
Ignoring this can lead to clipping in your signal chain due to the (unexpected) excess gain.
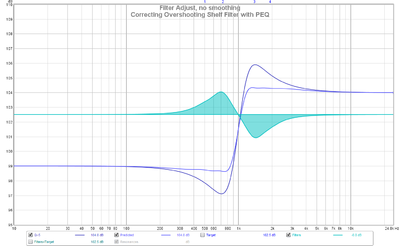
This example compares a +5dB high shelf at 1000Hz with S=1 vs S=5, the S=5 filter overshoots by ~1.9dB at each end
One option to avoid this problem is to use PEQ to correct the overshoot, in this example 2 filters are used to roughly correct each peak
Low vs High Shelf
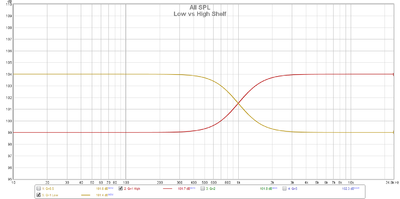
A positive low shelf is a filter whose (magnitude) response increases as frequency decreases. A positive high shelf is a filter whose (magnitude) response increases as frequency increases.
Negative High Shelf Filters
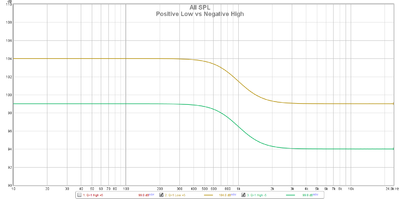
Now compare the positive low shelf to a negative high shelf, the 2 filters have exactly the same shape but the negative high shelf has a maximum value 5dB lower than the positive high shelf.
Put another way, the a negative high shelf achieves the same end result as a positive low shelf with a negative gain (volume) adjustment. This is important when digital signal headroom is limited (which is invariably is).
Adjust the Volume
This option changes the overall level of the signal within the specified channels.
2 values must be entered by the user:
- Gain: the level change in dB
- Channels: the channels to apply the adjustment to
Examples of where this is useful include:
- you have multiple speakers of different varieties in a surround setup and you need to level match them (though note the Room Correction DSP module also has level matching tools)
- you have applied boost via other PEQ filters and need to reduce the level to avoid clipping
Bitdepth Simulator
This option allows you to artificially reduce the bitdepth of the signal inside DSP studio to anything from 2 to 32 bits with or without dither. It is intended for testing purposes and is described in https://yabb.jriver.com/interact/index.php?topic=74999.0
Delay
This option allows you to apply different delays to different channels.
The delay can only be positive which, in distance terms, equates to a speaker which is closer to you, i.e. sound has less distance to travel so must be played later.
The screen allows you to enter arbitrarily precise values (e.g. 10.00001ms) however the actual resolution is dictated by the sample rate, for example approximately 0.02ms at 48kHz (i.e. 1/48000 seconds).
This feature can be useful in numerous scenarios, for example
- you have multiple speakers that are different distances from you (e.g. a surround sound system)
- if you're using an active crossover
- if you apply EQ to multiple subwoofers independently
Room Correction also provides the same functionality but expresses the delay as a distance which may be easier to use if you're just aligning surround channels by distance. However the units are larger in Room Correction so apply delay via DSP Studio if you need fine grained control over the delay or do not use the Room Correction module at all for some reason.
Divider
This option is purely for display purposes and is used to help break up blocks of filters used for different purposes. It has no impact on the signal chain at all.
Limiter
A limiter is a mechanism for preventing sounds that are louder than the specified limit being played on the selected channel(s).
Two types of limiters are provided and are described below.
Brick Wall Limiter
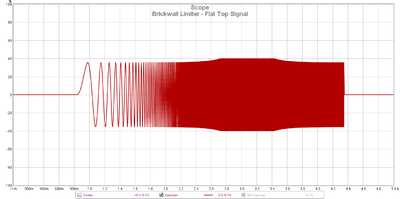
A brick wall limiter simply clips the signal so it keeps within the stated maximum value. It is more accurately named a "clipper" rather than a limiter. If the limit is set to -8 then no signal greater than -8dBFS will be allowed through and it will simply flat top clip the signal.
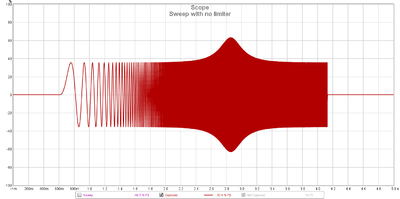
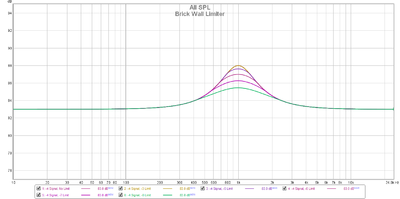
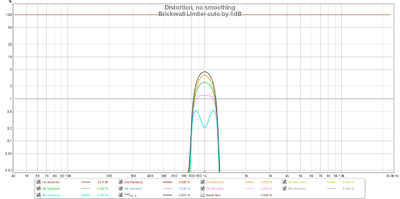
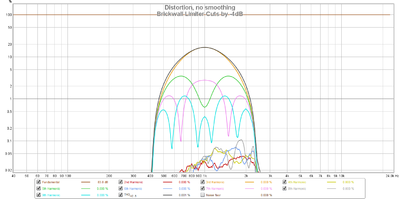
An example to illustrate, this is a +5dB PEQ with Q=1 at 1000Hz with a brick wall limiter set that cuts into the peak by +1dB each time.
The measurement signal without a limiter
The frequency response as the limiter bites deeper into the signal
The measured signal with the limiter cutting by 4dB, notice how the peak in the signal has been simply sliced off to produce a flat top.
The frequency response effect seems quite benign until you look at the distortion introduced as a result of that flat top.
- limiting by 1dB
- limiting by 4dB
tl;dr don't use a brick wall limiter!
Adaptive Limiter
An adaptive limiter is a type of dynamic compression that responds to peaks in the waveform, how quickly and aggressively the limiter is applied depends on the values specified. The following options are available:
- Attack (in microseconds)
- Hold (in milliseconds)
- Release (in milliseconds)
The default values are 3000, 10000 and 30000 respectively.
The precise definitions of these values is unclear, follow https://yabb.jriver.com/interact/index.php/topic,114561.0.html to see if we get a response from the developers.
Some further discussion can be found in this thread on interact - https://yabb.jriver.com/interact/index.php?topic=69319.0
Linkwitz Transform
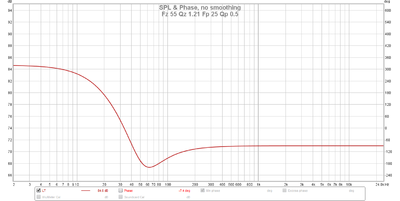
A loudspeaker driver in a sealed enclosure has response which is defined by two parameters:
- F: the system tuning frequency
- Q: the system quality factor
A linkwitz transform is a type of filter which is able to transform that response from one set of values for F & Q to another set.
MC refers to the current F and Q as Fz and Qz and the target F and Q as Fp and Qp.
Take care when using such a filter as it can result in a significant low frequency boost which could easily overload the speaker.
The "Adjust volume of all channels to prevent clipping" option is one approach to this problem, it simply applies a fixed -12dB level adjustment. I recommend not using this option and instead applying a cut equal to the size of the shelf introduced by the LT filter. This assumes you know the size of that shelf and if you don't then you cannot safely use this feature (so don't do it!).
An example to illustrate
References
A full description of this type of filter can be found in http://www.linkwitzlab.com/filters.htm#9
A practical guide to using this filter can be found in http://sound.whsites.net/linkwitz-transform.htm
The minidsp guide provides a spreadsheet that allows you to calculate the shape of the filter given various values, you can find this in https://www.minidsp.com/applications/advanced-tools/linkwitz-transform
Linkwitz-Riley
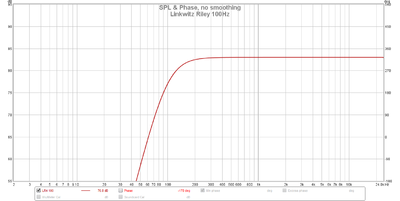
This option adds a 4th order Linkwitz-Riley (LR4) high pass filter to ALL channels. This, along with the lack of a corresponding low pass option, makes this option rather pointless.
The standard high & low pass filter options are 2nd order Butterworth (BW2) filters so you can just stack 2 of them to create an LR4 instead.
Mid-Side Decoding/Encoding
Mid-Side encoding is technique which converts a stereo signal to a mid channel and a sides channel. One use is as a mechanism for adjusting the stereo image in a recording.
The maths involved is a simple sum and difference matrix:
- L = M+S
- R = M-S
- M = L+R
- S = L-R
Encoding will place the output channel 1 as M and 2 as S and decoding will assume L carries the M and R carries the S.
WARNING: this feature may not work, see https://yabb.jriver.com/interact/index.php/topic,114567.0.html for details
Channel Limitations
There are no channel selectors in these options so this option is only suitable for stereo setups. However the mechanism for calculating M or S (or the reverse) can be implemented manually using the #Mix Channels option. However note that some spare channels will be required to achieve this, e.g.
- copy L to U1
- copy R to U2
- add R to L
- -3dB on L
- subtract U2 from U1
- -3dB on U1
- move U1 to R
Note the level adjustments are required to maintain the correct levels (as described in https://www.soundonsound.com/sound-advice/q-how-does-mid-sides-recording-actually-work)
Mixing
The mixing option allows you to mix and/or route content on a per channel basis. This enables things like;
- active speakers
- custom up/down mixing
- using an array of speakers for a single channel (e.g. a rear surround array)
Each mixing filter requires you to select 4 options
- Source
- Destination
- Mode
- Gain (dB)
Source and destination specified the named channels upon which the mode operates. There are 5 modes, each of which provides some explanatory text:
- Copy (replace destination with source)
- Move (replace destination with source and empty source)
- Swap (swap source and destination)
- Add (add source to destination)
- Subtract (subtract source from destination)
- another way to think of this is invert polarity of source and add to destination
If set, the gain option is applied to the source channel before the mix operation is performed.
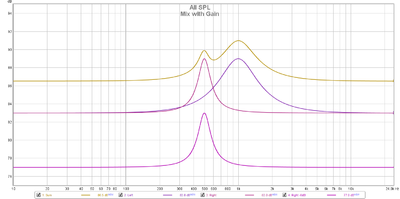
This example shows
- Left Channel has +6dB Q=3 at 500Hz
- Right Channel has +6dB Q=1 at 1000Hz
- Sum shows "Add Right to Left with -6dB gain", this means
- reduce right by 6dB
- add to Left
Managing Digital Headroom when Mixing
This primarily affects the add option.
If you add 2 channels together then the new summed channel can have a new peak level of upto 6dB higher. This worst case scenario occurs if two waves are exactly in phase.
It typically means that adding channels together must be accompanied by a corresponding gain reduction applied to the resulting channel to avoid compression (or clipping depending on how the rest of DSP studio is configured).
Spare Mixing Channels
The mix option provides 2 additional, empty, channels named User 1 and User 2 which can be used as a temporary working area. The mid-side encoding example given in #Channel Limitations makes use of these channels.
Mute
This option mutes the specified channels, i.e. it replaces the content with silence.
Order Channels
This options provides a means to reorder the channels. This can be used instead of the #Mixing option if you have to move a lot of channels around. However this option suffers the limitation of only supporting the named 7.1 channels so it's a fairly niche option.
Remove High Frequencies (low pass filter)
This option allows you to apply a low pass filter to the specified channels.
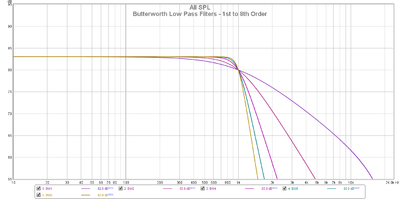
The filter is a minimum phase Butterworth filter with a selectable order:
- 6dB/octave (1st order) aka BW1
- 12dB/octave (2nd order) aka BW2
- 24dB/octave (4th order) aka BW4
- 36dB/octave (6th order) aka BW6
- 48dB/octave (8th order) aka BW8
Such filters are primarily used for active crossovers.
Creating Linkwitz-Riley Filters
A linkwitz-riley filter can be created by applying 2 butterworth filters.
For example
- applying 2 BW1 filters will create an LR2 filter
- applying 2 BW2 filters will create an LR4 filter
- applying 2 BW4 filters will create an LR8 filter
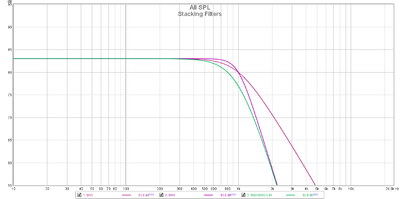
This example compares BW2 and BW4 to LR4.
Remove Low Frequencies (high pass filter)
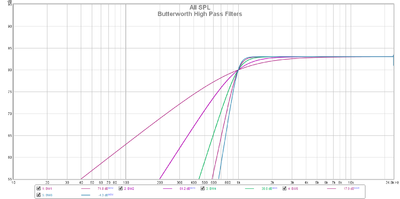
This option allows you to apply a high pass filter to the specified channels.
The filter types and use are as per the low pass filters, i.e. they are minimum phase butterworth filters which can be stacked to create linkwitz-riley filters.
Reverse Polarity
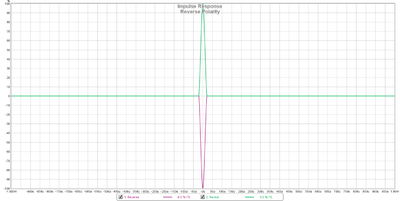
This option reverses the absolute polarity of the selected channel(s). The impact on the impulse can be seen in this measurement comparing two signals, one with inverted polarity and the other with normal polarity.
This can be useful in a number of scenarios, for example:
- if your speakers are wired backwards
- you're using an active crossover with certain types of filters
- to improve the integration of multiple subwoofers
Room Correction also provides an option to reverse polarity on a speaker by speaker basis.
See http://en.wikipedia.org/wiki/Absolute_phase#Sound_reproduction for further details on what polarity means in this context.
Subwoofer Limiter
The subwoofer limiter feature was introduced via https://yabb.jriver.com/interact/index.php?topic=62012.0
WARNING: this feature might be broken, see https://yabb.jriver.com/interact/index.php/topic,114574.0.html for details
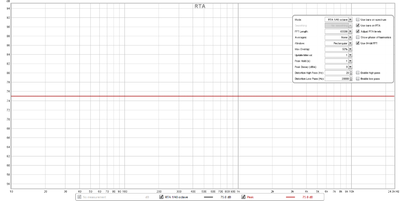
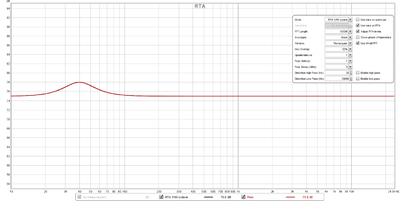
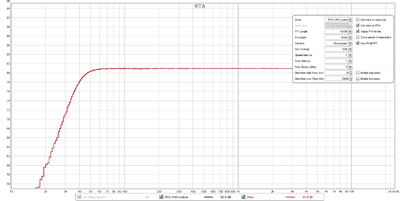
These graphs illustrate how it it behaves
- limiter is inactive
- limiter is active, signal is below the level required (limiter is boosting == seems broken to me, see thread below)
- limiter is active, signal has just triggered the limit
- limiter is active, 1dB is added to signal, limiter in full effect (behaves like a BW4 at 40Hz)
