Library Manager: Difference between revisions
No edit summary |
|||
| Line 57: | Line 57: | ||
* Import: opens the Media Import dialog |
* Import: opens the Media Import dialog |
||
* Library Options: opens Options > Library & Folders |
* Library Options: opens Options > Library & Folders |
||
* Clear Library: |
* Clear Library: '''Erases''' the current Library and resets the it back to the defaults (with '''no media imported'''). |
||
* Sync Library: Allows you to sync this local library with one served by another copy of Media Center on the network. |
* Sync Library: Allows you to sync this local library with one served by another copy of Media Center on the network. |
||
* Export to XML: Exports the Library to an XML File |
* Export to XML: Exports the Library to an XML File |
||
Revision as of 00:23, 3 October 2014
- See also: Library
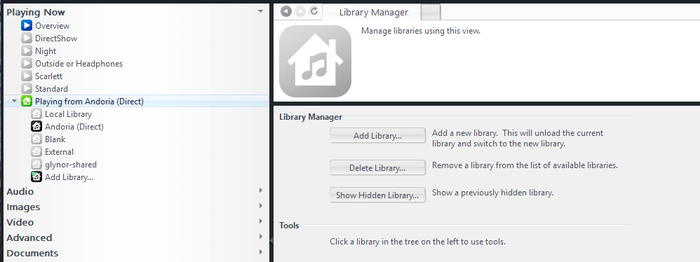
The Library Manger allows the user to create and maintain multiple, independent Libraries (databases). This can be useful in a multiple user environment, or when a specialized library is needed. Here are some of the ways that multiple libraries can be used:
- You can create a library for each member of the house. Members import only those files they like. They can also rate their music in their own way. You may want to disable tag updating in this scenario.
- You can create a library for Party Music. When your friends come over, they see the music they are supposed to see (and your collection of Engelbert Humperdinck albums remains your secret!). See Party Mode and Access Control for a different way of doing this.
- On a laptop that you use both at home and on the go, you could have two libraries: one for home use accessing a network drive containing the losslessly compressed content, and one containing smaller (lossy compressed) content for travel.
- You might want to keep your audio, images, and video separated from each other so you could create a separate library for each.
Finding the Library Manager
- In the Tree, go to Playing Now > Playing from <Current Library's Name>
Also see Advanced Import Options for information about updating existing libraries and fixing broken links.
Working with Libraries
Adding a Library
- Click Add Library.
- In the Name field, give the new library a name.
- Select a Library Type:
- Library Server: This is used to access the Media Server of another copy of MC running on the network. Enter the remote server's Access Key or network address.
- Local Library: This is used to create a new Library on a local disk. Please remember that MC performs best with its Library on a fast disk (slow external and network drives are not recommended).
Loading a Library
To Load a Library Using the Library Manager:
- Select the Library you'd like from the ones available under the Library Manager in the Tree.
- Click the Load Library button on the right.
To Load a Library Via The Command Line:
Run the Media Center launcher utility with the following command line parameters:
MC<current version>.exe /Library <library name>
For example
mc19.exe /Library "Only ABBA Library"
Managing Libraries
When you select an existing Library under the Library Manager, it provides information on the Library's location and size in the view header on the right-hand side. For any selected Library, you may:
- Rename it.
- Clone it to create a new, independent copy of the Library.
If you select the currently loaded Library, you can also create and restore backups:
- Back Up the current Library to a ZIP file on disk.
- Restore (overwrite) this Library with a previous backup.
And there are additional tools available for managing the current Library:
- Import: opens the Media Import dialog
- Library Options: opens Options > Library & Folders
- Clear Library: Erases the current Library and resets the it back to the defaults (with no media imported).
- Sync Library: Allows you to sync this local library with one served by another copy of Media Center on the network.
- Export to XML: Exports the Library to an XML File
