WebGizmo: Difference between revisions
No edit summary |
(→More) |
||
| (18 intermediate revisions by 3 users not shown) | |||
| Line 1: | Line 1: | ||
WebGizmo is no longer supported. Please see [https://wiki.jriver.com/index.php/Panel Panel] |
|||
[[File:WebGizmo.jpg|400px|thumb|center|alt WebGizmo]] |
[[File:WebGizmo.jpg|400px|thumb|center|alt WebGizmo]] |
||
| Line 6: | Line 8: | ||
== Introduction == |
== Introduction == |
||
WebGizmo |
WebGizmo provides remote streaming and remote control for JRiver Media Center. It runs in a browser but looks and acts like an application. This allows you to run it on an iPhone, iPad, netbook, or any other device that has a browser. |
||
Its interface is nearly identical to that of [http://wiki.jriver.com/index.php/Gizmo Gizmo], JRiver's remote control app for Android. |
|||
WebGizmo was introduced in JRiver Media Center 17.0. |
WebGizmo was introduced in JRiver Media Center 17.0. |
||
== Instructions== |
== Instructions== |
||
'''In Media Center''' |
|||
In MC (17.0.64 or greater), turn on Media Network under Tools/Options/Media Network. |
|||
'''In Your Browser''' |
|||
Using MC17.0.122 or higher, you can use this page: |
|||
http://jriver.com/webgizmo.html |
|||
Or you can enter this link in your browser: |
|||
http://wg.jriver.com/your_access_key (replace your_access_key with the six character Access Key that you can find in Tools / Options / Media Network. |
|||
You can save this link as a favorite in your browser. |
|||
'''Using older versions''' |
|||
In a browser on your tablet, connect to MC by entering a URL in this |
In a browser on your tablet, connect to MC by entering a URL in this |
||
form: |
form: |
||
[ip address or machine name]:52199 |
[ip address or machine (host) name]:52199 |
||
For example, on an internal network, you might enter this: |
For example, on an internal network, you might enter this: |
||
| Line 22: | Line 42: | ||
192.168.1.111:52199 (note the colon before 52199) |
192.168.1.111:52199 (note the colon before 52199) |
||
You should then see a web page menu that MC has generated. |
You should then see a web page menu that MC has generated. |
||
[[File:MediaNetworkHome.jpg|300px|thumb|center|alt Media Network Home]] |
|||
On that menu, select WebGizmo. |
|||
Alternatively, using the example above, enter 192.168.1.111:52199/Gizmo/mode.html to take you straight to WebGizmo. |
|||
'''WebGizmo''' |
|||
Under "Play to", select the device you will play to. The first one, "This Location", is the remote itself. The second should be the server you're playing from, and would be the usual choice when you're across the room from it. |
Under "Play to", select the device you will play to. The first one, "This Location", is the remote itself. The second should be the server you're playing from, and would be the usual choice when you're across the room from it. |
||
| Line 29: | Line 58: | ||
Volume and position can be set on the Playing Now screen. |
Volume and position can be set on the Playing Now screen. |
||
== Modifying Views == |
|||
Do you want to organise the display of TV Series, Seasons and Episodes in you WebGizmo? The following set of instructions will give you that. They insert a new Video Menu item called TV Series. On clicking this, you will see your TV Series listed. Clicking on one of these will list the Seasons in that Series. Clicking on a Season will give you the Episodes in that Season. |
|||
So, step by step: |
|||
1. Go to Tools > Options > Media Network > Advanced and select "Customise views for Gizmo and WebGizmo. |
|||
2. In the pop-up window, on the left, select Video. Click Add and choose Library Item. |
|||
3. In this window, change the name to TV Series. |
|||
4. To the right of this window, click Add > Library Field and select the field Series. |
|||
5. Click Add > Library Field again and select Season. |
|||
6. Click Add > Expression. Name the expression Program. In the Expression box, paste this: TVInfo(SeriesDisplay) |
|||
7. The order in the box should be Series, Season, Program. If it isn't, drag them to the correct order. |
|||
8. Click OK to close all the windows and you are done. |
|||
9. You will need to restart MC17 client and server (the server is found in the system tray, probably amongst your hidden icons). |
|||
== More == |
== More == |
||
A [http://yabb.jriver.com/interact/index.php?topic= |
A [http://yabb.jriver.com/interact/index.php?topic=68615.0 Thread on Interact]. |
||
WebGizmo will replace WebPlay and WebRemote. |
WebGizmo will replace WebPlay and WebRemote. |
||
[[Category: Frequently Asked Questions]] |
|||
Latest revision as of 21:29, 15 April 2022
WebGizmo is no longer supported. Please see Panel
Introduction
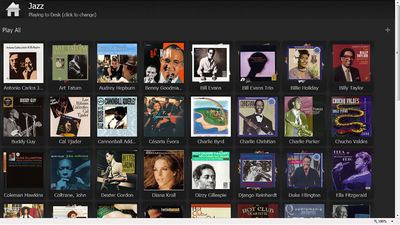
WebGizmo provides remote streaming and remote control for JRiver Media Center. It runs in a browser but looks and acts like an application. This allows you to run it on an iPhone, iPad, netbook, or any other device that has a browser.
Its interface is nearly identical to that of Gizmo, JRiver's remote control app for Android.
WebGizmo was introduced in JRiver Media Center 17.0.
Instructions
In Media Center
In MC (17.0.64 or greater), turn on Media Network under Tools/Options/Media Network.
In Your Browser
Using MC17.0.122 or higher, you can use this page:
http://jriver.com/webgizmo.html
Or you can enter this link in your browser:
http://wg.jriver.com/your_access_key (replace your_access_key with the six character Access Key that you can find in Tools / Options / Media Network.
You can save this link as a favorite in your browser.
Using older versions
In a browser on your tablet, connect to MC by entering a URL in this form:
[ip address or machine (host) name]:52199
For example, on an internal network, you might enter this:
192.168.1.111:52199 (note the colon before 52199)
You should then see a web page menu that MC has generated.
On that menu, select WebGizmo.
Alternatively, using the example above, enter 192.168.1.111:52199/Gizmo/mode.html to take you straight to WebGizmo.
WebGizmo
Under "Play to", select the device you will play to. The first one, "This Location", is the remote itself. The second should be the server you're playing from, and would be the usual choice when you're across the room from it.
The home icon in the upper left will take you back to the home page. You can select a different device to play to by tapping the top bar.
Volume and position can be set on the Playing Now screen.
Modifying Views
Do you want to organise the display of TV Series, Seasons and Episodes in you WebGizmo? The following set of instructions will give you that. They insert a new Video Menu item called TV Series. On clicking this, you will see your TV Series listed. Clicking on one of these will list the Seasons in that Series. Clicking on a Season will give you the Episodes in that Season.
So, step by step:
1. Go to Tools > Options > Media Network > Advanced and select "Customise views for Gizmo and WebGizmo.
2. In the pop-up window, on the left, select Video. Click Add and choose Library Item.
3. In this window, change the name to TV Series.
4. To the right of this window, click Add > Library Field and select the field Series.
5. Click Add > Library Field again and select Season.
6. Click Add > Expression. Name the expression Program. In the Expression box, paste this: TVInfo(SeriesDisplay)
7. The order in the box should be Series, Season, Program. If it isn't, drag them to the correct order.
8. Click OK to close all the windows and you are done.
9. You will need to restart MC17 client and server (the server is found in the system tray, probably amongst your hidden icons).
More
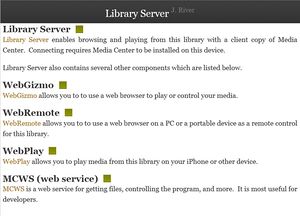
WebGizmo will replace WebPlay and WebRemote.

