Create Recorded TV in Theater View: Difference between revisions
(→Step 5) |
No edit summary |
||
| (17 intermediate revisions by the same user not shown) | |||
| Line 1: | Line 1: | ||
Media Center comes with some default Theater View items, such as Video > Movies, and Video > Shows. Some users don't like the separation between Movies and Shows, especially if the videos are recorded from TV devices. This wiki guide you through steps of creating a "Recorded TV" item in Theater View that will include both Movies and Shows. |
Media Center comes with some default Theater View items, such as Video > Movies, and Video > Shows. Some users don't like the separation between Movies and Shows, especially if the videos are recorded from TV devices. This wiki guide you through steps of creating a "Recorded TV" item in Theater View that will include both Movies and Shows. |
||
==Step 1== |
==Step 1. Open Theater View Options== |
||
Tools > Options... (Ctrl-O). |
1.1. Tools > Options... (Ctrl-O). |
||
| ⚫ | |||
| ⚫ | |||
==Step 2. Create a new item== |
|||
| ⚫ | |||
==Step 3== |
|||
In the lower portion of the window, under "Items To Show", select "Video". |
2.1. In the lower portion of the window, under "Items To Show", select "Video". |
||
| ⚫ | |||
==Step 4== |
|||
| ⚫ | |||
[[image:New Library Item.png]] |
[[image:New Library Item.png]] |
||
| ⚫ | 2.3. Notice also that the new item is at the same level as Audio, Video, etc. We would like it nested under Video (as a subitem of Video). To achieve that, first click "Move down" button. This moves the item to a lower position, below all items nested under Video, and above "Images". Next click the "Nest" button. Now the item is nested under Video (you notice that the item name is indented to the right a notch). We would like this item to be at the top of the Video group, by clicking "Move Up" button repeatedly, until it reaches the top of the Video group. See Screenshot. |
||
==Step 5== |
|||
'''If you don't want the item to be nested under Video, then you should skip this step and just keep the item in the root location.''' |
|||
| ⚫ | Notice also that the new item is at the same level as Audio, Video, etc. We would like it nested under Video (as a subitem of Video). To achieve that, first click "Move down" button. This moves the item to a lower position, below all items nested under Video, and above "Images". Next click the "Nest" button. Now the item is nested under Video (you notice that the item name is indented to the right a notch). We would like this item to be at the top of the Video group, by clicking "Move Up" button repeatedly, until it reaches the top of the Video group. See Screenshot. |
||
[[image:New Item nested under Video.png]] |
[[image:New Item nested under Video.png]] |
||
==Step 6== |
|||
The item is still called "New Library Item". Let's change it to "Recorded TV", by editing the "Name" edit box, under "Details". |
2.4. The item is still called "New Library Item". Let's change it to "Recorded TV", by editing the "Name" edit box, under "Details". |
||
==Step |
==Step 3. Set up rules== |
||
Click "Set rules for file display...". |
|||
| ⚫ | |||
[[image:Set rules for new item.png]] |
|||
| ⚫ | |||
| ⚫ | |||
satisfy the rule "Media Sub Type is Movie." We need to make the second and the third rules relate to each other by an "OR" relationship. |
|||
A window pops up, with an empty rule created. |
|||
| ⚫ | |||
You will notice that each time you click, either a '(' or a '[' or a combination of both, like "([", or "[(" appears. Keep clicking, these combinations cycle through. We want to stop at a single '(', i.e. a single left parenthesis. |
|||
| ⚫ | |||
[[image:Rule 1 Media Type is Video.png]] |
|||
| ⚫ | |||
| ⚫ | 3.3. Create a third rule by clicking "Add New Rule." Try making this rule "Media Sub Type is TV Show". Oops, you find that you cannot choose "TV Show", as the only choice now is "Movie". The reason is that these three rules, as created so far, are related to each other by "AND" relationship. All three rules must be satisfied. You cannot satisfy the rule "Media Sub Type is TV Show" at the same time also satisfy the rule "Media Sub Type is Movie." We need to make the second and the third rules relate to each other by an "OR" relationship. |
||
| ⚫ | 3.4. To specify an OR relationship, we use a pair of parenthesis (round brackets) to enclose the rules that are to be ORed together. First, click the little space to the left of the second rule. You will notice that each time you click, either a '(' or a '[' or a combination of both, like "([", or "[(" appears. Keep clicking, these combinations cycle through. We want to stop at a single '(', i.e. a single left parenthesis. |
||
Next click the little space at the end of the third rule, until you see a single right parenthesis, i.e. ')'. |
Next click the little space at the end of the third rule, until you see a single right parenthesis, i.e. ')'. |
||
3.5. Now you can select "TV Show" from the right-most dropdown list of the third rule. See screenshot below. |
|||
| ⚫ | |||
[[image:Rules With OR relationship.png]] |
|||
==Step 8== |
|||
| ⚫ | |||
==Step 4. Set up display options== |
|||
You will notice that stock items such as "Movies" and "Shows" have subitems in them. Let us create one similar to "Shows > Recent". |
You will notice that stock items such as "Movies" and "Shows" have subitems in them. Let us create one similar to "Shows > Recent". |
||
4.1. Select "Recorded TV" item that we have just created, and click "Add..." and choose "Library Item". A new item is created, right under "Recorded TV" (this time it is nested correctly, so we don't need to adjust its position and nesting). Name this item "Recent". |
|||
4.2. Select the newly created "Recent" item. Clear checkboxes in Options. Click "Set rules for file display". On the resulting window, leave the "Rules" empty. Under "Modify Results", choose "Sort by" from the left side dropdown list. Then click "Add..." button and choose "Descending (Z to A)", and then "Date Imported". The result is shown in the screenshot below. Click OK to finish. |
|||
the left side dropdown list. Then click "Add..." button and choose "Descending (Z to A)", and then "Date Imported". The result is shown in the screenshot below. Click OK to finish. |
|||
==Step 9== |
|||
[[image:Modify sorting.png]] |
|||
| ⚫ | |||
| ⚫ | |||
Click OK to exit Options window. |
Click OK to exit Options window. |
||
==Step |
==Step 6. Test== |
||
(Optional) Go to Theater View and test it out. |
(Optional) Go to Theater View and test it out. |
||
| ⚫ | |||
[[Category:Frequently Asked Questions]] |
|||
[[Category:Setup]] |
|||
[[Category:Tutorials]] |
|||
[[Category: Television]] |
|||
[[Category:Video]] |
|||
Latest revision as of 16:17, 29 November 2023
Media Center comes with some default Theater View items, such as Video > Movies, and Video > Shows. Some users don't like the separation between Movies and Shows, especially if the videos are recorded from TV devices. This wiki guide you through steps of creating a "Recorded TV" item in Theater View that will include both Movies and Shows.
Step 1. Open Theater View Options
1.1. Tools > Options... (Ctrl-O).
1.2. Select "Theater View" from the left pane.
Step 2. Create a new item
2.1. In the lower portion of the window, under "Items To Show", select "Video".
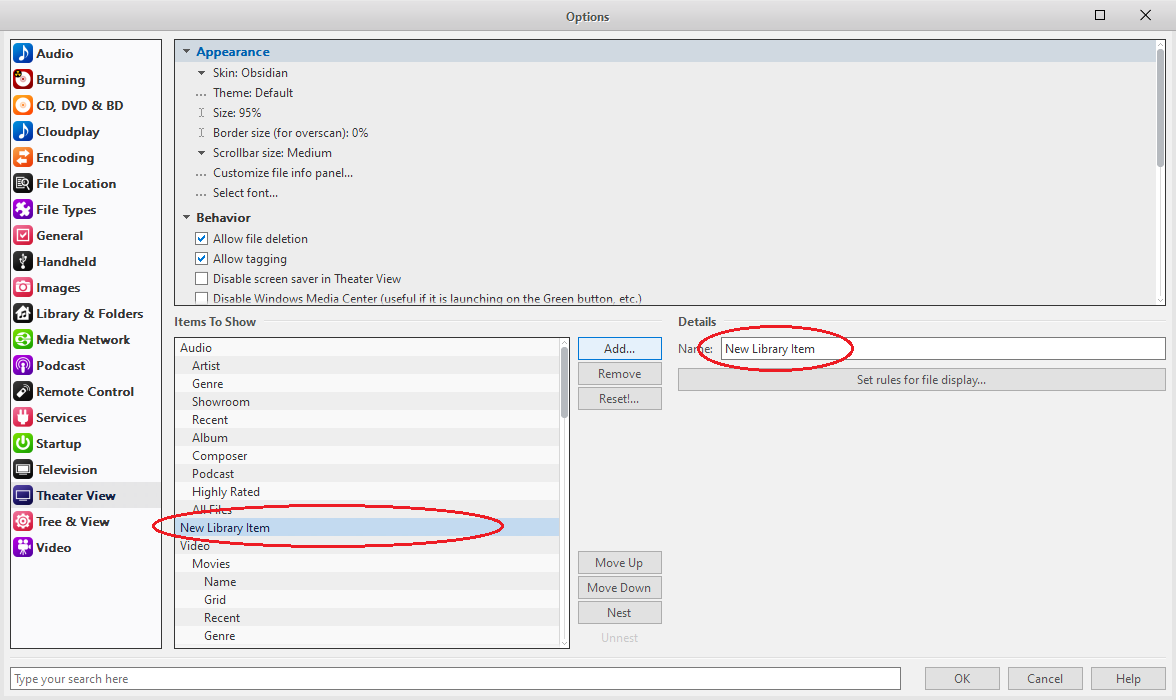
2.2. Click "Add..." and choose "Library Item". Notice that a new item is created, called "New Library Item". See screenshot below.
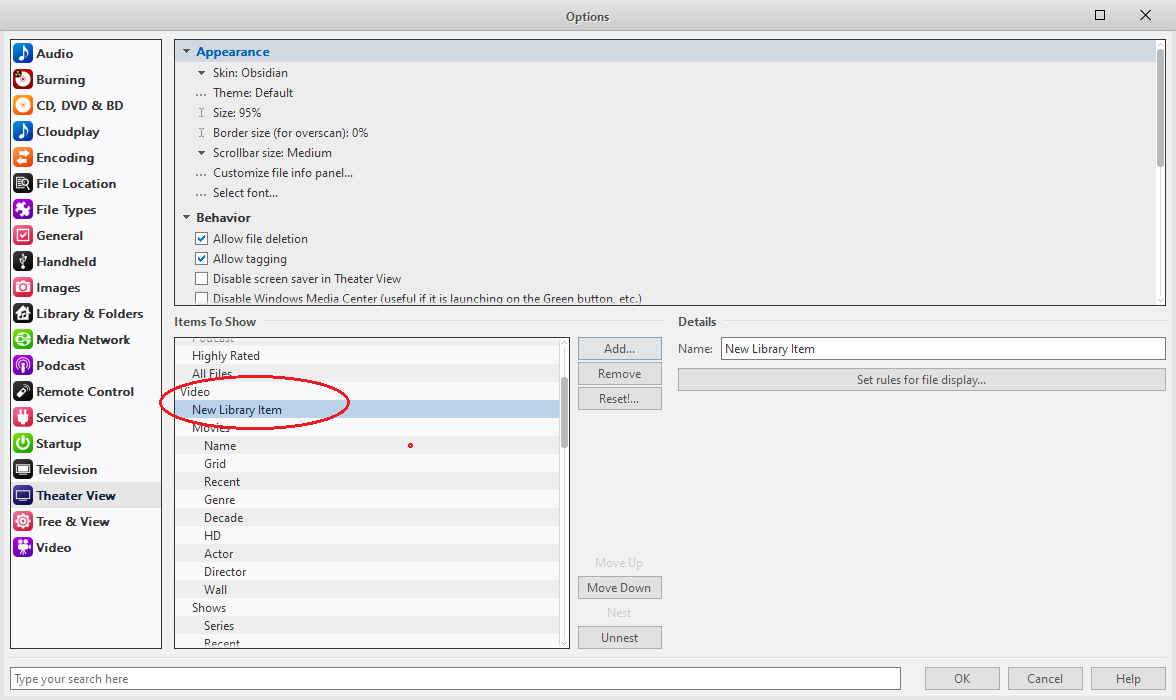
2.3. Notice also that the new item is at the same level as Audio, Video, etc. We would like it nested under Video (as a subitem of Video). To achieve that, first click "Move down" button. This moves the item to a lower position, below all items nested under Video, and above "Images". Next click the "Nest" button. Now the item is nested under Video (you notice that the item name is indented to the right a notch). We would like this item to be at the top of the Video group, by clicking "Move Up" button repeatedly, until it reaches the top of the Video group. See Screenshot.
If you don't want the item to be nested under Video, then you should skip this step and just keep the item in the root location.
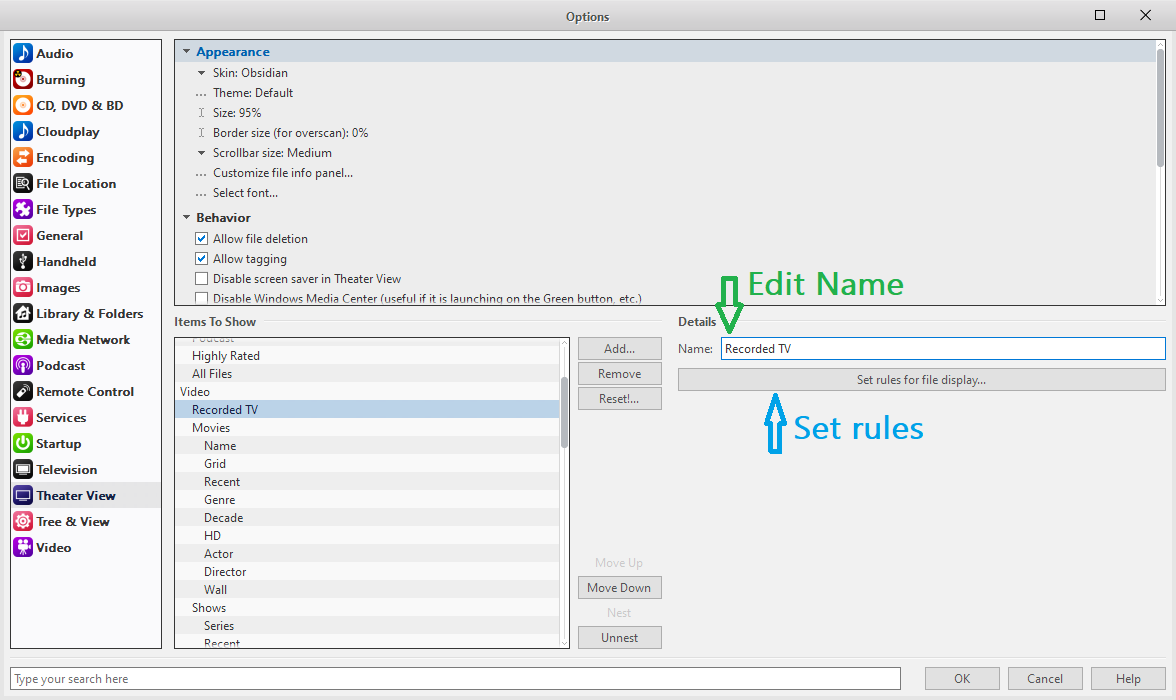
2.4. The item is still called "New Library Item". Let's change it to "Recorded TV", by editing the "Name" edit box, under "Details".
Step 3. Set up rules
Click "Set rules for file display...".
A window pops up, with an empty rule created.
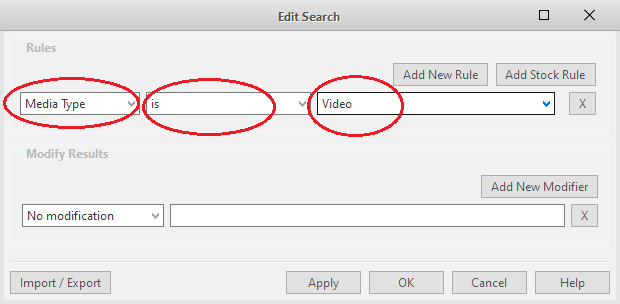
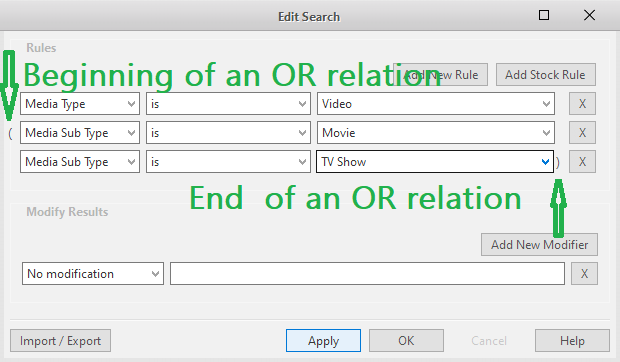
3.1. We make the first rule "media type is video", by selecting from the three dropdown lists, "Media Type", "is", "Video". See screenshot.
3.2. Create a second rule by clicking "Add New Rule." Make this second rule "Media Sub Type is Movie", by selecting appropriate items from the three dropdown lists.
3.3. Create a third rule by clicking "Add New Rule." Try making this rule "Media Sub Type is TV Show". Oops, you find that you cannot choose "TV Show", as the only choice now is "Movie". The reason is that these three rules, as created so far, are related to each other by "AND" relationship. All three rules must be satisfied. You cannot satisfy the rule "Media Sub Type is TV Show" at the same time also satisfy the rule "Media Sub Type is Movie." We need to make the second and the third rules relate to each other by an "OR" relationship.
3.4. To specify an OR relationship, we use a pair of parenthesis (round brackets) to enclose the rules that are to be ORed together. First, click the little space to the left of the second rule. You will notice that each time you click, either a '(' or a '[' or a combination of both, like "([", or "[(" appears. Keep clicking, these combinations cycle through. We want to stop at a single '(', i.e. a single left parenthesis. Next click the little space at the end of the third rule, until you see a single right parenthesis, i.e. ')'.
3.5. Now you can select "TV Show" from the right-most dropdown list of the third rule. See screenshot below.
3.6. Click OK to finish setting up the rules.
Step 4. Set up display options
You will notice that stock items such as "Movies" and "Shows" have subitems in them. Let us create one similar to "Shows > Recent".
4.1. Select "Recorded TV" item that we have just created, and click "Add..." and choose "Library Item". A new item is created, right under "Recorded TV" (this time it is nested correctly, so we don't need to adjust its position and nesting). Name this item "Recent".
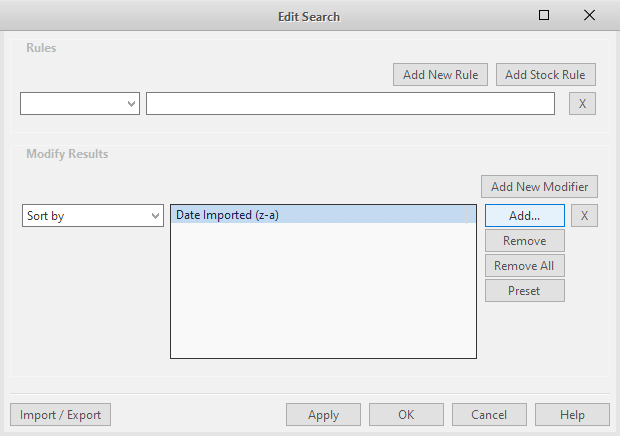
4.2. Select the newly created "Recent" item. Clear checkboxes in Options. Click "Set rules for file display". On the resulting window, leave the "Rules" empty. Under "Modify Results", choose "Sort by" from the left side dropdown list. Then click "Add..." button and choose "Descending (Z to A)", and then "Date Imported". The result is shown in the screenshot below. Click OK to finish.
Note that in this step, we use "Date Imported". You could choose to use "Date Recorded" instead. Normally there is no difference, as MC imports a show when it is being recorded. But if you record a show using another app, and import it a long time later, then there is a difference.
Step 5. Finish
Click OK to exit Options window.
Step 6. Test
(Optional) Go to Theater View and test it out.
