Create a Smartlist: Difference between revisions
Jump to navigation
Jump to search
No edit summary |
No edit summary |
||
| (12 intermediate revisions by 3 users not shown) | |||
| Line 1: | Line 1: | ||
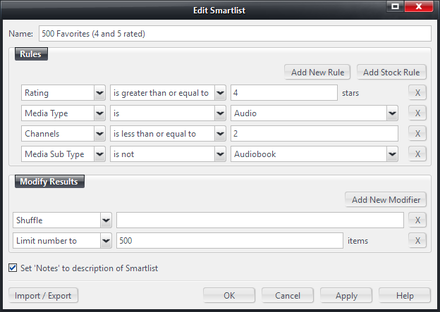
[[File:Smartlist-Editor Example.png|thumb|440px|right|An example of a Smartlist open in the Smartlist Editor.]] |
|||
{{see also|Smartlists}} |
|||
You can create a new Smartlist in any one of the following ways: |
You can create a new Smartlist in any one of the following ways: |
||
{| border="1" |
|||
|-valign="top" |
|||
|Toolbar |
|||
|[[Image:image55_15.png]] |
|||
|-valign="top" |
|||
|Right click |
|||
|on Playlists or a Playlist Group in the tree, and select "Add Smartlist" |
|||
|-valign="top" |
|||
|Menu bar |
|||
|Edit > Add Smartlist |
|||
|-valign="top" |
|||
|Keyboard |
|||
|F9 |
|||
|} |
|||
* Right click on the '''Playlists''' item in the [[Tree]], or one of the [[Playlist Groups]], and choose ''Add Smartlist'' |
|||
Name the smartlist, assign it to a Playlist Group if required and then enter the rules. You can use default rules by selecting the drop-down list next to "Smartlist Rule", or you can select the Advanced button for more options. |
|||
* Press '''F9''' on your Keyboard. |
|||
* Click the [[Toolbar]] button, if visible: [[File:Toolbar Icons-Add Smartlist.png]] |
|||
Name the Smartlist if required and then enter the rules. For more information on editing managing Smartlists, please refer to [[Smartlists|the full article]]. |
|||
<br \> |
|||
<br \> |
|||
Tip: You can create a Smartlist containing the database entries for files that were seen as bad or previously removed so that you can delete them and retry an import if the files were previously unrecognized. |
|||
* Right click on the '''Playlists''' item in the [[Tree]], or one of the [[Playlist Groups]], and choose ''Add Smartlist'' |
|||
You can add notes to your Smartlist. Once it is created, select it in the tree if it isn’t already selected, and click in the upper Display Pane where it says “Click here to add notes”. |
|||
* Name it "Bad or Removed" |
|||
* Set the '''Media Type is''' and check all of the possibilities ('''Audio''', '''empty''', '''data''', etc) |
|||
* Under Modify Results: '''Limit Database to''' choose '''Removed''' and '''Bad''' |
|||
* Hit Ok. |
|||
A Smartlist will be created that has all of the inactive database entries in it.<br \> |
|||
==Advanced button== |
|||
Select it, hit Ctrl-A on it to select all and hit delete.<br \> |
|||
Refresh the view and do it a second time if there are still some entries after refresh.<br \> |
|||
[[Category:Playlists]] |
|||
When you select the Advanced button, you can do one of two things. |
|||
* Start typing the rules according to Smartlist and Search – Rules and Modifiers; or |
|||
* Select the arrow on the left of the Smartlist Rule field to display a drop-down box with more options. These options include many of the most popular fields (Artist, Genre, etc), but for even more options, select More Fields in the drop down menu. |
|||
Latest revision as of 19:41, 26 July 2018
- See also: Smartlists
You can create a new Smartlist in any one of the following ways:
- Right click on the Playlists item in the Tree, or one of the Playlist Groups, and choose Add Smartlist
- Press F9 on your Keyboard.
- Click the Toolbar button, if visible:

Name the Smartlist if required and then enter the rules. For more information on editing managing Smartlists, please refer to the full article.
Tip: You can create a Smartlist containing the database entries for files that were seen as bad or previously removed so that you can delete them and retry an import if the files were previously unrecognized.
- Right click on the Playlists item in the Tree, or one of the Playlist Groups, and choose Add Smartlist
- Name it "Bad or Removed"
- Set the Media Type is and check all of the possibilities (Audio, empty, data, etc)
- Under Modify Results: Limit Database to choose Removed and Bad
- Hit Ok.
A Smartlist will be created that has all of the inactive database entries in it.
Select it, hit Ctrl-A on it to select all and hit delete.
Refresh the view and do it a second time if there are still some entries after refresh.
