TV Setup: Difference between revisions
No edit summary Tag: Manual revert |
|||
| (31 intermediate revisions by 2 users not shown) | |||
| Line 1: | Line 1: | ||
JRiver can record and play Television from several sources. |
|||
MC 20 introduced a television setup wizard to make setting up television viewing and recording easier. |
|||
The JRiver forum has a dedicated [https://yabb.jriver.com/interact/index.php?board=11.0 TV Board]. |
|||
== |
==Setup Wizard== |
||
To start the wizard, go to MC's Standard View and click Television on the left panel. If you have never |
To start the wizard, go to MC's Standard View and click Television on the left panel. If you have never set up television in MC before, you will see the following: |
||
[[File:Television Empty Guide window.png]] |
[[File:Television Empty Guide window.png]] |
||
| Line 12: | Line 14: | ||
Double-click on the text "Double-click here to run television setup." in the middle of the window on the right, to start the Setup Wizard. |
Double-click on the text "Double-click here to run television setup." in the middle of the window on the right, to start the Setup Wizard. |
||
Note that if you have |
Note that if you have set up TV in any way in the past, the window may be filled with programming guide information instead of the text "Double-click here to run television setup.". You can still start (or re-start) the wizard by going into Television properties page, by clicking the "TV Options..." button in the lower part of MC window. The Television property page can also be accessed through the menu, Tools > Options, and clicking Television on the left panel. Here is what it looks like: |
||
[[File:Television Properties.png]] |
[[File:Television Properties.png]] |
||
You can click "Setup..." under General (near the top of the window) to start the Setup wizard. |
You can click "Setup..." under General (near the top of the window) to start the Setup wizard. With build 94 or later of MC23 you can also start the Setup wizard by a right-click menu on "Television" branch in the left pane. |
||
If you have |
If you have previously set up television in MC in any way, then you may see the following window popping up before the actual wizard starts. |
||
[[File:Clean up options.png]] |
[[File:Clean up options.png]] |
||
You can check any or all checkboxes to perform various degree of cleaning up. Check all boxes if you want to do a complete reset. Click OK to continue. |
You can check any or all checkboxes to perform various degree of cleaning up. Check all boxes if you want to do a complete reset. Check nothing if you want to keep all existing data and settings, but only want to add additional profiles. Click OK to continue. Clicking Cancel will cancel the entire Setup process. |
||
The popup will not be shown for users setting up Television for the first time. |
The popup will not be shown for users setting up Television for the first time. |
||
| Line 57: | Line 59: | ||
==Service type== |
==Service type== |
||
[[File:TV Setup Service Type.png]] |
[[File:TV Setup Service Type 2020-06-03.png]] |
||
This page presents a list of service types. Pick one that you would like to setup. |
This page presents a list of service types. Pick one that you would like to setup. |
||
| Line 63: | Line 65: | ||
'''Antenna (over the air)''' |
'''Antenna (over the air)''' |
||
Choose this if you are setting up television reception through an antenna (either digital antenna, such as ATSC, DVB-T, or analog antenna). |
Choose this if you are setting up television reception through an antenna (either digital antenna, such as ATSC, DVB-T, or analog antenna). For ATSC 3.0 support, see note near the end of this section. |
||
'''Digital cable or satellite''' |
'''Digital cable or satellite''' |
||
| Line 76: | Line 78: | ||
Select this if you want to set up a video capture device to capture video from a custom feed. There will be no programming guide for this service type since it is technically not a television service. |
Select this if you want to set up a video capture device to capture video from a custom feed. There will be no programming guide for this service type since it is technically not a television service. |
||
'''Streaming (from a network tuner or from the Internet)''' |
|||
Select this option if you want to use the DMS capability of a network tuner, or if you want to use IPTV from the Internet. |
|||
'''Note: For ATSC 3.0''', choose "Streaming (from a network tuner or from the Internet)" in this step, and select "Tuner Stream" for Tuner Type in the next step. |
|||
After making your selection, click Next button to continue to the next page. |
After making your selection, click Next button to continue to the next page. |
||
| Line 83: | Line 91: | ||
This page lets you select your tuner(s) to be used in a hardware profile. The exact appearance of the window depends on your location (country) and your selection of "Service type" on the previous page. This screenshot shows the result when the country is one where DVB TV system is used, and the Service type is "Digital cable or satellite": |
This page lets you select your tuner(s) to be used in a hardware profile. The exact appearance of the window depends on your location (country) and your selection of "Service type" on the previous page. This screenshot shows the result when the country is one where DVB TV system is used, and the Service type is "Digital cable or satellite": |
||
[[File:TV Setup Page 3 Hardware.png]] |
[[File:TV Setup Page 3 Hardware DVB.png]] |
||
'''Tuner type''' |
'''Tuner type''' |
||
| Line 96: | Line 104: | ||
In this case the Tuner types are "Capture only" and "Camera". The former includes regular video capture devices that allows a user to choose an input line (HDMI, Composite, Component, SVideo, etc.) to connect the source video to. Examples are Hauppauge HDPVR, Hauppauge Colossus, etc. The latter is |
In this case the Tuner types are "Capture only" and "Camera". The former includes regular video capture devices that allows a user to choose an input line (HDMI, Composite, Component, SVideo, etc.) to connect the source video to. Examples are Hauppauge HDPVR, Hauppauge Colossus, etc. The latter is a webcam which has no input lines to select from as the only video feed is the video from the camera head. |
||
We assume that the "Capture only" devices' drivers provide programming interfaces for MC to select which input line to use. Most such devices do. There are exceptions though. For example, the "Blackmagic WDM Capture" device, as shown in the above screenshot, does not have such DirectShow interface. Therefore there is no way for MC to make selection of input line. This device is a "Capture only" device as it has different physical input lines. It is listed under "Camera" because it lacks such DirectShow interface. You can set it up in MC as a "camera" device, but you need to run its own configuration program to set its input line correctly before you actually use the device. |
We assume that the "Capture only" devices' drivers provide programming interfaces for MC to select which input line to use. Most such devices do. There are exceptions though. For example, the "Blackmagic WDM Capture" device, as shown in the above screenshot, does not have such a DirectShow interface. Therefore there is no way for MC to make selection of input line. This device is a "Capture only" device as it has different physical input lines. It is listed under "Camera" because it lacks such DirectShow interface. You can set it up in MC as a "camera" device, but you need to run its own configuration program to set its input line correctly before you actually use the device. |
||
| Line 153: | Line 161: | ||
Note: as of the writing of this wiki, the DisEqC type selection is still only a place-holder. MC does not actually control DisEqC at this time, and is dependent on user setting it up correctly before trying to DVB-S channels in MC. It is however important that you select the correct setting. |
Note: as of the writing of this wiki, the DisEqC type selection is still only a place-holder. MC does not actually control DisEqC at this time, and is dependent on user setting it up correctly before trying to DVB-S channels in MC. It is however important that you select the correct setting. |
||
When you click Next on the above page, the Hardware Specific Options pages for each tuner will be shown one-by-one. These will look almost exactly like the screenshot shown for [http://wiki.jriver.com/index.php/ |
When you click Next on the above page, the Hardware Specific Options pages for each tuner will be shown one-by-one. These will look almost exactly like the screenshot shown for [http://wiki.jriver.com/index.php/TV_Setup#DVB-T DVB-T above], except the word "DVB-S2" replaces "DVB-T2". |
||
After setting up each tuner for DVB-S2 capability, you will be taken to the [http://wiki.jriver.com/index.php/EPG#MC20.2B EPG set up pages.] |
After setting up each tuner for DVB-S2 capability, you will be taken to the [http://wiki.jriver.com/index.php/EPG#MC20.2B EPG set up pages.] |
||
| Line 166: | Line 174: | ||
Here you should select a cable provider from the list. |
Here you should select a cable provider from the list. |
||
When you click Next after selecting a cable provider, the Hardware Specific Options pages for each tuner will be shown one-by-one. These will look almost exactly like the screenshot shown for [http://wiki.jriver.com/index.php/ |
When you click Next after selecting a cable provider, the Hardware Specific Options pages for each tuner will be shown one-by-one. These will look almost exactly like the screenshot shown for [http://wiki.jriver.com/index.php/TV_Setup#DVB-T DVB-T above], except the word "DVB-C2" replaces "DVB-T2". |
||
After setting up each tuner for DVB-C2 capability, you will be taken to the [http://wiki.jriver.com/index.php/EPG#MC20.2B EPG set up pages.] |
After setting up each tuner for DVB-C2 capability, you will be taken to the [http://wiki.jriver.com/index.php/EPG#MC20.2B EPG set up pages.] |
||
| Line 224: | Line 232: | ||
If you select MCE or USB-UUIRT, the wizard will take you to the next page to setup IR blaster code learning. |
If you select MCE or USB-UUIRT, the wizard will take you to the next page to setup IR blaster code learning. |
||
| ⚫ | |||
[[File:TV Setup IR Blaster Learning.png]] |
[[File:TV Setup IR Blaster Learning.png]] |
||
| ⚫ | |||
When code learning for a given button is done, the wizard automatically advances to the next button. Complete the learning process for all buttons. |
When code learning for a given button is done, the wizard automatically advances to the next button. Complete the learning process for all buttons. |
||
| Line 264: | Line 274: | ||
===Analog Cable and Analog Antenna=== |
===Analog Cable and Analog Antenna=== |
||
The Hardware specific options page for these devices is identical to that described in [http://wiki.jriver.com/index.php/ |
The Hardware specific options page for these devices is identical to that described in [http://wiki.jriver.com/index.php/TV_Setup#Set-top_box Set-top box] |
||
[[File:TV Setup Hardware Specific Options Analog Capture.png]] |
[[File:TV Setup Hardware Specific Options Analog Capture.png]] |
||
| Line 278: | Line 288: | ||
You need to choose the video and audio input lines on the capture device. |
You need to choose the video and audio input lines on the capture device. |
||
The next page is the hardware specific options page, identical to that shown in [http://wiki.jriver.com/index.php/ |
The next page is the hardware specific options page, identical to that shown in [http://wiki.jriver.com/index.php/TV_Setup#Set-top_box Set-top box] |
||
The EPG guide data source page looks like this (as there is no need for EPG): |
The EPG guide data source page looks like this (as there is no need for EPG): |
||
| Line 291: | Line 301: | ||
Nothing to do here. |
Nothing to do here. |
||
===Tuner Stream (DMS) and IPTV=== |
|||
You will be taken to the [http://wiki.jriver.com/index.php/EPG#MC20.2B EPG set up pages.] |
|||
==The Summary Page== |
==The Summary Page== |
||
| Line 336: | Line 352: | ||
[[File:TV Setup loading OTA EPG in background.png]] |
[[File:TV Setup loading OTA EPG in background.png]] |
||
[[http://wiki.jriver.com/index.php/ |
[[http://wiki.jriver.com/index.php/TV_Setup#Where_to_start Go to Top of page]] |
||
[[Category: Frequently Asked Questions]] |
[[Category: Frequently Asked Questions]] |
||
Latest revision as of 18:29, 5 August 2024
JRiver can record and play Television from several sources.
The JRiver forum has a dedicated TV Board.
Setup Wizard
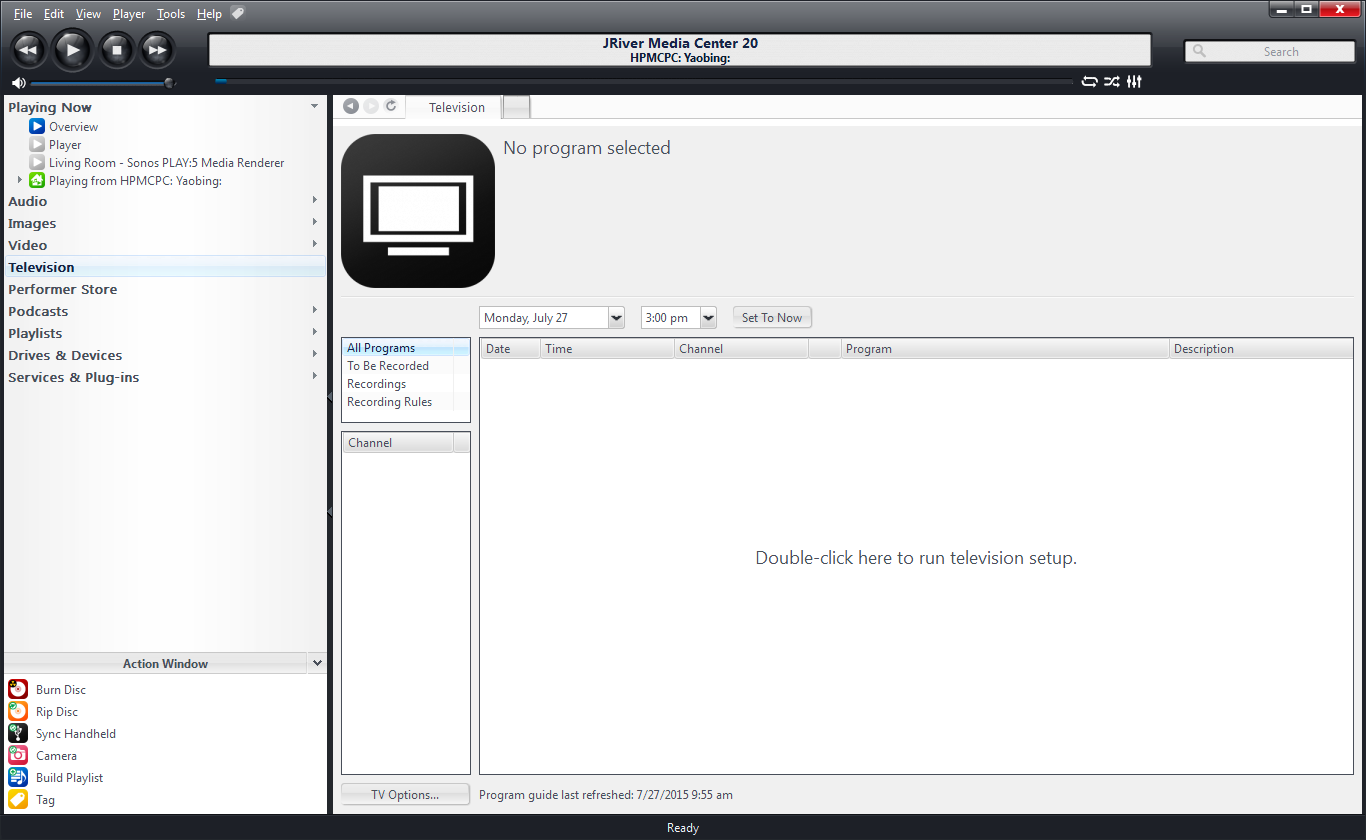
To start the wizard, go to MC's Standard View and click Television on the left panel. If you have never set up television in MC before, you will see the following:
Double-click on the text "Double-click here to run television setup." in the middle of the window on the right, to start the Setup Wizard.
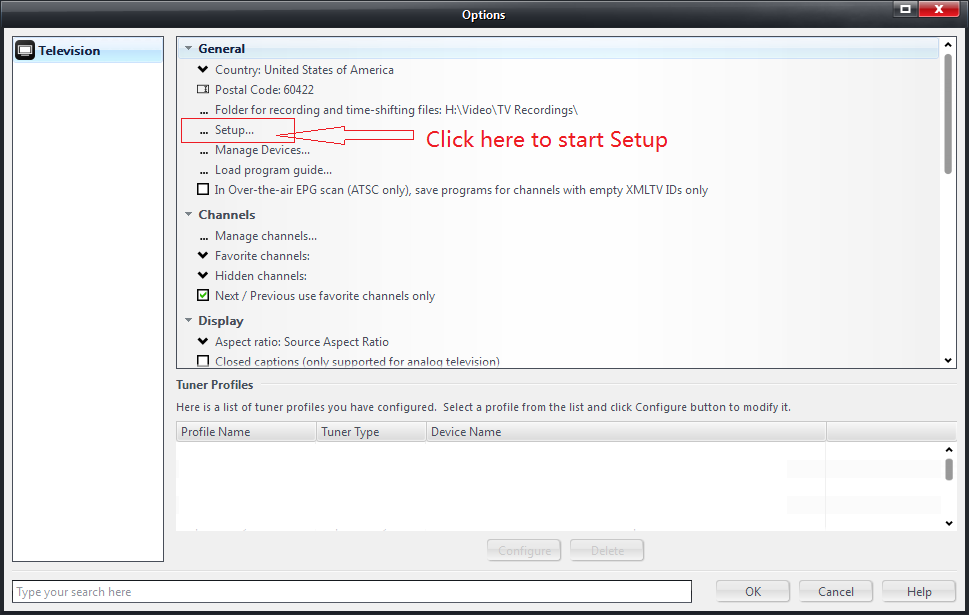
Note that if you have set up TV in any way in the past, the window may be filled with programming guide information instead of the text "Double-click here to run television setup.". You can still start (or re-start) the wizard by going into Television properties page, by clicking the "TV Options..." button in the lower part of MC window. The Television property page can also be accessed through the menu, Tools > Options, and clicking Television on the left panel. Here is what it looks like:
You can click "Setup..." under General (near the top of the window) to start the Setup wizard. With build 94 or later of MC23 you can also start the Setup wizard by a right-click menu on "Television" branch in the left pane.
If you have previously set up television in MC in any way, then you may see the following window popping up before the actual wizard starts.
You can check any or all checkboxes to perform various degree of cleaning up. Check all boxes if you want to do a complete reset. Check nothing if you want to keep all existing data and settings, but only want to add additional profiles. Click OK to continue. Clicking Cancel will cancel the entire Setup process.
The popup will not be shown for users setting up Television for the first time.
Next we describe the Setup wizard page by page.
Location and recording settings
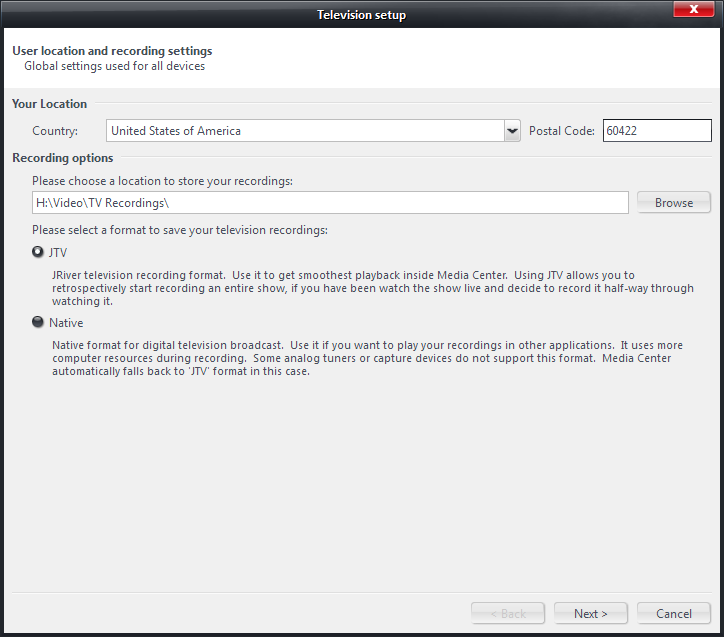
Here you need to set some general settings.
Your location
You select your country from the list and type in your postal code in the box.
Recording Options
Here you set the recording folder - location all television recording files and time-shifting temporary files will be saved.
You also need to select a recording format.
JTV - this is MC's JRiver Television format. Use it to get the smoothest playback experience inside MC.
Native - this is the native format for most TV stations, in other words, the transport stream format (.TS format).
The explanations and descriptions on the wizard page are clear enough so you can easily follow them.
After making all selections, click Next button to continue to the next page.
Service type
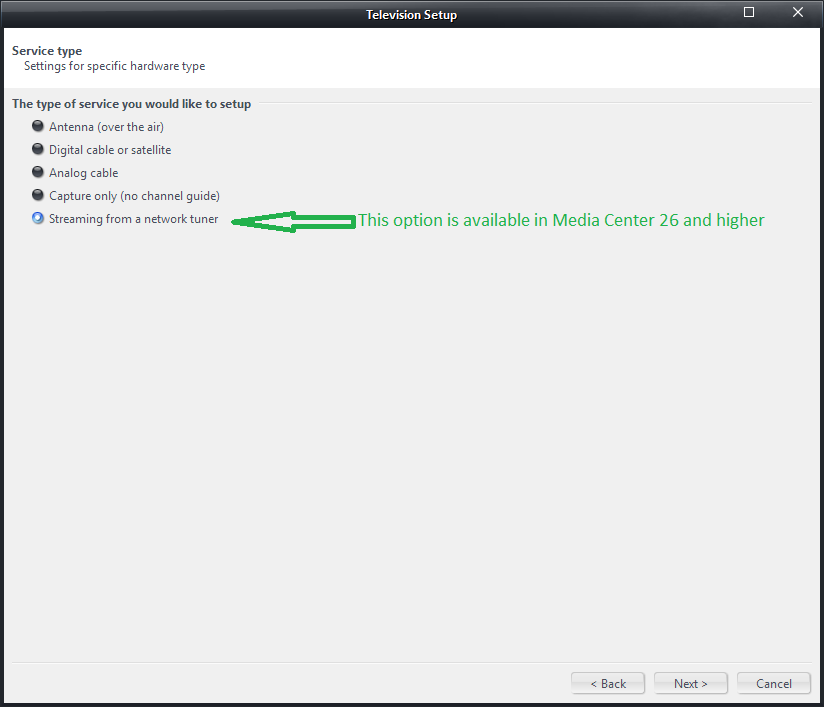
This page presents a list of service types. Pick one that you would like to setup.
Antenna (over the air)
Choose this if you are setting up television reception through an antenna (either digital antenna, such as ATSC, DVB-T, or analog antenna). For ATSC 3.0 support, see note near the end of this section.
Digital cable or satellite
This includes a number of different types of services - Clear QAM, CableCARD, DVB-C, DVB-S, or Set-top box.
Analog cable
Select this if you want to set up for analog cable reception (where available).
Capture only (no channel guide)
Select this if you want to set up a video capture device to capture video from a custom feed. There will be no programming guide for this service type since it is technically not a television service.
Streaming (from a network tuner or from the Internet)
Select this option if you want to use the DMS capability of a network tuner, or if you want to use IPTV from the Internet.
Note: For ATSC 3.0, choose "Streaming (from a network tuner or from the Internet)" in this step, and select "Tuner Stream" for Tuner Type in the next step.
After making your selection, click Next button to continue to the next page.
Capture hardware
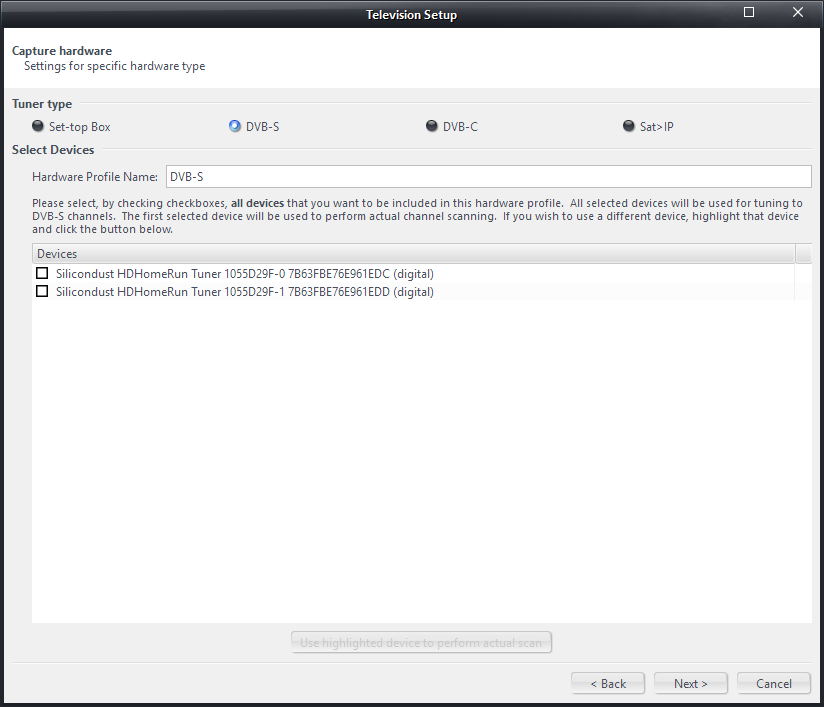
This page lets you select your tuner(s) to be used in a hardware profile. The exact appearance of the window depends on your location (country) and your selection of "Service type" on the previous page. This screenshot shows the result when the country is one where DVB TV system is used, and the Service type is "Digital cable or satellite":
Tuner type
The choices depend on your location and Service type selected on previous page. For example, for Service type of "Antenna" in ATSC-land, the choices may be "ATSC" and "Analog Antenna", or "ATSC" alone (as in the USA).
You need to select one from the options.
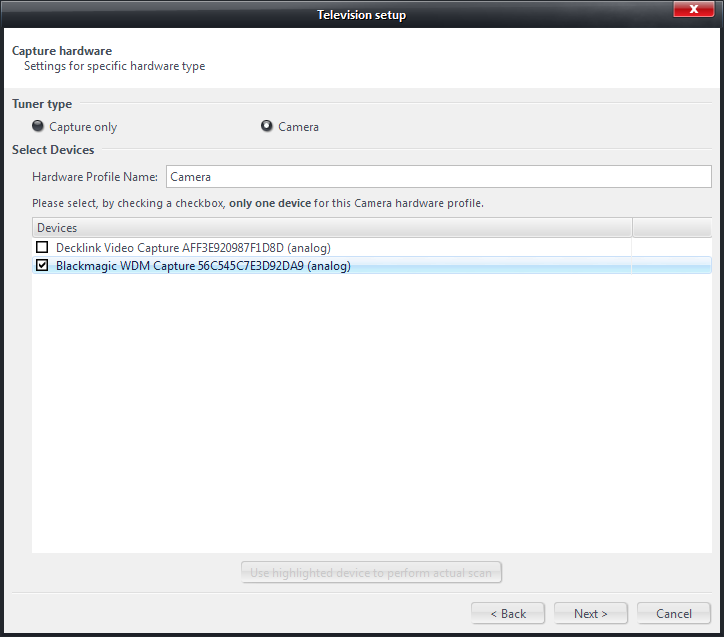
The Tuner type choices here are mostly self-explanatory but a little discussion is needed for Service type "Capture-only (no channel guide)". Here is a screenshot:
In this case the Tuner types are "Capture only" and "Camera". The former includes regular video capture devices that allows a user to choose an input line (HDMI, Composite, Component, SVideo, etc.) to connect the source video to. Examples are Hauppauge HDPVR, Hauppauge Colossus, etc. The latter is a webcam which has no input lines to select from as the only video feed is the video from the camera head.
We assume that the "Capture only" devices' drivers provide programming interfaces for MC to select which input line to use. Most such devices do. There are exceptions though. For example, the "Blackmagic WDM Capture" device, as shown in the above screenshot, does not have such a DirectShow interface. Therefore there is no way for MC to make selection of input line. This device is a "Capture only" device as it has different physical input lines. It is listed under "Camera" because it lacks such DirectShow interface. You can set it up in MC as a "camera" device, but you need to run its own configuration program to set its input line correctly before you actually use the device.
Select Devices
There are three items here - "Hardware profile name", a list of devices, and a button that says "Use highlighted device to perform actual scan".
A hardware profile, also called "Tuner profile" and "Tuner type profile", is setup for one type of tuner hardware in most cases. For example, you set up one profile for your "ATSC" tuners, and another profile for your "Set-top box" tuner. Most profiles involve multiple tuners (ATSC, DVB-T, DVB-S, DVB-C, QAM, etc.). All tuners of the same type share the same profile. MC automatically select one available tuner of the given type for viewing or recording. "Set-top box" and "Capture only" profiles however each can only include one device.
The "Hardware profile name" box is automatically filled with the tuner type name. You can edit it to any name you want. For example, you may need to setup two Set-top box profiles, and name them "STB HDPVR" and "STB AverMedia", to indicate which capture device is used for the STB channels.
The instruction text just above the device list window varies depending on which tuner type you are trying to set up. The text may be either
"Please select, by checking a checkbox, only one device for this [tuner type] hardware profile."
or
"Please select, by checking checkboxes, all devices that you want to be included in this hardware profile. All selected devices will be used for tuning to [tuner type] channels. The first selected device will be used to perform actual channel scanning. If you wish to use a different device, highlight that device and click the button below."
These instructions are sufficiently self-explanatory.
The button "Use highlighted device to perform actual scan" is enabled only if its use makes sense. When scanning for channels actually involve a tuner physically (e.g. ATSC, DVB, QAM, analog cable etc.), and you have selected multiple tuners for the profile, you may use this button to move a particular tuner to the top of the list, to be used in the actual scanning.
After making all selections, click Next button to continue to the next page.
The next few pages
What happens after you click the Next button on "Capture hardware page" depends on which tuner type you are trying to set up.
ATSC and CableCARD
You will be taken to the EPG set up pages.
DVB-T
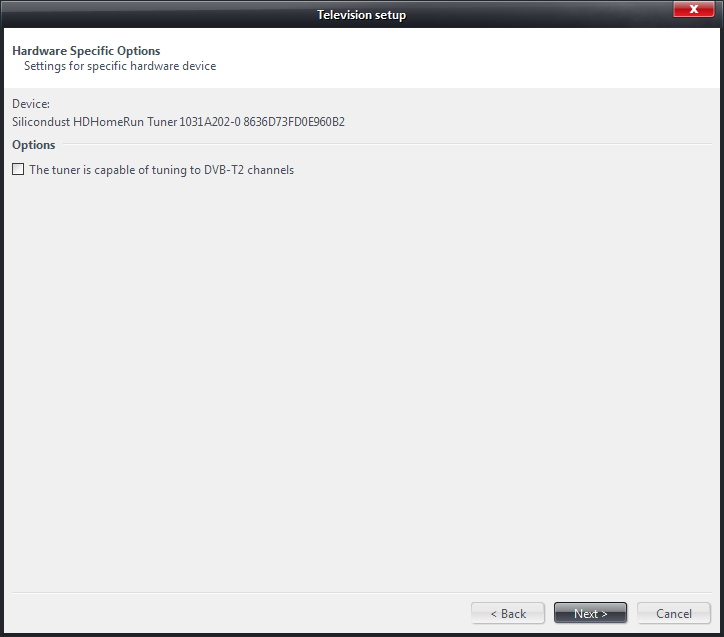
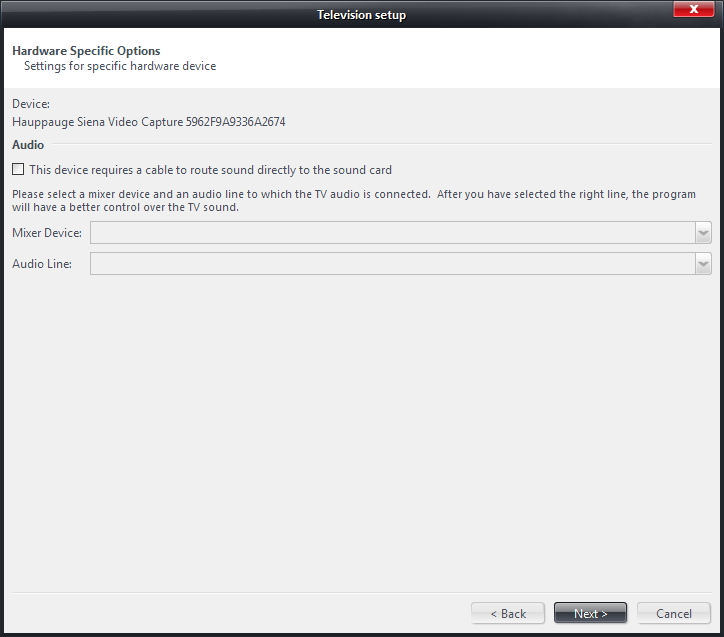
The next page looks like this:
This page is shown repeatedly, one per each tuner device selected. There is only one option on this page. It allows you to specify whether the tuner is capable of tuning to DVB-T2 channels. Make sure you check or uncheck the checkbox for each and every tuner selected in the profile.
After setting up each tuner for DVB-T2 capability, you will be taken to the EPG set up pages.
DVB-S
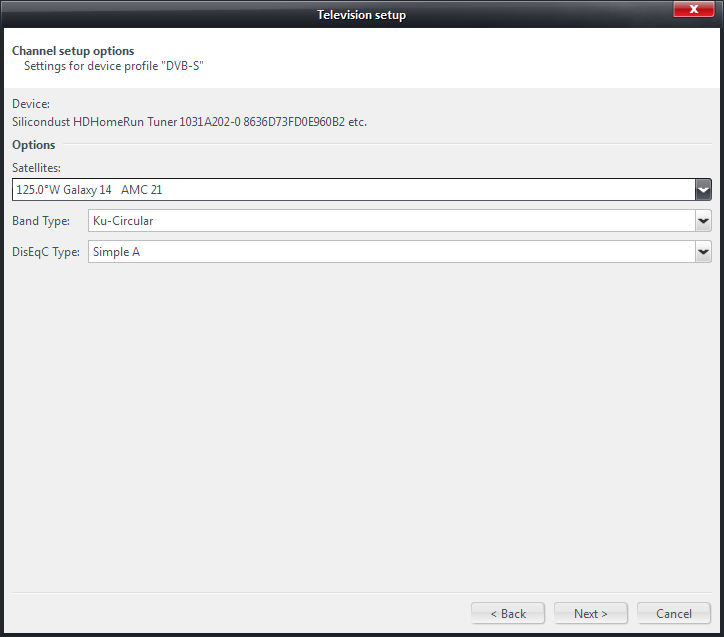
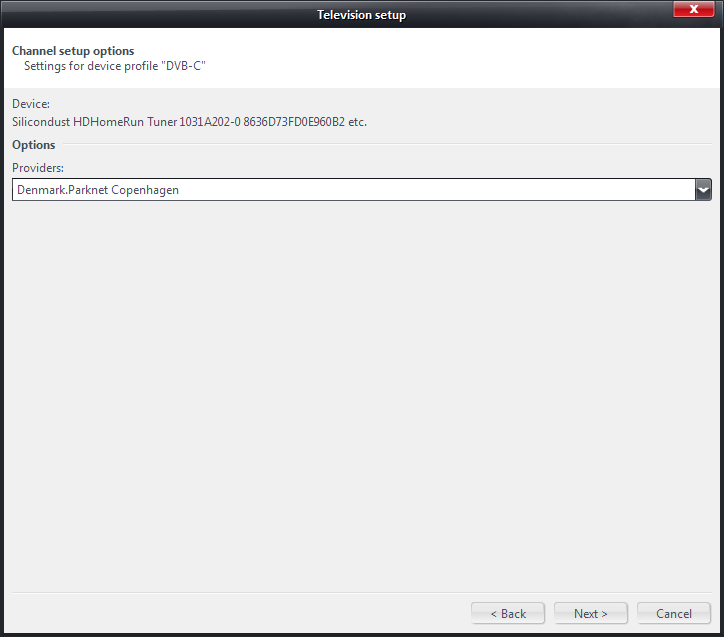
The next page is the Channel setup page, which collects some information about the type of channels (DVB-S).
Here you should select a satellite from which this set of channels will be received from. In addition, you should also select a Band type, and a DisEqC type.
Note: as of the writing of this wiki, the DisEqC type selection is still only a place-holder. MC does not actually control DisEqC at this time, and is dependent on user setting it up correctly before trying to DVB-S channels in MC. It is however important that you select the correct setting.
When you click Next on the above page, the Hardware Specific Options pages for each tuner will be shown one-by-one. These will look almost exactly like the screenshot shown for DVB-T above, except the word "DVB-S2" replaces "DVB-T2".
After setting up each tuner for DVB-S2 capability, you will be taken to the EPG set up pages.
DVB-C
The next page is the Channel setup page, which collects some information about the DVB-C channels that you are trying to setup.
Here you should select a cable provider from the list.
When you click Next after selecting a cable provider, the Hardware Specific Options pages for each tuner will be shown one-by-one. These will look almost exactly like the screenshot shown for DVB-T above, except the word "DVB-C2" replaces "DVB-T2".
After setting up each tuner for DVB-C2 capability, you will be taken to the EPG set up pages.
Set-top box
For Set-top box type, the next page will be the Hardware specific options. This page looks the same for all WDM capture devices (including analog antenna and analog cable tuners).
However, the options here are applicable only to a few very old video capture/Analog TV tuner devices. So it is a safe bet that you can skip this page, by clicking Next directly.
The options are:
This device requires a cable to route sound directly to the sound card
Check this checkbox if your old analog TV tuner device comes with an audio cable that connects it to your sound card.
If you check this checkbox, then the next two boxes become active:
Mixer device - select a device that correspond to the sound card that you made the audio connection.
Audio Line - select an audio line that corresponds to the actual connection that you made.
Next you will be taken to the EPG set up pages.
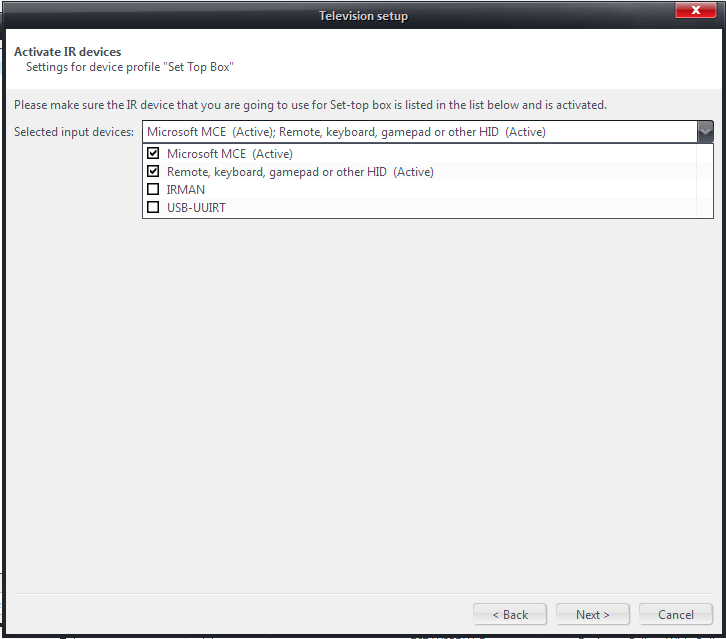
After the EPG setup pages, the "Activate IR Devices" page appears next.
Set-top box channels require an IR blaster to change channel on the STB. You should make sure the IR device that you intend to use with this particular set-top box is activated. By default, Windows MCE is activated. You may want to activate other devices by checking the checkbox before it.
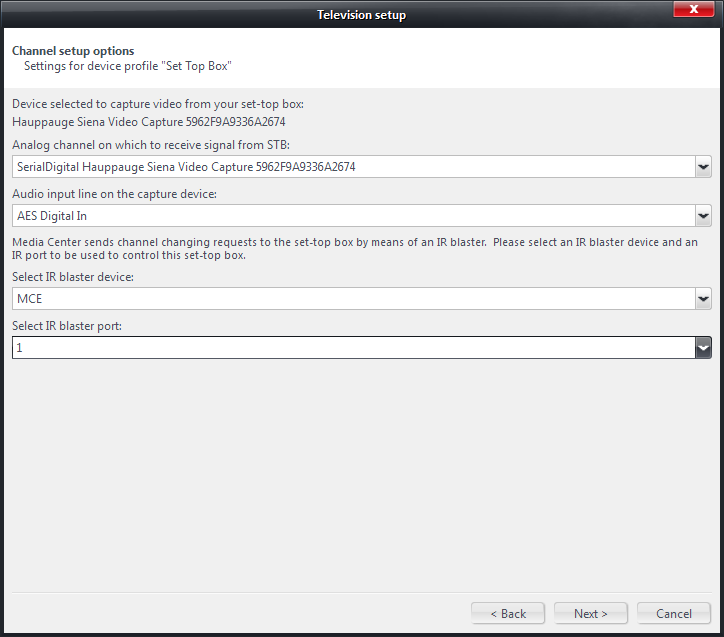
The next page will be the Channel setup options for Set-top box.
On this page you will select four parameters:
Analog channel on which to receive signal from the STB
Choose one from the drop list - SerielDigital, Composite, etc., depending on the capture device selected.
Audio input line on the capture device
Choose one from the drop list - AES digital in, Line in, SPDIF Digital In, etc., depending on the capture device selected.
Select IR blaster device
Select one from the drop list - MCE, USB-UUIRT, Hauppauge IR blaster, etc., depending on what IR device you have on your computer, and what devices you activated on previous page.
Selcet IR blaster port
1, 2, 3, etc., depending on the IR device selected.
If you select "Hauppauge IR blaster" as your device, you should make sure that the IR blaster configuration utility has been installed (outside of MC setup), you should run the IRBlastCfg utility to set it up.
If you select MCE or USB-UUIRT, the wizard will take you to the next page to setup IR blaster code learning.
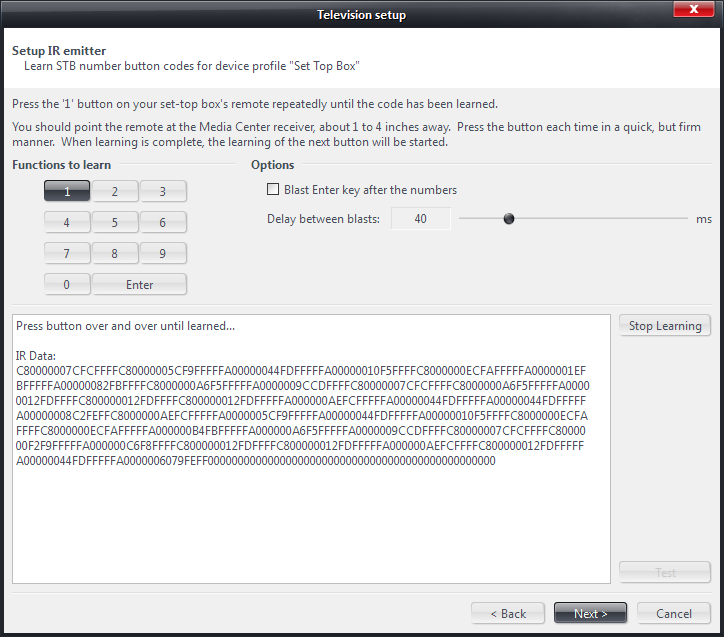
Carefully follow the instructions on the wizard page to allow IR blaster device to learn code for each button (the number buttons and Enter button). It starts with button '1'.
When code learning for a given button is done, the wizard automatically advances to the next button. Complete the learning process for all buttons.
If you know for sure that a certain button's code is already learned (for example you are repeating the setup to fix IR code only for some of the buttons) you may click "Stop Learning" button at any time. Then you can click the next button that you want MC to learn, and click "Start Learning" to start learning code for the new button.
There are a few options that you can set on the page too.
Blast the Enter key after the numbers
Check this checkbox if your Set-top box requires it.
Delay between blasts
The default value should usually work. If your blaster does not change channels correctly, you may try adjusting the value.
Repeat count
This option will not be shown for MCE device. It is for USB-UUIRT device only. If your blaster does not control the STB properly, you may try adjusting this value.
When all codes are learned, you can test the codes by clicking "Test" button. When in Test mode, MC loads up the video capture device that you selected in the process and displays the video that feeds into the selected input line. If you connected your STB to the video capture device correctly, and your STB is powered on, you should see video in MC (partially blocked by the Setup wizard window). You can use the mouse to click the number buttons consecutively to simulate channel changing. You should see the blaster flashing in the process. STB should change channel accordingly. If it does not, try adjusting the position of the IR blaster with respect to the STB.
You can click "Stop testing" to end testing, and click Next button to move on to the next page.
Clear QAM
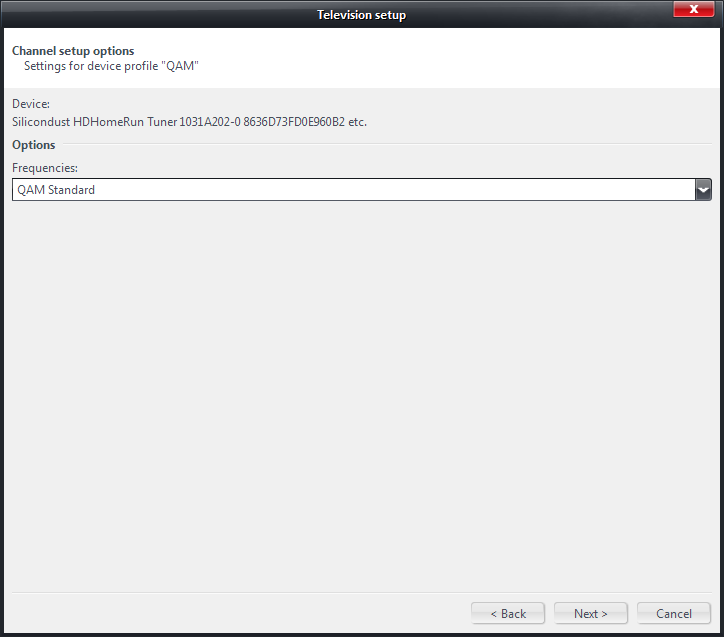
The Channel setup options page for Clear QAM channels look like this:
Here you need to select a frequency scheme used by your cable company. "QAM Standard" maybe a safe bet. To be sure, you may ask your cable company what scheme they use. Or you can simply try them out one by one, and see which one gives you better result.
After selecting frequency type, you will be taken to the EPG set up pages.
Analog Cable and Analog Antenna
The Hardware specific options page for these devices is identical to that described in Set-top box
You will need to set this page up for each and every analog tuner you selected for this profile. You will then be taken to the EPG set up pages.
Capture only
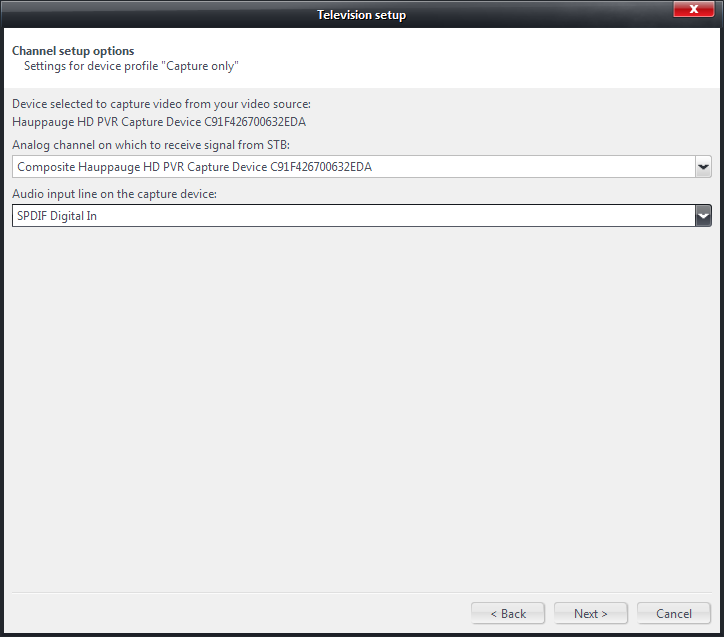
The first page after selecting the hardware is the channel setup options page. It looks like this for Capture only type:
You need to choose the video and audio input lines on the capture device.
The next page is the hardware specific options page, identical to that shown in Set-top box
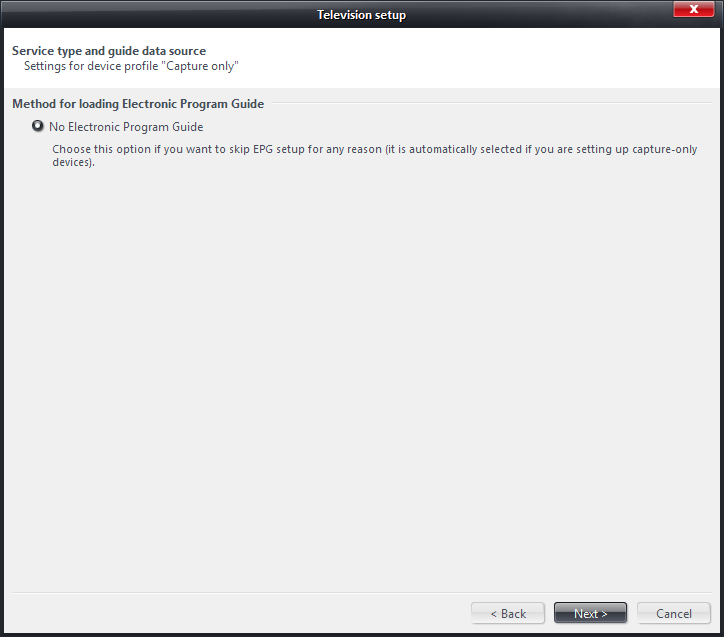
The EPG guide data source page looks like this (as there is no need for EPG):
Camera
After selecting the hardware device, the "No EPG" page appears.
Nothing to do here.
Tuner Stream (DMS) and IPTV
You will be taken to the EPG set up pages.
The Summary Page
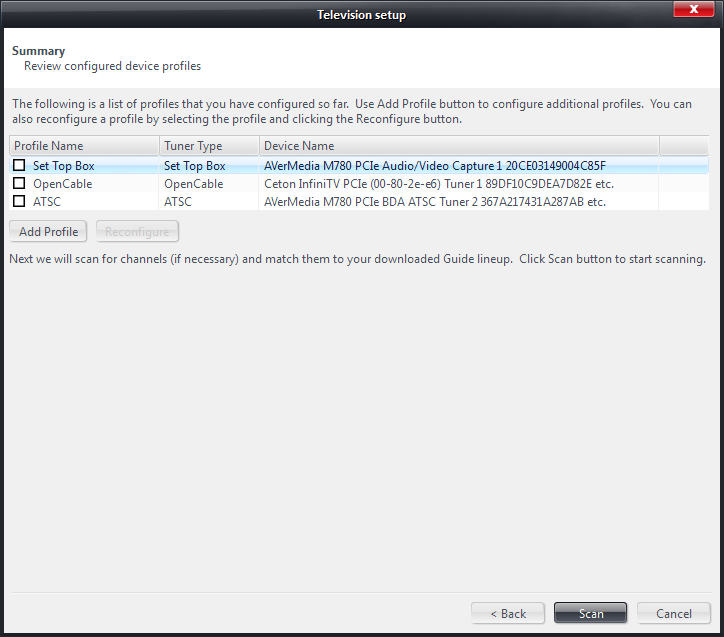
After all is done, you will reach the Summary page.
This page lists the profiles you have set up so far. Click Add Profile button to add another profile. Select a profile and click Reconfigure button to modify a profile. If you click either Add Profile or Reconfigure button, you will be taken back to the Service type page.
After setting up all profiles, click Scan to start scanning for channels and loading EPG data.
Sanning
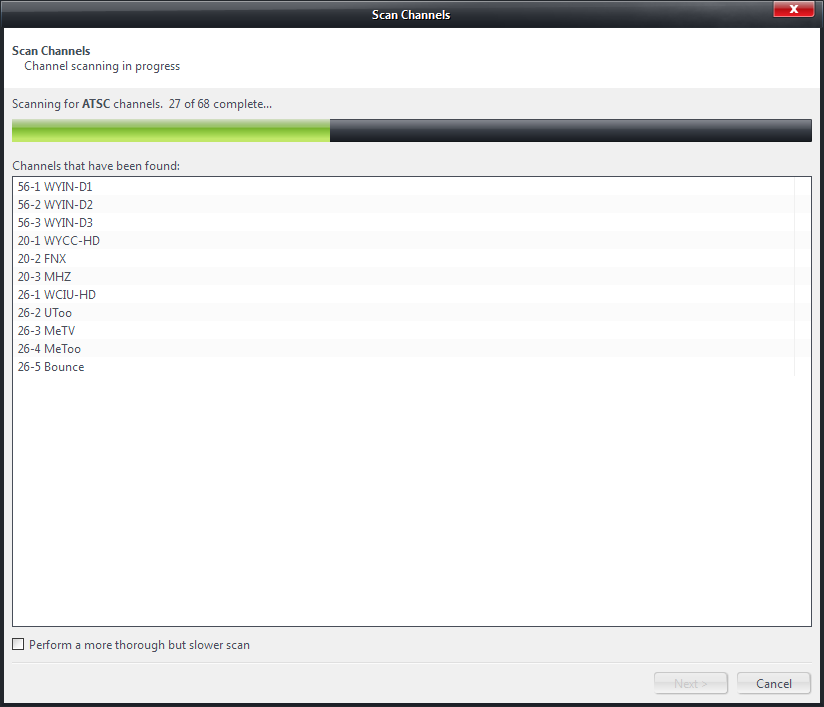
Scanning starts when you click Scan button on the Summary page.
MC scans for channels for each set up profile, one-by-one. So the following page may appear multiple times.
The Next button is disabled until channel scanning for the profile is finished. Click Next to continue.
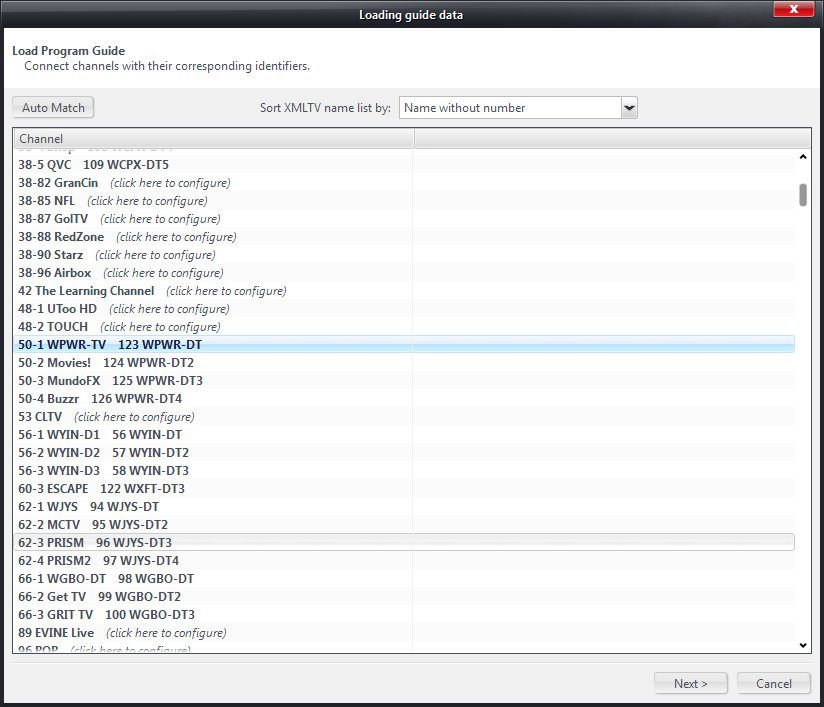
This is repeated for all profiles in the setup. Next EPG loading starts. After MC finishes downloading EPG data from specified data source, it displays this window:
In this window you make mapping of your channels to xmltv channel IDs so that the programs in the EPG are associated with the correct channels.
This window is also repeated as necessary for all epg loading modes (see note below about Over-the-air EPG scanning).
See EPG set up pages for more information about matching channels to xmltv channel IDs.
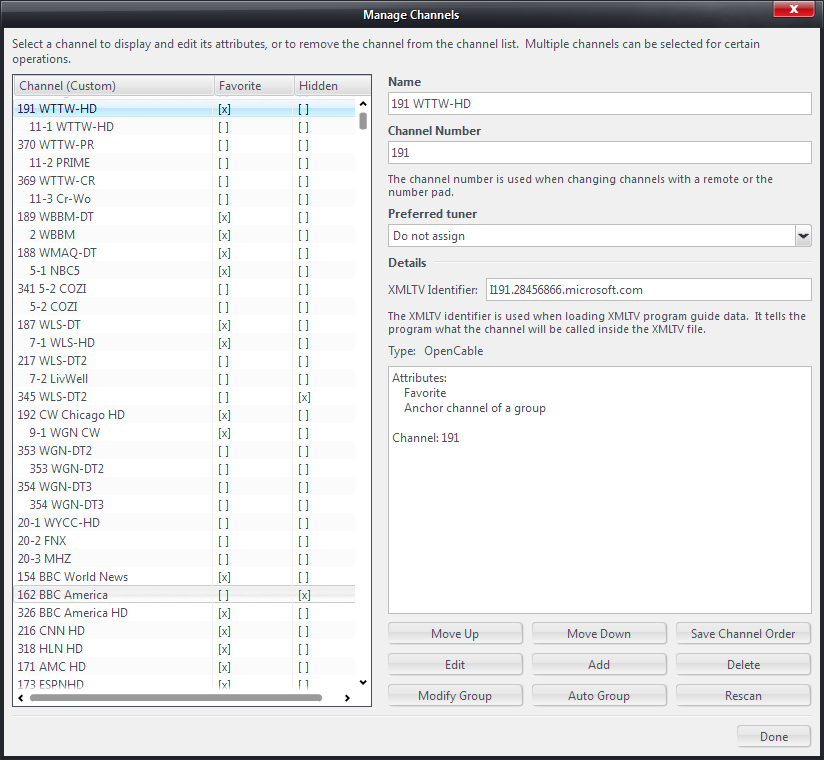
When all is done, you will end up at the Manage Channels window
where you can do additional managing and organizing of your channels, such as grouping channels of different types into one set, making some channels your favorite channels, and disabling some channels that you do not need. Click Done button to exit.
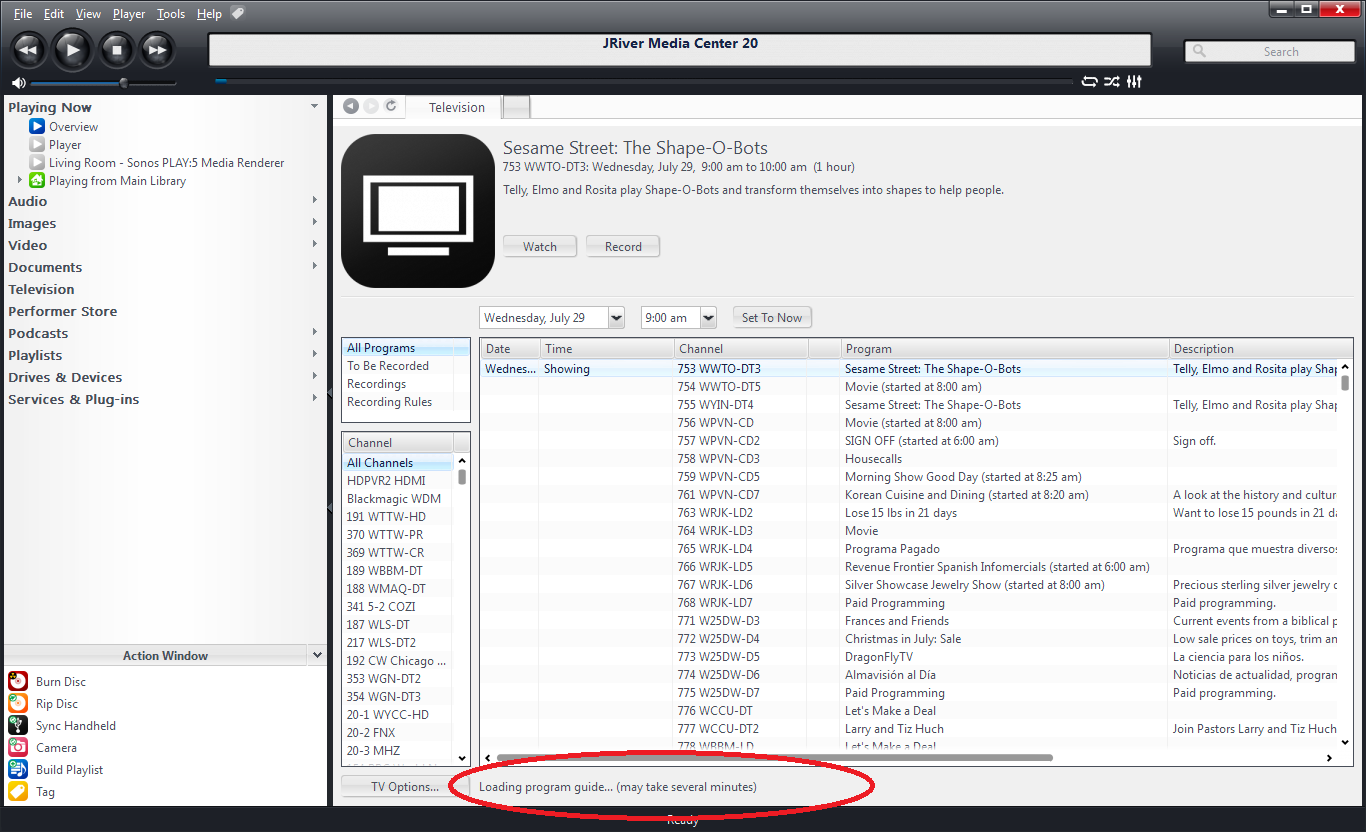
Note: there will be no TV channel to XMLTV channel ID mapping window for EPG loading mode "over-the-air". EPG scanning in over-the-air mode is done after all other EPG loading methods have finished, and is done in the background. You can see the indication of it in the status area at the bottom of the MC Television view, as shown in the following screenshot.
