Home Networking Examples: Difference between revisions
| (13 intermediate revisions by 2 users not shown) | |||
| Line 1: | Line 1: | ||
== Overview == |
|||
The following are some examples of how users have configured their home networks using MC and other devices. |
The following are some examples of how users have configured their home networks using MC and other devices. |
||
| Line 29: | Line 28: | ||
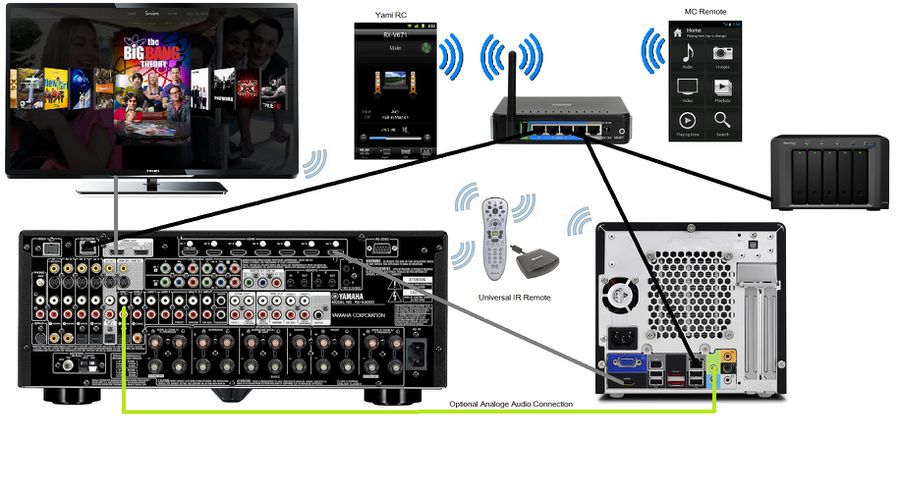
== Example 2 : Typical Home Network Setup with an AVR, a HTPC and a NAS == |
== Example 2 : Typical Home Network Setup with an AVR, a HTPC and a NAS == |
||
In this example MC is running on the HTPC which is connected to a AVR and pulling the media from a NAS over a home network. |
In this example MC is running on the HTPC which is connected to a AVR and pulling the media from a NAS over a home network. |
||
# Connect the HTPC, NAS, |
# Connect the HTPC, NAS, AVI etc up using Ethernet if you can (most reliable) |
||
# Use the Wireless connection for your Remote Android/iPhone Apps |
# Use the Wireless connection for your Remote Android/iPhone Apps |
||
# Use a universal IR RC to control the HTPC/ |
# Use a universal IR RC to control the HTPC/AVR/TV |
||
# Optionally use Android/IOS RC applications like [[Gizmo]] to control MC on the HTPC or the MFRs App to control the AVR if it is network connected |
|||
# Use HDMI between the HTPC >> |
# Use HDMI between the HTPC >> AVI >> TV |
||
# Optionally add the Analogue Audio Cable to enable a second Audio Zone |
# Optionally add the Analogue Audio Cable to enable a second Audio Zone |
||
| ⚫ | |||
== Example 3 : Direct Playback from MC Library Server Clients (using Windows UNC Shares) == |
|||
When a MC Library Server Client connects to a MC Library Server it receives a full copy of the Library, but not the actual files. When you commence playback, the MC Library Server Client will either play the file directly (if it can access the file) or the MC Server will send a stream. It can be advantageous to allow the MC Library Server Clients to access the files directly: |
|||
| ⚫ | |||
# Blu-ray (and DVD) Menus will work |
|||
# There is no transcoding of files |
|||
To allow MC Library Server clients direct access to the files you will need to do a few things: |
|||
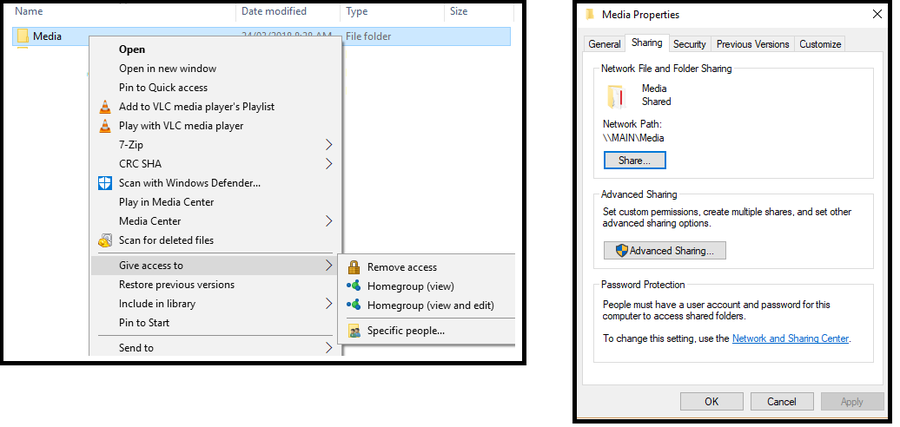
# UNC Share: There are several ways of doing this, and MS provides some instructions on their Web Page - https://support.microsoft.com/en-au/help/4092694/windows-10-changes-to-file-sharing-over-a-network. Currently (in Windows 10), you can right click on the folder with your media in it and use the "Give access to" menu option to allow sharing. Once established you should see in the folder properties on the Sharing tab details of the "Network Path". From you client PC, go to Windows (file) Explorer and see if you can now browse to your files. If so you are then ready to update your Library to use this path. |
|||
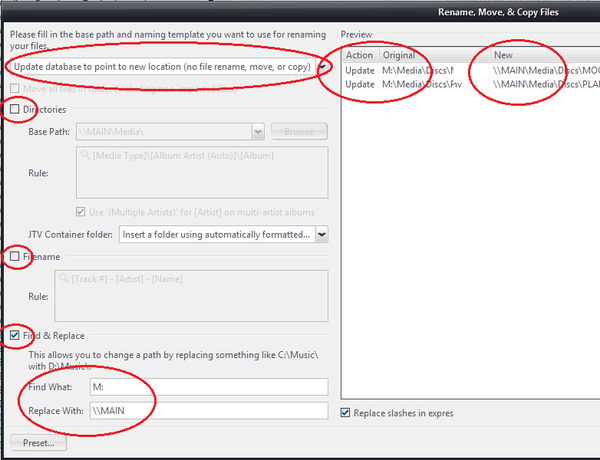
# Update Library Path to UNC Share: PLEASE - Make a BACKUP of you library before attempting this (in case something goes wrong). Then Try on a couple of files first (in case something goes wrong!!) and test that it works. Using MC's Rename, Move, & Copy Files tool, select the files in your library that you want to make available using the UNC Share path. Make SURE you have selected "Update database to point to location...". Really make sure you have this selected or MC will MOVE your items rather than just changing the path. Under Find & Replace put your Drive Letter (eg M:) in "Find What" and the UNC Path (eg \\MAIN) in the "Replace With" field. Check the Preview Windows that the results look correct then press OK to make the changes. |
|||
# Check "Play local file..." : On your MC Library Server Clients, make sure have have enabled in Tools--> Options--> Media Network--> Client Options--> "Play local file if one that matches Library Server file is found" |
|||
[[image:CreateShare.png |900px]] |
|||
[[image:UpdateLibtoShare.png |600px]] |
|||
If all has gone well, your MC Library Server Clients will now have direct access to the files and will play them accordingly. Couple of note: |
|||
# Importing New Items: When ripping or importing items, if done from the UNC Path in the future there is no need to then rename them. |
|||
# Non Windows OS: This guide is only for Windows UNC Shares and it will not work if you have a mix of non Windows Clients as the Network Paths are named differently. |
|||
[[Category:Media Network]] |
[[Category:Media Network]] |
||
[[Category: |
[[Category:Setup]] |
||
Latest revision as of 03:37, 26 March 2018
The following are some examples of how users have configured their home networks using MC and other devices.
Example 1 : MC Server computer connected to living room TV, MC client computer connected to projector in family room
I have a Windows 7 server computer in a closet near our living room plasma TV. I run DVI video to the TV and simple analog audio to a Logitech 2.1 speaker system near the TV. The server computer has a large internal drive dedicated to media including recorded TV. The media drive is shared on the home LAN. Media Center is installed on the server computer with media networking fully enabled.
I have another Windows 7 computer in our family room running Media Center as a Library Server client to the living room computer. I run DVI video to a 20" monitor and HDMI video to a 720p projector and digital audio via coax to a Sony A/V amplifier (5.1 speaker system). I also run analog audio to a headphone jack on an exercise treadmill.
I use JRiver MCE remotes and transceivers on each system for remote control.
The setup of the client went pretty smoothly, but there were a few tips that I'll list here for future reference:
- As of build 17.0.63, playback of Blu-ray titles over Library Server is not supported. The work around is to make the filenames on the server match the filenames on the client so that the client will play them using a network drive path or a UNC path rather than over a Library Server URL.
- I programmed a button on the JRiver remote to toggle between the Projector and the monitor as the sole display. There were numerous problems with trying to use an "extend desktop onto both monitors" type of setup so it's preferred to use one monitor at a time. In Tools/Options/Remote Control/Commands, select Add/Custom..., change the name to "Monitor Toggle", and click "Add Run", then type "mc17.exe" for executable filename and "/MonitorToggle" for parameters. Click Ok back to the command list and then with the newly created command highlighted, click "Start Learning" and point your JRiver remote at the transceiver and click the button you want to use (I used the "1" button). Click Ok and you can test it out - press "1" and it should switch to one of the monitors, click "1" again and it should switch to the other monitor. Create another command called "Monitor Extend" with "/MonitorExtend" as the parameter, program it to the "2" button, then you can press "2" to get the desktop extended onto both monitors.
- I setup one zone called ("Headphones") to play through the headphones at the treadmill, and another zone called "Sony Amp" to play through the Sony 5.1 receiver. I then programmed two buttons on the remote to select those zones. On the remote control command list screen, use Add/Add Media Center Command. Select the zone you want for each button, then train those buttons (I used buttons "3" and "4") using the "Start Learning" process described in the previous tip. I documented these remote buttons and taped the piece of paper to the treadmill stand.
- In Tools/Options/Theater View, I set these options:
- Check "Disable screen saver in Theater View"
- Check "Disable Windows Media Center"
- Set "Switch to zone on load" to "Sony Amp" since we use that more often than the treadmill headphones.
- In Tools/Options/Startup, I set these options:
- Set "Location" to "Last Location"
- Set "Mode" to "Theater View"
- Set "Run on Windows startup" to "Media Server" so that all it ever takes to get into Theater View is to press the green button on the remote.
- In Tools/Options/Media Network, I set these options:
- Un-check "Client Options/Show playback zones from server on the client" because I didn't want to allow the "There" zone to be selected for playback on the server.
- In Tools/Options/Remote Control, I set these options:
- Click "Devices & Options", make sure "Selected input devices" contains both "Microsoft MCE" and "Remote, keyboard, gamepad, or other HID" as active.
Example 2 : Typical Home Network Setup with an AVR, a HTPC and a NAS
In this example MC is running on the HTPC which is connected to a AVR and pulling the media from a NAS over a home network.
- Connect the HTPC, NAS, AVI etc up using Ethernet if you can (most reliable)
- Use the Wireless connection for your Remote Android/iPhone Apps
- Use a universal IR RC to control the HTPC/AVR/TV
- Optionally use Android/IOS RC applications like Gizmo to control MC on the HTPC or the MFRs App to control the AVR if it is network connected
- Use HDMI between the HTPC >> AVI >> TV
- Optionally add the Analogue Audio Cable to enable a second Audio Zone
When a MC Library Server Client connects to a MC Library Server it receives a full copy of the Library, but not the actual files. When you commence playback, the MC Library Server Client will either play the file directly (if it can access the file) or the MC Server will send a stream. It can be advantageous to allow the MC Library Server Clients to access the files directly:
- Blu-ray (and DVD) Menus will work
- There is no transcoding of files
To allow MC Library Server clients direct access to the files you will need to do a few things:
- UNC Share: There are several ways of doing this, and MS provides some instructions on their Web Page - https://support.microsoft.com/en-au/help/4092694/windows-10-changes-to-file-sharing-over-a-network. Currently (in Windows 10), you can right click on the folder with your media in it and use the "Give access to" menu option to allow sharing. Once established you should see in the folder properties on the Sharing tab details of the "Network Path". From you client PC, go to Windows (file) Explorer and see if you can now browse to your files. If so you are then ready to update your Library to use this path.
- Update Library Path to UNC Share: PLEASE - Make a BACKUP of you library before attempting this (in case something goes wrong). Then Try on a couple of files first (in case something goes wrong!!) and test that it works. Using MC's Rename, Move, & Copy Files tool, select the files in your library that you want to make available using the UNC Share path. Make SURE you have selected "Update database to point to location...". Really make sure you have this selected or MC will MOVE your items rather than just changing the path. Under Find & Replace put your Drive Letter (eg M:) in "Find What" and the UNC Path (eg \\MAIN) in the "Replace With" field. Check the Preview Windows that the results look correct then press OK to make the changes.
- Check "Play local file..." : On your MC Library Server Clients, make sure have have enabled in Tools--> Options--> Media Network--> Client Options--> "Play local file if one that matches Library Server file is found"
If all has gone well, your MC Library Server Clients will now have direct access to the files and will play them accordingly. Couple of note:
- Importing New Items: When ripping or importing items, if done from the UNC Path in the future there is no need to then rename them.
- Non Windows OS: This guide is only for Windows UNC Shares and it will not work if you have a mix of non Windows Clients as the Network Paths are named differently.


