Room Correction: Difference between revisions
No edit summary |
No edit summary |
||
| (8 intermediate revisions by the same user not shown) | |||
| Line 1: | Line 1: | ||
[[File:MC19-DSP-Room Correction.png|thumb|500px|Media Center's Room Correction DSP]] |
[[File:MC19-DSP-Room Correction.png|thumb|500px|Media Center's Room Correction DSP]] |
||
== What is Room Correction? == |
|||
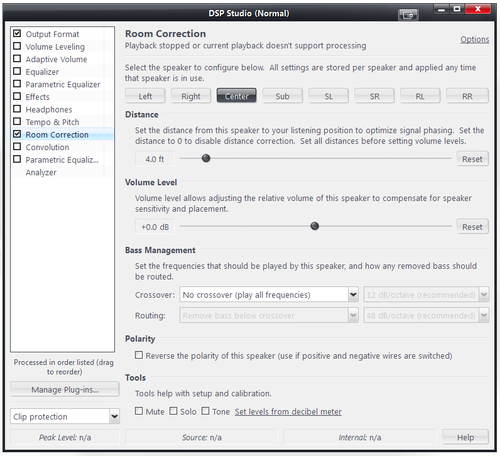
Media Center's [[DSP Studio]] contains an advanced Room Correction system similar to those found on most home theater AV Receivers. This can be used to optimize the sound output for your room, speaker placement, and speaker size. |
|||
Media Center's [[DSP Studio]] provides a "Room Correction" module which enables Media Center to behave in a similar fashion to a home theater AV receiver. It allows you to: |
|||
To enable the Room Correction DSP: |
|||
* Open the [[DSP Studio]], and click on '''Room Correction'''. Make sure it's enabled by checking the box next to it. |
|||
* Set the speaker distances for all the speakers you use. |
|||
* Play something that uses all the speakers. Note that the DSP Studio dialog is [http://en.wikipedia.org/wiki/Dialog_box#Modeless modeless] so you can still use the rest of [[Standard View]] while you have it open. |
|||
* configure a surround sound system which has speakers are different distances to the main listening position |
|||
While playing, go through each speaker and tick the 'Level' checkbox at the bottom of the Room Correction page. Adjust the volume sliders until the level tones played by all speakers are the same volume. A decibel meter is best for this stage, but there are also apps that can use the microphone in your phone. You can also calibrate by ear and get passable results. |
|||
* apply per speaker gain trims to account for speakers that have different sensitivities |
|||
* mark speakers as "small" or "large", i.e. implement [http://www.audioholics.com/subwoofer-setup/bass-management-basics-2013-settings-made-simple bass management] which routes low frequency content to your subwoofer |
|||
== Setup Instructions == |
|||
Finally, if you would like low frequencies to be routed to your subwoofer (bass management), configure the bass redirection portion of Room Correction for each speaker. |
|||
=== Enable the Module === |
|||
Open the [[DSP Studio]], click on '''Room Correction''' and enable it by checking the box next to it. |
|||
=== Position the Module === |
|||
The effect of the room correction module can overlap with the [[Parametric Equalizer]] and [[Convolution]] blocks so therefore we have to make sure the module is in the correct position in the signal chain. How to do this is described in [DSP#Ordering DSPs]. |
|||
The functional overlap occurs because this module can: |
|||
* apply a delay to each channel |
|||
* apply a gain adjustment to each channel |
|||
* apply low and high pass filters the specified channels |
|||
One common approach is to list DSP blocks in the following order: |
|||
* [[Parametric Equalizer]] |
|||
* Room Correction |
|||
* [[Convolution]] |
|||
* [[Parametric Equalizer 2]] |
|||
This allows the 1st PEQ block to affect the input (source) channels which can be useful when applying personal preferences to the source content, for example [http://data-bass.ipbhost.com/topic/285-the-bass-eq-for-movies-thread/|Bass EQ]. Room Correction comes next in order to convert the source content to physical output channels. Convolution (optional) and PEQ2 follow which enables further equalisation for the room setup. This can include copying the subwoofer channel to additional output channels and applying independent EQ schemes to achieve a better end result. |
|||
=== Distance === |
|||
This section applies if your speakers are physically located at different distances to the main listening position. To set this, for each speaker: |
|||
* click the named speaker button |
|||
* measure the physical distance from the main listening position to the speaker |
|||
* move the slider to measured distance |
|||
==== Distance and Subwoofers ==== |
|||
Modern commercial subwoofers often contain DSP functionality built into the amplifier. This is used to provide features like PEQ and room correction. SVS are one example of a manufacturer that includes such functionality in their devices, for example https://www.svsound.com/blogs/svs/75346755-understanding-dsp |
|||
Such functionality will always add latency to the signal chain which has the effect of increasing the apparent distance to the subwoofer. |
|||
In these cases the physical distance may result in a lack of output around the crossover frequency. There are various ways to tackle this problem: |
|||
* ask the manufacturer how much delay is added by their device |
|||
* if you have a microphone |
|||
** measure the actual delay (e.g. using [https://www.roomeqwizard.com/ Room EQ Wizard]) |
|||
** use the "sub distance tweak" (i.e. use an RTA and measure the combined response, adjust distance to achieve most SPL through the crossover range) |
|||
* guess and add ~2ft to the measured distance |
|||
=== Volume Level === |
|||
==== Using an SPL Meter ==== |
|||
This is a simple and reliable way to get the levels right. To do this: |
|||
* click the "Set levels from decibel meter" link at the bottom of the page |
|||
* follow the instructions on the page to play the test tones |
|||
[[File:set_levels_from_decibel_meter.png|frameless|400px]] |
|||
* hold the SPL meter at the listening position & measure each speaker in turn |
|||
* enter the measured SPL in dB into the form |
|||
* Click OK, the level meters will now be set for each speaker measured |
|||
==== By Ear ==== |
|||
Use Tools > Advanced Tools > Audio Calibration > Volume Calibration to play band limited pink noise through each speaker in turn. |
|||
Cycle back and forth through the channels, adjusting the volume sliders as you go until you perceive each speaker as playing at the same volume. |
|||
=== Bass Management === |
|||
This section allows you to route low frequency content to the subwoofer channel while maintaining the correct levels with respect to the LFE channel. |
|||
This diagram illustrates the processing performed |
|||
[[File:bass_management.png|frameless|400px]] |
|||
NB: See [[Editing the Bass Management Diagram]] for details on how to update this diagram. |
|||
There are 2 options to configure for each main channel |
|||
* Crossover |
|||
* Routing |
|||
Crossover represents the high pass filter applied to the main channel, this applies a butterworth high pass filter with user selectable |
|||
* frequency (40, 60, 80, 100, 120, 200Hz) |
|||
* slope (12, 24dB) |
|||
As per the diagram, the high passed content remains on the specified main channel. |
|||
Routing represents the low pass filter side of the equation, the following options are available |
|||
* remove bass below crossover: this option simply throws away the content |
|||
** this is the default option, remember to change this value as this option is not the norm |
|||
* move bass to subwoofer: this is the traditional bass management option, the content is summed into the SW channel along with the LFE channel and any other main channels |
|||
* copy bass to subwoofer: this is colloquially known as "double bass" or "LFE+Main", in this case the main channel receives a full range signal ''and'' the subwoofer also receives the low passed content |
|||
** this option should only be used with extremely capable (i.e. quite large) speakers unless an additional high pass filter is added via [[Parametric Equalizer]] |
|||
When the move or copy option is selected, the slope of the low pass filter can be chosen independently of the high pass filter. 12, 24, 36 and 48dB options are provided and the filter is, as usual, a Butterworth filter. |
|||
==== THX Style Bass Management ==== |
|||
A conventional approach to bass management uses the following options |
|||
* crossover: 80Hz, 12dB slope |
|||
* routing: move bass to subwoofer, 24dB slope |
|||
==== A Recommended Approach ==== |
|||
Note that the conventional approach described above assumes the use of the main speaker that exhibits a 2nd order rolloff at 80Hz (i.e. is a theoretically perfect sealed speaker with an Fs of 80Hz). |
|||
This will almost ''never'' exist in reality so a more sensible recommendation is to use symmetric slopes, i.e. |
|||
* use 24dB on for both crossover and routing |
|||
* use a crossover frequency that is suitable for your speakers (might be more or less than 80Hz) |
|||
==== Bass Management In Action ==== |
|||
This graph shows the results of the default crossover settings |
|||
* red: a low passed main channel with a 48dB slope at 80Hz |
|||
* cyan: a high passed main channel with a 12dB slope at 80Hz |
|||
* purple: the LFE channel only (i.e. a [[Parametric Equalizer#Mixing]] function is used to move the main channel to the SW channel before room correction executes) |
|||
[[File:bass_management_in_action.png|frameless|400px]] |
|||
There are a couple of '''extremely''' important points to note from the example above |
|||
===== Downstream Must Add 10dB to the SW ===== |
|||
The red and cyan lines (high and low passed main channel) are 10dB apart. This means something downstream of Room Correction ''must'' add 10dB to the SW channel. |
|||
https://yabb.jriver.com/interact/index.php/topic,114602.0.html discusses this point. The author supposes that this is the normal behaviour of an AV receiver or processor when handling a multichannel LPCM stream. |
|||
''If you use room correction but do not use such a device, you must handle this 10dB offset yourself'' |
|||
===== There is no LPF of LFE ===== |
|||
AVRs often have a "LPF of LFE" option, i.e. they allow the user to specify a corner frequency for a low pass filter to apply to the LFE channel. The default is typically a 48dB/octave low pass filter at 120Hz. |
|||
Room Correction '''does not''' have such an option so will send a full range LFE signal to your subwoofer. Recent content is typically '''not''' filtered in the same way that Dolby Digital content was (i.e. in the DVD days, the LFE channel '''was''' low pass filtered at master time) so this configuration can result in unpleasant sounds emanating from your subwoofer. |
|||
To rectify this, apply an appropriate low pass filter via a [[Parametric Equalizer]] stage that has been placed after this module in DSP Studio. |
|||
===== Use of Butterworth Filters may produce cancellations in the in room response ===== |
|||
MC uses butterworth filters for bass management. Multichannel content may have content on the LFE and main channels that is largely coherent (i.e. identical, or almost identical, sound). This can produce cancellations when the resulting content is reproduced and acoustically summed at the listening position. |
|||
Use the PEQ stages to apply custom bass management to avoid this. |
|||
See https://yabb.jriver.com/interact/index.php/topic,127245.0.html for details |
|||
== Alternatives to Room Correction == |
|||
The functionality in the room correction module can be replaced by: |
|||
* using [[Parametric Equalizer#Delay|Delay]] to account for different distances per speaker |
|||
* using [[Parametric Equalizer#Mixing|Mixing]], [https://wiki.jriver.com/index.php/Parametric_Equalizer#Remove_High_Frequencies_.28low_pass_filter.29 low pass filters] and [https://wiki.jriver.com/index.php/Parametric_Equalizer#Remove_Low_Frequencies_.28high_pass_filter.29 high pass filters] to perform bass management |
|||
* performing all such functions via [[Convolution]] |
|||
[[Category:DSP]] |
[[Category:DSP]] |
||
Latest revision as of 15:22, 23 October 2020
What is Room Correction?
Media Center's DSP Studio provides a "Room Correction" module which enables Media Center to behave in a similar fashion to a home theater AV receiver. It allows you to:
- configure a surround sound system which has speakers are different distances to the main listening position
- apply per speaker gain trims to account for speakers that have different sensitivities
- mark speakers as "small" or "large", i.e. implement bass management which routes low frequency content to your subwoofer
Setup Instructions
Enable the Module
Open the DSP Studio, click on Room Correction and enable it by checking the box next to it.
Position the Module
The effect of the room correction module can overlap with the Parametric Equalizer and Convolution blocks so therefore we have to make sure the module is in the correct position in the signal chain. How to do this is described in [DSP#Ordering DSPs].
The functional overlap occurs because this module can:
- apply a delay to each channel
- apply a gain adjustment to each channel
- apply low and high pass filters the specified channels
One common approach is to list DSP blocks in the following order:
- Parametric Equalizer
- Room Correction
- Convolution
- Parametric Equalizer 2
This allows the 1st PEQ block to affect the input (source) channels which can be useful when applying personal preferences to the source content, for example EQ. Room Correction comes next in order to convert the source content to physical output channels. Convolution (optional) and PEQ2 follow which enables further equalisation for the room setup. This can include copying the subwoofer channel to additional output channels and applying independent EQ schemes to achieve a better end result.
Distance
This section applies if your speakers are physically located at different distances to the main listening position. To set this, for each speaker:
- click the named speaker button
- measure the physical distance from the main listening position to the speaker
- move the slider to measured distance
Distance and Subwoofers
Modern commercial subwoofers often contain DSP functionality built into the amplifier. This is used to provide features like PEQ and room correction. SVS are one example of a manufacturer that includes such functionality in their devices, for example https://www.svsound.com/blogs/svs/75346755-understanding-dsp
Such functionality will always add latency to the signal chain which has the effect of increasing the apparent distance to the subwoofer.
In these cases the physical distance may result in a lack of output around the crossover frequency. There are various ways to tackle this problem:
- ask the manufacturer how much delay is added by their device
- if you have a microphone
- measure the actual delay (e.g. using Room EQ Wizard)
- use the "sub distance tweak" (i.e. use an RTA and measure the combined response, adjust distance to achieve most SPL through the crossover range)
- guess and add ~2ft to the measured distance
Volume Level
Using an SPL Meter
This is a simple and reliable way to get the levels right. To do this:
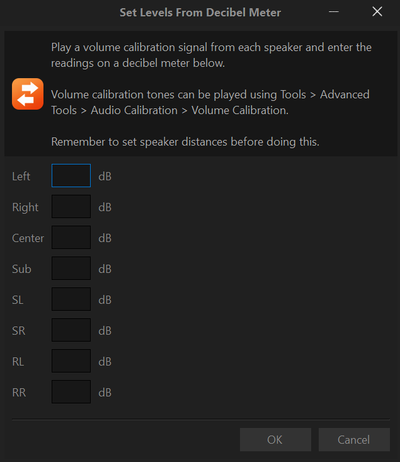
- click the "Set levels from decibel meter" link at the bottom of the page
- follow the instructions on the page to play the test tones
- hold the SPL meter at the listening position & measure each speaker in turn
- enter the measured SPL in dB into the form
- Click OK, the level meters will now be set for each speaker measured
By Ear
Use Tools > Advanced Tools > Audio Calibration > Volume Calibration to play band limited pink noise through each speaker in turn. Cycle back and forth through the channels, adjusting the volume sliders as you go until you perceive each speaker as playing at the same volume.
Bass Management
This section allows you to route low frequency content to the subwoofer channel while maintaining the correct levels with respect to the LFE channel.
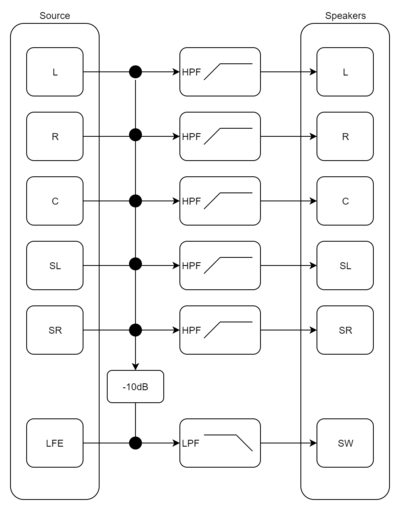
This diagram illustrates the processing performed
NB: See Editing the Bass Management Diagram for details on how to update this diagram.
There are 2 options to configure for each main channel
- Crossover
- Routing
Crossover represents the high pass filter applied to the main channel, this applies a butterworth high pass filter with user selectable
- frequency (40, 60, 80, 100, 120, 200Hz)
- slope (12, 24dB)
As per the diagram, the high passed content remains on the specified main channel.
Routing represents the low pass filter side of the equation, the following options are available
- remove bass below crossover: this option simply throws away the content
- this is the default option, remember to change this value as this option is not the norm
- move bass to subwoofer: this is the traditional bass management option, the content is summed into the SW channel along with the LFE channel and any other main channels
- copy bass to subwoofer: this is colloquially known as "double bass" or "LFE+Main", in this case the main channel receives a full range signal and the subwoofer also receives the low passed content
- this option should only be used with extremely capable (i.e. quite large) speakers unless an additional high pass filter is added via Parametric Equalizer
When the move or copy option is selected, the slope of the low pass filter can be chosen independently of the high pass filter. 12, 24, 36 and 48dB options are provided and the filter is, as usual, a Butterworth filter.
THX Style Bass Management
A conventional approach to bass management uses the following options
- crossover: 80Hz, 12dB slope
- routing: move bass to subwoofer, 24dB slope
A Recommended Approach
Note that the conventional approach described above assumes the use of the main speaker that exhibits a 2nd order rolloff at 80Hz (i.e. is a theoretically perfect sealed speaker with an Fs of 80Hz).
This will almost never exist in reality so a more sensible recommendation is to use symmetric slopes, i.e.
- use 24dB on for both crossover and routing
- use a crossover frequency that is suitable for your speakers (might be more or less than 80Hz)
Bass Management In Action
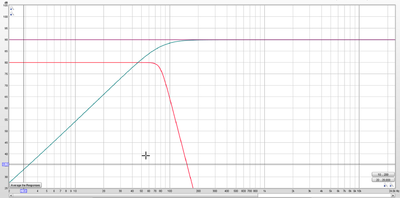
This graph shows the results of the default crossover settings
- red: a low passed main channel with a 48dB slope at 80Hz
- cyan: a high passed main channel with a 12dB slope at 80Hz
- purple: the LFE channel only (i.e. a Parametric Equalizer#Mixing function is used to move the main channel to the SW channel before room correction executes)
There are a couple of extremely important points to note from the example above
Downstream Must Add 10dB to the SW
The red and cyan lines (high and low passed main channel) are 10dB apart. This means something downstream of Room Correction must add 10dB to the SW channel.
https://yabb.jriver.com/interact/index.php/topic,114602.0.html discusses this point. The author supposes that this is the normal behaviour of an AV receiver or processor when handling a multichannel LPCM stream.
If you use room correction but do not use such a device, you must handle this 10dB offset yourself
There is no LPF of LFE
AVRs often have a "LPF of LFE" option, i.e. they allow the user to specify a corner frequency for a low pass filter to apply to the LFE channel. The default is typically a 48dB/octave low pass filter at 120Hz.
Room Correction does not have such an option so will send a full range LFE signal to your subwoofer. Recent content is typically not filtered in the same way that Dolby Digital content was (i.e. in the DVD days, the LFE channel was low pass filtered at master time) so this configuration can result in unpleasant sounds emanating from your subwoofer.
To rectify this, apply an appropriate low pass filter via a Parametric Equalizer stage that has been placed after this module in DSP Studio.
Use of Butterworth Filters may produce cancellations in the in room response
MC uses butterworth filters for bass management. Multichannel content may have content on the LFE and main channels that is largely coherent (i.e. identical, or almost identical, sound). This can produce cancellations when the resulting content is reproduced and acoustically summed at the listening position.
Use the PEQ stages to apply custom bass management to avoid this.
See https://yabb.jriver.com/interact/index.php/topic,127245.0.html for details
Alternatives to Room Correction
The functionality in the room correction module can be replaced by:
- using Delay to account for different distances per speaker
- using Mixing, low pass filters and high pass filters to perform bass management
- performing all such functions via Convolution


