Auto-Import: Difference between revisions
No edit summary |
No edit summary |
||
| Line 22: | Line 22: | ||
You can enable or disable Background Auto-Import Scanning at <span style="color:#8B4513">Tools > Options > Libraries & Folders > Auto-Import > Run auto-import in background</span>. |
You can enable or disable Background Auto-Import Scanning at <span style="color:#8B4513">Tools > Options > Libraries & Folders > Auto-Import > Run auto-import in background</span>. |
||
[[File:MC19-AutoImport-Configuration.png|thumb|400px| |
[[File:MC19-AutoImport-Configuration.png|thumb|400px|right]] |
||
There are two major sections of the Auto-Import configuration dialog: |
There are two major sections of the Auto-Import configuration dialog: |
||
Revision as of 03:30, 25 March 2014
Media Center has a full-featured Auto-Import system. With this system you can:
- Define a set of folders that contain media, each of which have separate options defined.
- Manually scan all of your pre-defined folders on demand.
- Make use of the powerful Carnac (file name parsing) and Automatic Metadata Lookup features of Media Center
- Automatically apply tags to the files imported using powerful Tag on Import rules.
- Watch the folders automatically in the background for new files, without bogging down disk or network access.
In most cases, using Auto-Import to automatically watch your media locations on disk is the preferred means of Importing new content. Media Center turns this feature on by default, and automatically sets itself to to watch the locations found when it completed the automatic First-Use Scan. If you did not allow it to run this automated scan, then you will need to configure Auto-Import yourself.
You can configure Media Center's Auto-Import functionality via either:
- In MC's Options dialog at Tools > Options > Libraries & Folders > Auto-Import.
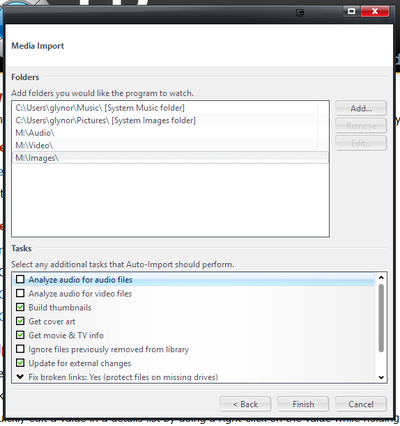
- The Media Import wizard at Tools > Import.
Configuring Auto-Import
You can configure Media Center's Auto-Import functionality via either:
- In MC's Options dialog at Tools > Options > Libraries & Folders > Auto-Import.
- The Media Import wizard at Tools > Import.
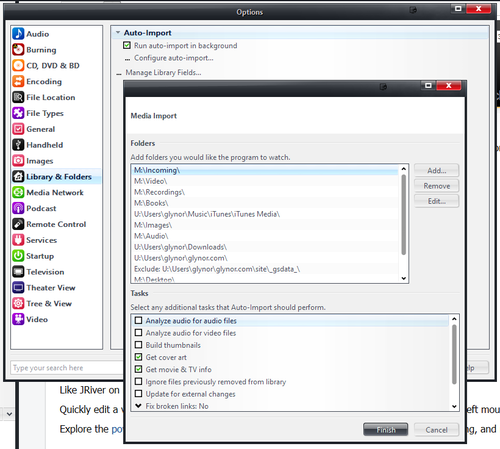
You can enable or disable Background Auto-Import Scanning at Tools > Options > Libraries & Folders > Auto-Import > Run auto-import in background.
There are two major sections of the Auto-Import configuration dialog:
- Folders - these are the folders that Auto-Import will watch for changes.
- Tasks - these are post-processing tasks that can be applied to newly imported files
Watched Folders
In the watched Folders section of the Auto-Import dialog, you can define a set of folders on disk that will be watched for changes. When you add a directory to the watched Folders list, Media Center will automatically monitor this directory, and any of its subdirectories, for new files and modifications to existing files. You can also specify folders to be excluded from monitoring.
Media Center can watch any folder you can mount natively on the filesystem. For OSX (and Linux), this includes any volume you can access from the Finder or Teminal prompt (which includes all local and network volumes). For Windows, this includes full support for:
- Local disks
- Mounted Network Drives (with a drive letter)
- UNC Paths (eg. \\server\share\path\to\folder\)
From the Folders section of the Auto-Import configuration dialog, you can:
- Add new folders to watch (or exclude from watching)
- Remove existing folder entries
- Edit existing folder entries
When you Add a new entry, or modify an existing entry, you will
Auto-Import Tasks
Background Scanning
Media Center's Auto-Import system runs by default in the background, and will automatically pick up changes in any of your defined Auto-Import Directories (detailed below). If needed, this feature can be disabled here: Tools > Options > Libraries & Folders > Auto-Import
With the background scanning feature disabled, you can still manually initiate a scan of your defined Auto-Import Directories with the Import Media wizard: Tools > Import
Media Center's Background Auto-Import works by:
- Monitoring File System Events for changes and responding instantly to only those files that changed in a watched directory.
- Running a background full-scan of the defined watched directories, and checking for changes, once every two hours. This is run with a low thread priority to prevent it from impacting foreground tasks.
Unlike the folder watching systems provided by many other applications, Media Center's background Auto-Import system relies, in part, upon a system called File System Events that is provided by your Operating System to allow it to respond to any changes made in a watched directory. This allows Media Center to react instantaneously when any changes are committed to a watched directory (you don't have to wait for the next "pass" on a timer), and prevents performance bottlenecks associated with regularly scanning the directories for all changes. Instead, when a single file is added or modified in a watched directory, Media Center is notified immediately by the underlying OS, and can react to only that file.
This system requires support from the Operating System and filesystem. Currently, this feature requires:
- Windows or OSX versions of Media Center
- Watched folders on a watchable filesystem (NTFS or network drive for Windows, any supported filesystem on OSX)
- If using a network volume, the server or NAS device must properly support File System Events.
This allows Media Center to instantly respond to changes in the file system without having to bog your disk (or, worse, network interface) down with constant checks for changes in your media storage locations, most of which will not have changed. Therefore, this allows Media Center to schedule its periodic full scans of your media locations far less often than would be needed otherwise. If your storage device does not support File System events, it will still pick up new files automatically once every two hours. You can schedule additional checks yourself using MC's Automation capabilities (see below for details).


