InflatableMouse-temp: Difference between revisions
No edit summary |
No edit summary |
||
| Line 24: | Line 24: | ||
It can also be quite demanding of your hardware in its default configuration. Unlike most HTPC tasks, madVR uses your GPU to handle its advanced scaling and image processing, and that is often a component that people do not consider when building a HTPC. |
It can also be quite demanding of your hardware in its default configuration. Unlike most HTPC tasks, madVR uses your GPU to handle its advanced scaling and image processing, and that is often a component that people do not consider when building a HTPC. |
||
To access the madVR configuration, you need to start playing a video (I would then recommend pausing it) right-click anywhere on the screen, and go to: |
<span style="color: red;"><b><i>To access the madVR configuration</i></b></span>, you need to start playing a video (I would then recommend pausing it) right-click anywhere on the screen, and go to: |
||
<span style="color: brown;">DirectShow Filters → madVR</span> |
<span style="color: brown;">DirectShow Filters → madVR</span> |
||
| Line 39: | Line 39: | ||
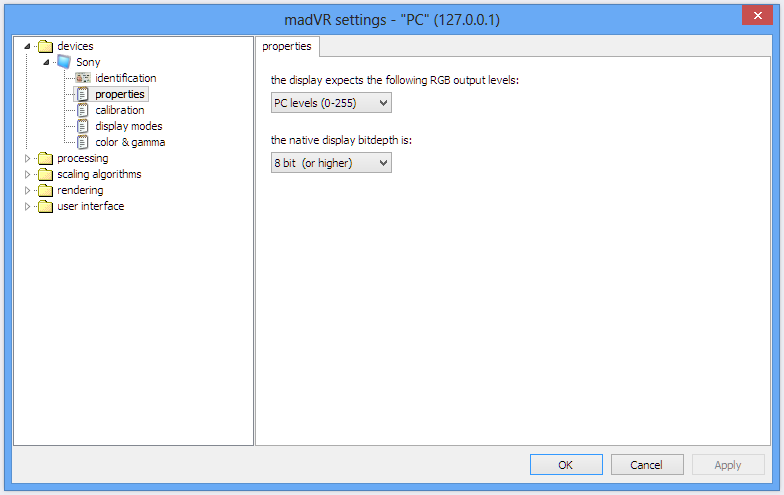
[[File:02-propertiesa4ux8.png|none|frame|Properties tab in MadVR Settings]] |
[[File:02-propertiesa4ux8.png|none|frame|Properties tab in MadVR Settings]] |
||
This allows you to set the levels madVR will output to Windows, and the level of dithering used. |
|||
Regardless of what your display accepts, whether it is 16–235 or 0–255, it should be left at 0–255 to avoid having the image appear “washed out”. |
|||
Typically if you need to send 16–235 to a display, you will use the video card output to set that, not the video renderer. |
|||
And unless you specifically know that your display is using less than 8-bit natively, you should leave that option at 8-bit. Reducing it increases the amount of dithering (noise) madVR will add to the image. |
|||
==Calibration== |
|||
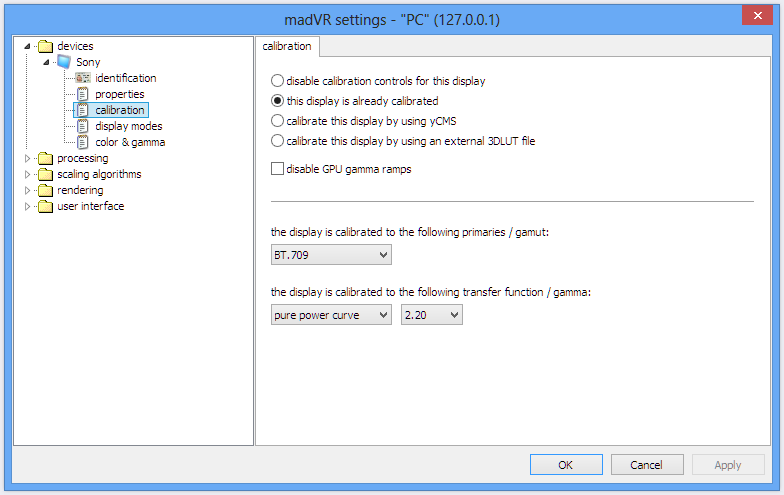
[[File:03-calibrationoluk8.png|none|frame|Calibration tab in MadVR Settings]] |
|||
madVR has a number of advanced calibration options, but I will not be going over them in detail in this guide—calibration could have a whole guide written about it alone. |
|||
Unless you are looking to use the more advanced calibration features of madVR, it is generally best to leave it configured as shown above. |
|||
With HD content these settings mean that color should look the same as other video renderers, but with SD video, it allows madVR to perform the colorspace transformations required for SMPTE-C and EBU/PAL content. |
|||
These colorspace transformations require a small amount of GPU power, so if your computer is really struggling to play back video smoothly in madVR, it will have to be disabled. |
|||
The yCMS and 3DLUT options are a lot more complicated to use, and are also more demanding of your GPU. |
|||
==Display Modes== |
|||
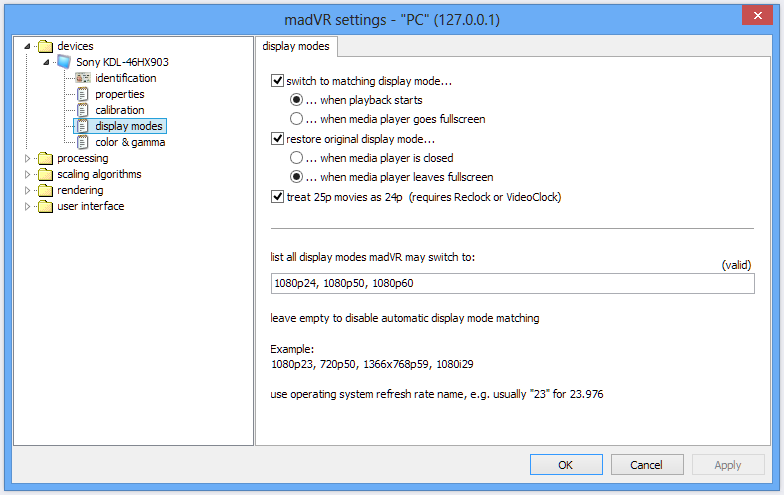
[[File:Refresh-rates1oj0c.png|none|frame|Display Modes tab in MadVR Settings]] |
|||
madVR includes a display mode switcher for automatic resolution and refresh rate changing. |
|||
Most people will be using madVR to handle video scaling, so it will only be used to change refresh rates. |
|||
These are simply entered using comma separated values. Be sure that your display actually supports the resolutions you have selected. I would suggest that you try switching to them via your graphics cardʼs control panel first. |
|||
The treat 25p movies as 24p (requires Reclock) option is useful for those of us with PAL film-based content (typically DVDs) as it allows either ReClock or JRiverʼs VideoClock (the text needs updated) to play back PAL content at the original 24p speed, rather than being sped-up to 25fps. |
|||
All this option does is tell madVR to switch to the best display mode for 24p when you are playing back 25p content—how that is handled is up to the player. (which is fine if you are using ReClock/VideoClock) |
|||
madVRʼs display mode switcher is a bit more advanced than Media Centerʼs switcher right now, so I would recommend using it instead. With IVTC content (which I will detail later) it switches the display to 24p, whereas JRiverʼs switcher does not. |
|||
<span style="color: blue;"><b><i>Updated 13/06/2013:</i></b></span> There is an issue with Windows 8 where most video cards will switch to 23Hz and 59Hz when an application tries to set the refresh rate to 24Hz or 60Hz. madVR 0.86.3 fixes this problem. Media Center's switcher currently does not, and will switch to 23/59Hz rather than 24/60Hz as specified. |
|||
==Color & Gamma== |
|||
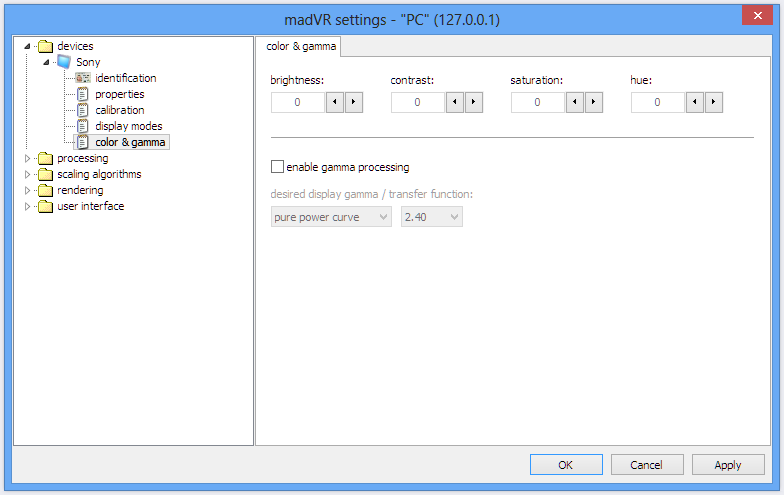
[[File:05-color-gammatcusb.png|none|frame|Color & Gamma tab in MadVR Settings]] |
|||
This section allows you to perform simple color & gamma adjustments to any video being rendered by madVR. |
|||
It is probably best that these are left alone for most users. |
|||
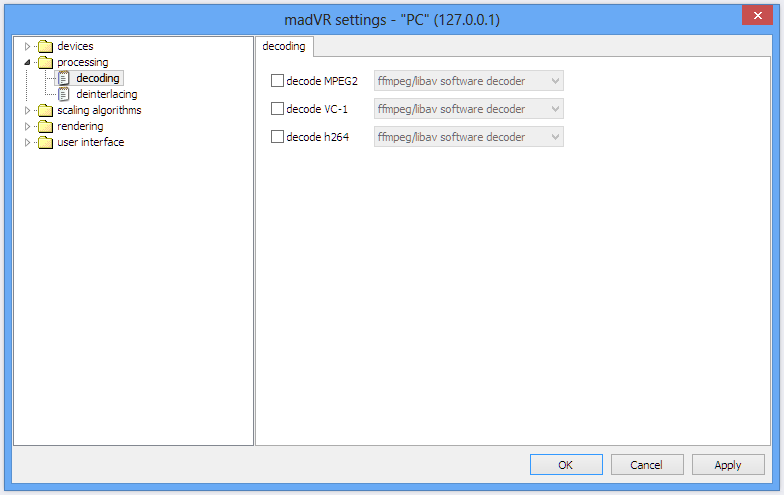
==Decoding== |
|||
[[File:06-decoding9auj1.png|none|frame|Color & Gamma tab in MadVR Settings]] |
|||
madVR has the option to handle video decoding itself. I recommend leaving that up to your player though. Media Center uses LAV Video for decoding. |
|||
In Media Center, under Tools → Options → Video there is an option to use hardware accelerated video decoding, which I recommend trying if you are having difficulty playing videos, or want to reduce power consumption during media playback. |
|||
<span style="color: blue;"><b><i>Updated 13/06/2013:</i></b></span> Media Center now uses LAV's DXVA2 Copy-Back decoding with Nvidia cards, so no further configuration is necessary when using hardware acceleration. |
|||
<!-- [[Category: Frequently Asked Questions|MadVR Guide]] --> |
<!-- [[Category: Frequently Asked Questions|MadVR Guide]] --> |
||
Revision as of 12:19, 19 January 2014
This is InflatableMouse' scratch page.
Note: this page is not done yet!
Overview
What is madVR?
madVR is an advanced video renderer written by Mathias Rauen, which leverages the power of your graphics card (hereby referred to as “GPU”) for advanced video scaling and processing. Just some of the advanced features that madVR offers include: high precision YUV>RGB conversion, inverse-telecine with decimation to extract 24p from a 29fps source; frame blending to play back video smoothly regardless of the source framerate and your refresh rate; colorspace transformations and 3DLUT calibration.
How do I use madVR?
In JRiver Media Center, madVR is activated by changing the video mode from Red October Standard to Red October HQ.
Tools → Options → Video → General Video Settings → Video Mode: Red October HQ
The next time you play a video, Media Center will download the required files for the plugin to work.
| Important Note by JRiver -- Nothing further is required in order to enjoy the benefits of madVR. The following instructions should be considered for expert level users only. |
|---|
Configuring madVR
madVR has a lot of options, which can be confusing for new users. It can also be quite demanding of your hardware in its default configuration. Unlike most HTPC tasks, madVR uses your GPU to handle its advanced scaling and image processing, and that is often a component that people do not consider when building a HTPC.
To access the madVR configuration, you need to start playing a video (I would then recommend pausing it) right-click anywhere on the screen, and go to:
DirectShow Filters → madVR
The first section to configure is Devices.
There may be a few devices already listed here even if you have not used madVR before, as the build Media Center downloads has some pre-configured. You can simply right-click and delete them—but leave the entry for your display. You can select what type of device is connected in this tab, but it doesnʼt affect anything other than the icon displayed.
Below that is the Identification section, but there is nothing to configure there—it just gives you some additional information based on your displayʼs EDID data.
Next is the Properties Tab.
This allows you to set the levels madVR will output to Windows, and the level of dithering used.
Regardless of what your display accepts, whether it is 16–235 or 0–255, it should be left at 0–255 to avoid having the image appear “washed out”. Typically if you need to send 16–235 to a display, you will use the video card output to set that, not the video renderer.
And unless you specifically know that your display is using less than 8-bit natively, you should leave that option at 8-bit. Reducing it increases the amount of dithering (noise) madVR will add to the image.
Calibration
madVR has a number of advanced calibration options, but I will not be going over them in detail in this guide—calibration could have a whole guide written about it alone.
Unless you are looking to use the more advanced calibration features of madVR, it is generally best to leave it configured as shown above. With HD content these settings mean that color should look the same as other video renderers, but with SD video, it allows madVR to perform the colorspace transformations required for SMPTE-C and EBU/PAL content. These colorspace transformations require a small amount of GPU power, so if your computer is really struggling to play back video smoothly in madVR, it will have to be disabled.
The yCMS and 3DLUT options are a lot more complicated to use, and are also more demanding of your GPU.
Display Modes
madVR includes a display mode switcher for automatic resolution and refresh rate changing.
Most people will be using madVR to handle video scaling, so it will only be used to change refresh rates. These are simply entered using comma separated values. Be sure that your display actually supports the resolutions you have selected. I would suggest that you try switching to them via your graphics cardʼs control panel first.
The treat 25p movies as 24p (requires Reclock) option is useful for those of us with PAL film-based content (typically DVDs) as it allows either ReClock or JRiverʼs VideoClock (the text needs updated) to play back PAL content at the original 24p speed, rather than being sped-up to 25fps. All this option does is tell madVR to switch to the best display mode for 24p when you are playing back 25p content—how that is handled is up to the player. (which is fine if you are using ReClock/VideoClock)
madVRʼs display mode switcher is a bit more advanced than Media Centerʼs switcher right now, so I would recommend using it instead. With IVTC content (which I will detail later) it switches the display to 24p, whereas JRiverʼs switcher does not.
Updated 13/06/2013: There is an issue with Windows 8 where most video cards will switch to 23Hz and 59Hz when an application tries to set the refresh rate to 24Hz or 60Hz. madVR 0.86.3 fixes this problem. Media Center's switcher currently does not, and will switch to 23/59Hz rather than 24/60Hz as specified.
Color & Gamma
This section allows you to perform simple color & gamma adjustments to any video being rendered by madVR. It is probably best that these are left alone for most users.
Decoding
madVR has the option to handle video decoding itself. I recommend leaving that up to your player though. Media Center uses LAV Video for decoding.
In Media Center, under Tools → Options → Video there is an option to use hardware accelerated video decoding, which I recommend trying if you are having difficulty playing videos, or want to reduce power consumption during media playback.
Updated 13/06/2013: Media Center now uses LAV's DXVA2 Copy-Back decoding with Nvidia cards, so no further configuration is necessary when using hardware acceleration.

