DSP: Difference between revisions
No edit summary |
RoderickGI (talk | contribs) |
||
| (23 intermediate revisions by 3 users not shown) | |||
| Line 1: | Line 1: | ||
== What is DSP Studio? == |
|||
<span style="color:#8B4513">Player > SP Studio</span>, or click the[[Image:image55_20.png]]button under the Player Window. |
|||
DSP Studio allows you to apply a variety of powerful and flexible [http://en.wikipedia.org/wiki/Digital_signal_processing digital signal processors] in order to implement features like: |
|||
* active crossovers |
|||
| ⚫ | |||
* room and speaker correction |
|||
* equal loudness volume controls |
|||
and much much more. |
|||
This is achieved via the use of built functionality or via third party [https://en.wikipedia.org/wiki/Virtual_Studio_Technology VST] plugins. |
|||
To access DSP Studio, you can either: |
|||
* Choose the <i>Player Menu</i>, then <i>DSP Studio</i>; or |
|||
* Click the DSP button on the main UI screen; or |
|||
[[File:open_dsp_studio.png|frameless|250px]] |
|||
* Use the CTRL+D keyboard shortcut |
|||
== Available DSPs == |
|||
DSP Studio contains a number of high-quality Digital Signal Processors, much like those that would be included in a high-end AV Receiver (and individual pro components). These include: |
|||
* [[Output Format]] |
|||
* [[Volume Leveling]] |
|||
* [[Adaptive Volume]] |
|||
* [[Equalizer]] |
* [[Equalizer]] |
||
* [[ |
* [[Parametric Equalizer]] |
||
* [[Effects]] |
|||
* [[Headphones]] |
|||
* [[Tempo and Pitch|Tempo & Pitch]] |
|||
* [[Room Correction]] |
|||
* [[Convolution]] |
|||
* [[Parametric Equalizer 2]] |
|||
== Managing VST Plugins == |
|||
[https://en.wikipedia.org/wiki/Virtual_Studio_Technology VST] is a standard interface for audio plugins. |
|||
=== Adding a VST === |
|||
To add a VST: |
|||
* Open DSP Studio |
|||
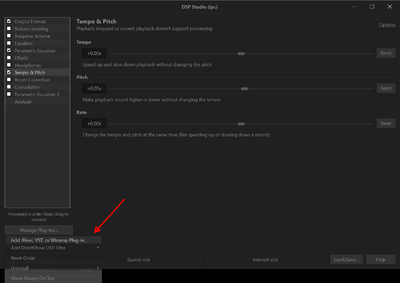
* Click Manage Plugins > Add JRiver, VST, Winamp Plug-in... |
|||
[[File:add_vst.png|frameless|400px]] |
|||
* Select the VST DLL from your filesystem |
|||
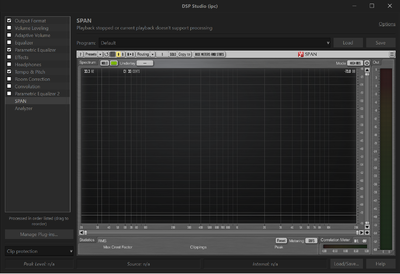
* The VST should now appear in the DSP list, in this example we've added Voxengo SPAN |
|||
[[File:vst_example.png|frameless|400px]] |
|||
=== Removing a VST === |
|||
To remove a VST: |
|||
* Open DSP Studio |
|||
* Click Manage Plugins > Uninstall |
|||
* Select the plugin to remove |
|||
=== VST Versions === |
|||
Media Center supports VST2 and VST3 Plug-ins. (See VST discussion at https://yabb.jriver.com/interact/index.php/topic,126706.0.html) |
|||
== Controlling the DSP Processing Chain == |
|||
=== Ordering DSPs === |
|||
The order in which the DSP blocks are processed can be changed by dragging and dropping the relevant block. This enables you to choose in which order certain actions are performed. |
|||
The exceptions to this rule are [[Output Format]], [[Volume Leveling]] and [[Adaptive Volume]] which must be processed first. |
|||
=== Enabling and Disabling Individual Blocks === |
|||
Each block has a checkbox next to it, if the box is unchecked then the block is ignored. |
|||
=== Additional Options === |
|||
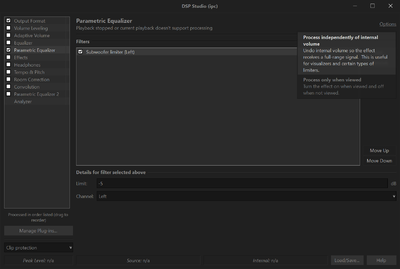
An options button appears in the top right corner of DSP studio for some blocks. This allows you to set 2 additional options for that block: |
|||
* process independently of internal volume: this means the block receives a signal that has not been affected by the volume control |
|||
* process only when viewed: typically useful for visualisers to avoid the cpu cost when the block is not visible |
|||
[[File:dsp_studio_control.png|frameless|400px]] |
|||
== Understanding the Playback Chain == |
|||
[[Audio Path]] is always on hand to provide a detailed description of exactly what processing is applied during playback. |
|||
| ⚫ | |||
* [[Audio Setup]] |
|||
* [[Audio Troubleshooting Guide]] |
|||
* [[Replay Gain]] |
* [[Replay Gain]] |
||
* [[ |
* [[Volume]] |
||
[[Category:DSP]] |
|||
[[Category:Linked From MC]] |
|||
Latest revision as of 01:05, 20 October 2020
What is DSP Studio?
DSP Studio allows you to apply a variety of powerful and flexible digital signal processors in order to implement features like:
- active crossovers
- room and speaker correction
- equal loudness volume controls
and much much more.
This is achieved via the use of built functionality or via third party VST plugins.
To access DSP Studio, you can either:
- Choose the Player Menu, then DSP Studio; or
- Click the DSP button on the main UI screen; or
- Use the CTRL+D keyboard shortcut
Available DSPs
DSP Studio contains a number of high-quality Digital Signal Processors, much like those that would be included in a high-end AV Receiver (and individual pro components). These include:
- Output Format
- Volume Leveling
- Adaptive Volume
- Equalizer
- Parametric Equalizer
- Effects
- Headphones
- Tempo & Pitch
- Room Correction
- Convolution
- Parametric Equalizer 2
Managing VST Plugins
VST is a standard interface for audio plugins.
Adding a VST
To add a VST:
- Open DSP Studio
- Click Manage Plugins > Add JRiver, VST, Winamp Plug-in...
- Select the VST DLL from your filesystem
- The VST should now appear in the DSP list, in this example we've added Voxengo SPAN
Removing a VST
To remove a VST:
- Open DSP Studio
- Click Manage Plugins > Uninstall
- Select the plugin to remove
VST Versions
Media Center supports VST2 and VST3 Plug-ins. (See VST discussion at https://yabb.jriver.com/interact/index.php/topic,126706.0.html)
Controlling the DSP Processing Chain
Ordering DSPs
The order in which the DSP blocks are processed can be changed by dragging and dropping the relevant block. This enables you to choose in which order certain actions are performed.
The exceptions to this rule are Output Format, Volume Leveling and Adaptive Volume which must be processed first.
Enabling and Disabling Individual Blocks
Each block has a checkbox next to it, if the box is unchecked then the block is ignored.
Additional Options
An options button appears in the top right corner of DSP studio for some blocks. This allows you to set 2 additional options for that block:
- process independently of internal volume: this means the block receives a signal that has not been affected by the volume control
- process only when viewed: typically useful for visualisers to avoid the cpu cost when the block is not visible
Understanding the Playback Chain
Audio Path is always on hand to provide a detailed description of exactly what processing is applied during playback.


