Lip Sync: Difference between revisions
RoderickGI (talk | contribs) No edit summary |
|||
| (2 intermediate revisions by 2 users not shown) | |||
| Line 16: | Line 16: | ||
* LEFT Half --> Press "<" (eg "SHIFT + COMMA") |
* LEFT Half --> Press "<" (eg "SHIFT + COMMA") |
||
* RIGHT Half --> Press ">" (eg "SHIFT + PERIOD") |
* RIGHT Half --> Press ">" (eg "SHIFT + PERIOD") |
||
* Reset adjustment --> Press "?" (eg "SHIFT + /") |
|||
... repeat till the Beep coincides with Red Segment at the Top (See Pic). You don't have to get this perfect (the adjustment is in 50ms increments) but you will be able to remove any noticeable lipsync. |
... repeat till the Beep coincides with Red Segment at the Top (See Pic). You don't have to get this perfect (the adjustment is in 50ms increments) but you will be able to remove any noticeable lipsync. |
||
| Line 31: | Line 32: | ||
[http://files.jriver.com/extras/av_sync_pal.zip AV Sync PAL.zip] |
[http://files.jriver.com/extras/av_sync_pal.zip AV Sync PAL.zip] |
||
[http://files.jriver.com/extras/av_sync_3D_mvc_film.zip AV Sync 3D MVC Film.zip] |
|||
[[File:AVSyncExample.png|frame|none]] |
|||
Link to Interact Thread |
Link to Interact Thread |
||
Latest revision as of 22:47, 6 April 2019
Overview
Lip Sync issues occur when the timing of the Audio and Video track are out of sync. MC allows you to adjust A/V sync correction in milliseconds to address Lipsync issues when playing back video.
Manually Setting A/V Correction by Zone
Under "Tools --> Options --> Video --> Advanced" there are two options to adjust A/V Sync correction on a per zone basis, one for when the display is in 24hz mode and one for other frequencies. You can manually add values (both +'ve and -'ve) to advance or retard the the Lipsync till it is in sync.
Adjusting the A/V Correction during Playback of a File
In addition, MC will allow you to modify the lipsync during playback of a video using keyboard shortcuts (SHIFT+COMMA and SHIFT+PERIOD). When doing lip-sync adjustment using keyboard shortcuts, the final result is saved in the PlaybackInfo tag of the file and these values will be used in subsequent playback.
Adjusting a Zones A/V Correction during Playback of a Calibration File
These should be pretty easy to use, just:
- Download the test file(s) of choice and unzip the MKV file(s),
- Import the MKV file(s) into Media Center and set the Media Sub Type to "System"
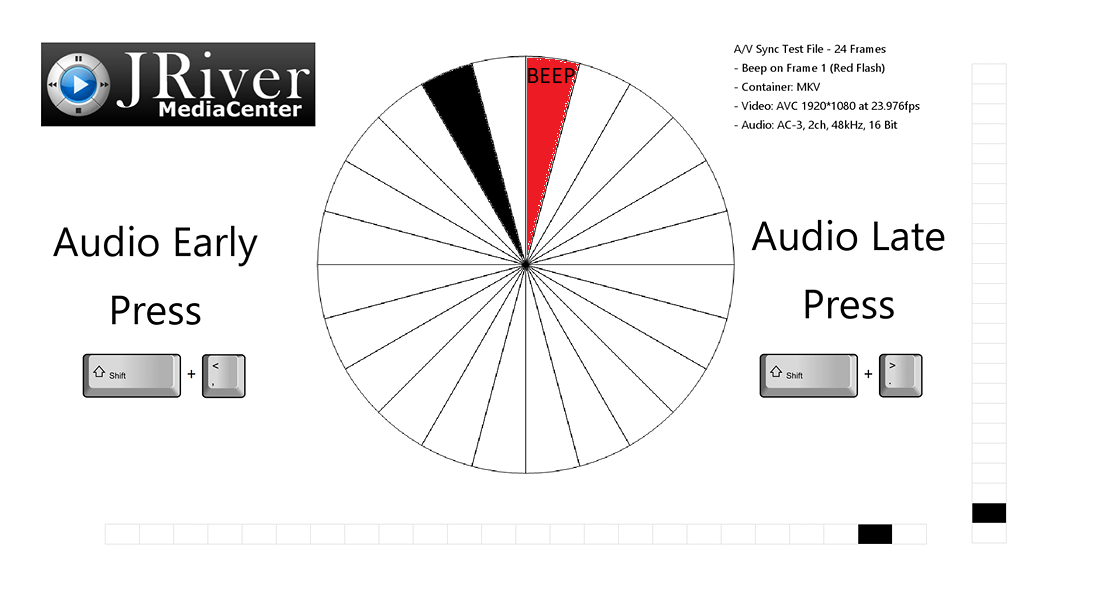
Play the test file and when you hear the BEEP and the Black Segment is in the:
- LEFT Half --> Press "<" (eg "SHIFT + COMMA")
- RIGHT Half --> Press ">" (eg "SHIFT + PERIOD")
- Reset adjustment --> Press "?" (eg "SHIFT + /")
... repeat till the Beep coincides with Red Segment at the Top (See Pic). You don't have to get this perfect (the adjustment is in 50ms increments) but you will be able to remove any noticeable lipsync.
Links: MC Stores the lip sync adjustment in values in "Tools--> Options--> Video--> Advanced--> A/V Sync correction". There is a value for 24hz Display and one for all else (eg 50, 60 etc).
- AV Sync Film (24MB) : This file is 23.976fps (typical Movies) and will populate the "24hz" Display value in MC
- AV Sync PAL (70MB) : This file is 50fps (typical PAL Video) and will populate the "50, 60 etc" Display value in MC
- AV Sync NTSC (86MB) : This file is 59.94fps (typical NTSC Video) and will populate the "50, 60 etc" Display value in MC
You probably only need the Film and either the PAL or NTSC test clip to calibrate your Display.
Link to Interact Thread
