Users: Difference between revisions
No edit summary |
|||
| (34 intermediate revisions by the same user not shown) | |||
| Line 1: | Line 1: | ||
| ⚫ | |||
== Overview == |
|||
| ⚫ | |||
The accounts are part of the library. The user accounts are included as part of a library backup, and any connected clients will have access to the same accounts as the server. |
The accounts are part of the library. The user accounts are included as part of a library backup, and any connected clients will have access to the same accounts as the server. |
||
| Line 9: | Line 7: | ||
User accounts change what files are shown in the library. However, they have no impact on a file's actual availability at the operating system level. |
User accounts change what files are shown in the library. However, they have no impact on a file's actual availability at the operating system level. |
||
'''None of this restricts access to the filesystem in any way.''' So, users can still all of the source media files via Windows Explorer. MC ''will'' refuse to play a file if opened (even from Windows Explorer) by a user without permissions for the file. But no other application will respect this restriction. Also, if you've created a user restriction via the ''Files to Show'' field in the ''Add User'' dialog, there is nothing to stop this user from simply re-opening the dialog and removing the filter. |
'''None of this restricts access to the filesystem in any way.''' So, users can still access all of the source media files via Windows Explorer. MC ''will'' refuse to play a file if opened (even from Windows Explorer) by a user without permissions for the file. But no other application will respect this restriction. Also, if you've created a user restriction via the ''Files to Show'' field in the ''Add User'' dialog, there is nothing to stop this user from simply re-opening the dialog and removing the filter. |
||
Passwords for the users are stored encrypted, but a clever person with a hex editor could remove the user accounts completely from the library. |
Passwords for the users are stored encrypted, but a clever person with a hex editor could remove the user accounts completely from the library. |
||
| Line 19: | Line 17: | ||
== Adding Users == |
== Adding Users == |
||
1. Add a new user via View > User > Add User |
1. Add a new user via <span style="color:#8B4513">View > User > Add User</span> |
||
2. Give the user a name, and a password if you want. |
2. Give the user a name, and a password if you want. |
||
| Line 25: | Line 23: | ||
[[File:MC19-Add User.png|frame|none]] |
[[File:MC19-Add User.png|frame|none]] |
||
Repeat the above to create additional users. You can add any number of users. For each user, you can optionally specify search criteria in order to hide items from that user (detailed below). |
Repeat the above to create additional users. You can add any number of users. For each user, you can optionally specify search criteria in order to hide items from that user ([[Users#Restrict_Files_or_Users|detailed below]]). |
||
== Choosing the Active User == |
== Choosing the Active User == |
||
| Line 39: | Line 37: | ||
If the user has a password, you will be prompted for it: |
If the user has a password, you will be prompted for it: |
||
<gallery widths="320px" heights="200px" mode="packed-hover"> |
|||
<gallery> |
|||
File:MC19-Switch_Users-StandardView_Password.png|Standard View |
File:MC19-Switch_Users-StandardView_Password.png|Standard View |
||
File:MC19-Switch Users-TheaterView Password.png|Theater View |
File:MC19-Switch Users-TheaterView Password.png|Theater View |
||
| Line 48: | Line 46: | ||
If you are using Media Network features, any connected clients (whether connected copies of MC, JRemote, Gizmo, or whatever) will "open as" whichever User is ''currently active on the server'' when first launched. In other words, whichever User happened to have been "last used", on the server, becomes is the "network client user setting". So, if you want to keep a default of a particular one of your users (the Everyday one, for example) then you'll want to make sure to leave the server set on the Everyday user when you're done using it. |
If you are using Media Network features, any connected clients (whether connected copies of MC, JRemote, Gizmo, or whatever) will "open as" whichever User is ''currently active on the server'' when first launched. In other words, whichever User happened to have been "last used", on the server, becomes is the "network client user setting". So, if you want to keep a default of a particular one of your users (the Everyday one, for example) then you'll want to make sure to leave the server set on the Everyday user when you're done using it. |
||
In connected copies of Media Center, however (the HTPC in the Living Room, for example) you are able to switch the active user to any of the other options (using the above explained methods). But when you close and re-open the client copy, it will revert back to whatever is currently active on the server. |
In connected copies of Media Center, however (the HTPC in the Living Room, for example) you are able to switch the active user to any of the other options (using the above explained methods). But when you close and re-open the client copy, it will revert back to whatever is currently active on the server. Access to this ability to switch users depends on support in the client (it is not currently supported in JRemote), and if not supported, you will be restricted to the user set on the Server. |
||
So what will often work best is if you have exactly this: An Everyday user (with no password) that you use regularly, and leave the Server set on (if using those features). And then you add a password to the Administrator account, and any other users you want restricted for some reason. |
So what will often work best is if you have exactly this: An Everyday user (with no password) that you use regularly, and leave the Server set on (if using those features). And then you add a password to the Administrator account, and any other users you want restricted for some reason. |
||
| Line 62: | Line 60: | ||
To locate the nUserId for each user you've added to your system, open the user.jmd file in your Library in a text editor, and locate the UD for the user you'd like to use: |
To locate the nUserId for each user you've added to your system, open the user.jmd file in your Library in a text editor, and locate the UD for the user you'd like to use: |
||
<pre |
<pre> |
||
<XMLPH version="1.0"> |
<XMLPH version="1.0"> |
||
<Item Name="WriteAccess">1</Item> |
<Item Name="WriteAccess">1</Item> |
||
| Line 75: | Line 73: | ||
<Item Name="Password"></Item> |
<Item Name="Password"></Item> |
||
<Item Name="DisplayName">Everyday</Item> |
<Item Name="DisplayName">Everyday</Item> |
||
</pre> |
|||
'''DO NOT MODIFY THIS FILE (doing so will damage the Library).''' |
'''DO NOT MODIFY THIS FILE (doing so will damage the Library).''' |
||
So, to switch to my Everyday user from the example above, using |
So, to switch to my Everyday user from the example above, using MC20, I'd use: |
||
<code> |
<code>mc20.exe /MCC 22028,1003</code> |
||
== Restrict Files or Users == |
== Restrict Files or Users == |
||
| Line 88: | Line 86: | ||
# the [User] Field for each file |
# the [User] Field for each file |
||
# the Files to Show field available when you create a new user |
# the Files to Show field available when you create a new user |
||
=== User Field Restrictions === |
=== User Field Restrictions === |
||
To restrict a file or files by the [User] field, add the username of the user that should see the files to the special [User] field. You can do this from the Tag Action Window (choose <span style="color:#8B4513">Also Show > User<span> |
To restrict a file or files by the [User] field, add the username of the user that should see the files to the special [User] field. You can do this from the Tag Action Window (choose <span style="color:#8B4513">Also Show > User</span> if needed). Then, only that user (and the Administrator) will see those files. In effect, you are "assigning" those files to that particular user. |
||
So, for any files you want to be seen only by your |
So, for any files you want to be seen only by your kids, you'd pick their account in the [User] drop-down list. And, for yours, pick your account. If you messed them up, use the Administrator account to find them and fix them. All other files where this [User] field is blank (so, every file before you start this mission) will be shown to all users and part of the common library. |
||
More than one user can own a particular file. If you assign two users to the same file (or files) then they will be able to see the files, but other users won't. |
More than one user can own a particular file. If you assign two users to the same file (or files) then they will be able to see the files, but other users won't. |
||
| Line 116: | Line 114: | ||
The upside to using the '''Files to Show''' restriction is that it doesn't block those files from other users inside MC (they remain within the "common user library"). And, it allows you to restrict files in a variety of categories from certain users "automatically" as you simply tag your files as you normally would anyway. With the [[Users#User_Field_Restrictions|User field method]], you have to explicitly assign individual files to a particular user (and then only that user can see the files). |
The upside to using the '''Files to Show''' restriction is that it doesn't block those files from other users inside MC (they remain within the "common user library"). And, it allows you to restrict files in a variety of categories from certain users "automatically" as you simply tag your files as you normally would anyway. With the [[Users#User_Field_Restrictions|User field method]], you have to explicitly assign individual files to a particular user (and then only that user can see the files). |
||
As a warning, these two items ''can'' exclude one another. So, using my example above where I assigned ABBA to the Kids and Snuggle Bunny users. If the Kids user has a search like the one above, and ABBA was classified as |
As a warning, these two items ''can'' exclude one another. So, using my example above where I assigned ABBA to the Kids and Snuggle Bunny users. If the Kids user has a search like the one above, and ABBA was classified as <tt>[Media Sub Type] == [https://en.wikipedia.org/wiki/Rule_34_%28Internet_meme%29 Adult]</tt>, then the Kids still wouldn't see the files even if you (perhaps accidentally) assigned those files to them. |
||
In this way, it is possible to hide some files from ''all users'', so be a bit careful. If the files in question are assigned to ''only'' a particular user, and that user has a filter in '''Files to Show''' that prevents them from seeing those files, then no one but the ''Administrator'' would be able to see the files. |
In this way, it is possible to hide some files from ''all users'', so be a bit careful. If the files in question are assigned to ''only'' a particular user, and that user has a filter in '''Files to Show''' that prevents them from seeing those files, then no one but the ''Administrator'' would be able to see the files. |
||
Also, note that the Edit Current User dialog box is not, itself, password protected. So there is nothing to stop a determined teenager from opening the same dialog box back up and removing the filter. As [[Users#Security_and_Scope|referenced above]], this feature is designed for convenience, not security. If you need to keep files on your filesystem secret, you should encrypt them on a [https://veracrypt.codeplex.com/ VeraCrypt volume]. |
|||
==== Advanced Files to Show Searches ==== |
==== Advanced Files to Show Searches ==== |
||
| Line 128: | Line 128: | ||
<code>-[Media Sub Type]=[Adult],[Home Video],[Karaoke],[System],[Test Clip] -[Genre]=[Child],[Holiday]</code> |
<code>-[Media Sub Type]=[Adult],[Home Video],[Karaoke],[System],[Test Clip] -[Genre]=[Child],[Holiday]</code> |
||
[[File:MC19-User Restrictions-Everyday Example.png|thumb|none| |
[[File:MC19-User Restrictions-Everyday Example.png|thumb|none|600px]] |
||
For a Kids user, you could use a Files to Show setting of: |
For a Kids user, you could use a Files to Show setting of: |
||
| Line 134: | Line 134: | ||
<code>-[Media Sub Type]=[Adult],[Karaoke],[System],[Test Clip] [Genre]=[Child],[Family],[Kids]</code> |
<code>-[Media Sub Type]=[Adult],[Karaoke],[System],[Test Clip] [Genre]=[Child],[Family],[Kids]</code> |
||
[[File:MC19-User Restrictions-Kids Example.png|thumb|none| |
[[File:MC19-User Restrictions-Kids Example.png|thumb|none|600px]] |
||
You can use the full power of MC's Search Rules to construct pretty much any combination of filters you can dream up. For further information, please see the [[ |
You can use the full power of MC's Search Rules to construct pretty much any combination of filters you can dream up. For further information, please see the [[Search Language]] page. |
||
=== Automatically Assigning a User At Import === |
=== Automatically Assigning a User At Import === |
||
If you want files from certain directories (or with certain other characteristics) to be automatically assigned to a particular user when new files are imported, you can use the [[ |
If you want files from certain directories (or with certain other characteristics) to be automatically assigned to a particular user when new files are imported, you can use the [[Tag_on_Import|Tag on Import feature of Auto-Import]] to automatically accomplish this task. |
||
If you only want to assign all files imported in a particular watched directory to a particular user, this is simple. |
If you only want to assign all files imported in a particular watched directory to a particular user, this is simple. |
||
| Line 147: | Line 147: | ||
# Add the following Custom Rule to the ''Apply these Tags'' section: |
# Add the following Custom Rule to the ''Apply these Tags'' section: |
||
< |
<pre> |
||
Field: User |
Field: User |
||
Value: <Username> |
Value: <Username> |
||
</ |
</pre> |
||
[[File:MC19-Tag On Import-Simple User Rule.png|thumb|none| |
[[File:MC19-Tag On Import-Simple User Rule.png|thumb|none|600px]] |
||
However, it will often be convenient to use searches on the path of the files within a "larger" watched directory to automatically assign the user depending on the specific file path. |
However, it will often be convenient to use searches on the path of the files within a "larger" watched directory to automatically assign the user depending on the specific file path. Rules that use expressions are often useful to automatically assign tags to files when you have Auto-Import set up to watch an entire directory tree, and files within these can be identified by their subdirectory. |
||
To assign files to the user "Snuggle Bunny" you'd add this rule: |
For example, if you have the entire <tt>C:\Users\</tt> directory watched, so that all files of all users get picked up by MC. To assign files to the user "Snuggle Bunny" you'd add this rule: |
||
< |
<pre> |
||
Rule Field: User |
Rule Field: User |
||
Value: If(IsEqual([Filename],Users\snugglebunny\Music,8),Snuggle Bunny,[User]) |
Value: If(IsEqual([Filename],Users\snugglebunny\Music,8),Snuggle Bunny,[User]) |
||
</ |
</pre> |
||
And, for yourself, you'd add: |
And, for yourself, you'd add: |
||
< |
<pre> |
||
Rule Field: User |
Rule Field: User |
||
Value: If(IsEqual([Filename],Users\ABBAlvr78\Music,8),ABBAlvr78,[User]) |
Value: If(IsEqual([Filename],Users\ABBAlvr78\Music,8),ABBAlvr78,[User]) |
||
</ |
</pre> |
||
Substituting your own usernames, of course. |
Substituting your own usernames, of course. |
||
[[Category:Frequently Asked Questions]] |
|||
Latest revision as of 16:39, 19 March 2016
MC19 adds user accounts to the library. User accounts allow you to control which users see what content in your library. User accounts can optionally be password protected. The User system replaces Access Control from earlier versions.
The accounts are part of the library. The user accounts are included as part of a library backup, and any connected clients will have access to the same accounts as the server.
Security and Scope
User accounts change what files are shown in the library. However, they have no impact on a file's actual availability at the operating system level.
None of this restricts access to the filesystem in any way. So, users can still access all of the source media files via Windows Explorer. MC will refuse to play a file if opened (even from Windows Explorer) by a user without permissions for the file. But no other application will respect this restriction. Also, if you've created a user restriction via the Files to Show field in the Add User dialog, there is nothing to stop this user from simply re-opening the dialog and removing the filter.
Passwords for the users are stored encrypted, but a clever person with a hex editor could remove the user accounts completely from the library.
The purpose of the feature is not about security. It is about hiding "noise" from users who don't need to see it (or shouldn't have it shoved in their faces). It is, as Matt put it originally, that:
The possibilities here are pretty endless, but our goals for MC19 are modest. I want a simple way to not see Curious George when I sit down at the couch. We're not trying to make everything in MC fully multi-user.
Adding Users
1. Add a new user via View > User > Add User
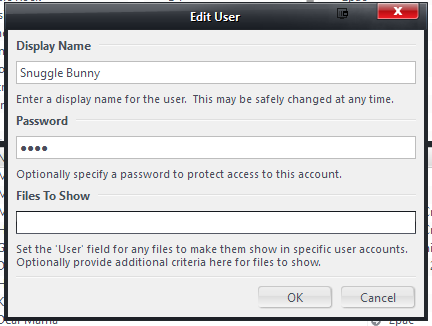
2. Give the user a name, and a password if you want.
Repeat the above to create additional users. You can add any number of users. For each user, you can optionally specify search criteria in order to hide items from that user (detailed below).
Choosing the Active User
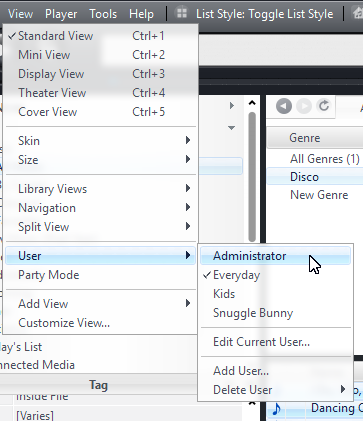
Switch users in Standard View using the View > User menu item.
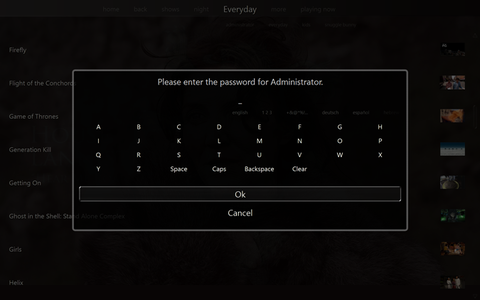
In Theater View, the User name will be shown in the Top Roller of your Views, and you can navigate to it and then choose the user you want to use.
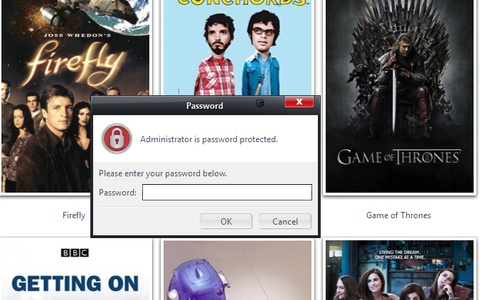
If the user has a password, you will be prompted for it:
Media Network Users
If you are using Media Network features, any connected clients (whether connected copies of MC, JRemote, Gizmo, or whatever) will "open as" whichever User is currently active on the server when first launched. In other words, whichever User happened to have been "last used", on the server, becomes is the "network client user setting". So, if you want to keep a default of a particular one of your users (the Everyday one, for example) then you'll want to make sure to leave the server set on the Everyday user when you're done using it.
In connected copies of Media Center, however (the HTPC in the Living Room, for example) you are able to switch the active user to any of the other options (using the above explained methods). But when you close and re-open the client copy, it will revert back to whatever is currently active on the server. Access to this ability to switch users depends on support in the client (it is not currently supported in JRemote), and if not supported, you will be restricted to the user set on the Server.
So what will often work best is if you have exactly this: An Everyday user (with no password) that you use regularly, and leave the Server set on (if using those features). And then you add a password to the Administrator account, and any other users you want restricted for some reason.
Automation
MC includes a MCC_SET_USER Core Command (22028) that can be used from the command line and from within scripts to switch select a specified user automatically.
To use this command, you can use the MC launcher from the command line with something like:
MC<version>.exe /MCC 22028,<nUserId>
To locate the nUserId for each user you've added to your system, open the user.jmd file in your Library in a text editor, and locate the UD for the user you'd like to use:
<XMLPH version="1.0">
<Item Name="WriteAccess">1</Item>
<Item Name="ID">0</Item>
<Item Name="VisibleFilesSearch"/>
<Item Name="Password"></Item>
<Item Name="DisplayName">Administrator</Item>
</XMLPH><XMLPH version="1.0">
<Item Name="WriteAccess">1</Item>
<Item Name="ID">1003</Item>
<Item Name="VisibleFilesSearch">-[Media Sub Type]=[Adult]</Item>
<Item Name="Password"></Item>
<Item Name="DisplayName">Everyday</Item>
DO NOT MODIFY THIS FILE (doing so will damage the Library).
So, to switch to my Everyday user from the example above, using MC20, I'd use:
mc20.exe /MCC 22028,1003
Restrict Files or Users
The special Administrator account (which cannot be removed) will always see all files. For regular users, by default, all files will also be visible (so part of the "common shared library"). You have two ways to "restrict" access to files:
- the [User] Field for each file
- the Files to Show field available when you create a new user
User Field Restrictions
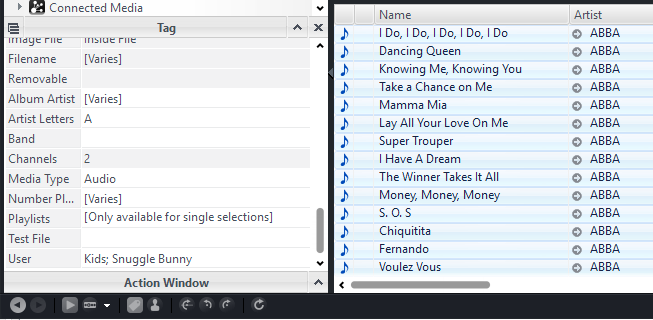
To restrict a file or files by the [User] field, add the username of the user that should see the files to the special [User] field. You can do this from the Tag Action Window (choose Also Show > User if needed). Then, only that user (and the Administrator) will see those files. In effect, you are "assigning" those files to that particular user.
So, for any files you want to be seen only by your kids, you'd pick their account in the [User] drop-down list. And, for yours, pick your account. If you messed them up, use the Administrator account to find them and fix them. All other files where this [User] field is blank (so, every file before you start this mission) will be shown to all users and part of the common library.
More than one user can own a particular file. If you assign two users to the same file (or files) then they will be able to see the files, but other users won't.
Files to Show User Restrictions
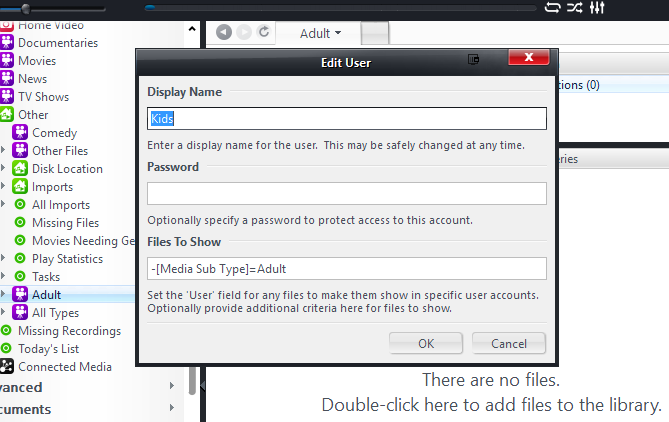
If instead of assigning files to a particular user, you want to restrict what that user can see in the library, you can add a Search Expression to the Files to Show box in the Edit User dialog (shown above). This will be applied in addition to whatever restrictions are applied by tagging individual files with a [User] tag. This method is probably best reserved for intermediately experienced users, but it can be handy when you want to restrict a particular user from certain categories of content.
As an example, if I added the following search to my "Snuggle Bunny" user above:
[Media Sub Type]=Adult
It would change the whole meaning of the pet name, and that user would see only things marked as adult (everywhere else in my Library would be blank). To do the reverse, for a child's account, for example, you use this instead:
-[Media Sub Type]=Adult
The upside to using the Files to Show restriction is that it doesn't block those files from other users inside MC (they remain within the "common user library"). And, it allows you to restrict files in a variety of categories from certain users "automatically" as you simply tag your files as you normally would anyway. With the User field method, you have to explicitly assign individual files to a particular user (and then only that user can see the files).
As a warning, these two items can exclude one another. So, using my example above where I assigned ABBA to the Kids and Snuggle Bunny users. If the Kids user has a search like the one above, and ABBA was classified as [Media Sub Type] == Adult, then the Kids still wouldn't see the files even if you (perhaps accidentally) assigned those files to them.
In this way, it is possible to hide some files from all users, so be a bit careful. If the files in question are assigned to only a particular user, and that user has a filter in Files to Show that prevents them from seeing those files, then no one but the Administrator would be able to see the files.
Also, note that the Edit Current User dialog box is not, itself, password protected. So there is nothing to stop a determined teenager from opening the same dialog box back up and removing the filter. As referenced above, this feature is designed for convenience, not security. If you need to keep files on your filesystem secret, you should encrypt them on a VeraCrypt volume.
Advanced Files to Show Searches
You can use this feature to create a wide variety of powerful searches in order to restrict files from particular users. However, remember that you don't need to construct these by hand. The simplest way to make a search is to make a Smartlist, and use that as your template. The Smartlist will show whatever files the user will see (when viewed from the Administrator's account).
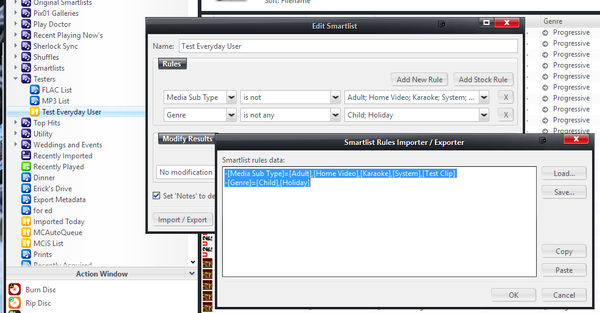
To create a user called Everyday that hides files from a variety of categories, you could use a search like:
-[Media Sub Type]=[Adult],[Home Video],[Karaoke],[System],[Test Clip] -[Genre]=[Child],[Holiday]
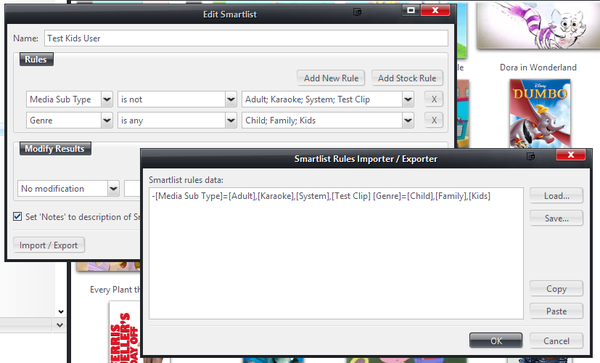
For a Kids user, you could use a Files to Show setting of:
-[Media Sub Type]=[Adult],[Karaoke],[System],[Test Clip] [Genre]=[Child],[Family],[Kids]
You can use the full power of MC's Search Rules to construct pretty much any combination of filters you can dream up. For further information, please see the Search Language page.
Automatically Assigning a User At Import
If you want files from certain directories (or with certain other characteristics) to be automatically assigned to a particular user when new files are imported, you can use the Tag on Import feature of Auto-Import to automatically accomplish this task.
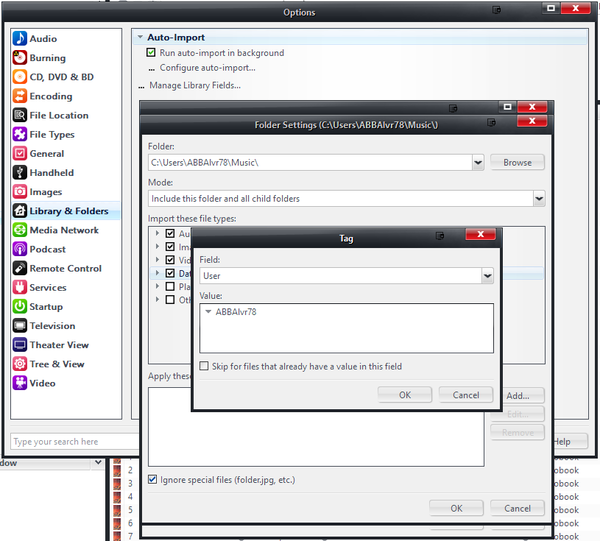
If you only want to assign all files imported in a particular watched directory to a particular user, this is simple.
- Open up the Auto-Import settings
- Edit the entry for the particular watched folder for which you'd like to add the tag
- Add the following Custom Rule to the Apply these Tags section:
Field: User
Value: <Username>
However, it will often be convenient to use searches on the path of the files within a "larger" watched directory to automatically assign the user depending on the specific file path. Rules that use expressions are often useful to automatically assign tags to files when you have Auto-Import set up to watch an entire directory tree, and files within these can be identified by their subdirectory.
For example, if you have the entire C:\Users\ directory watched, so that all files of all users get picked up by MC. To assign files to the user "Snuggle Bunny" you'd add this rule:
Rule Field: User
Value: If(IsEqual([Filename],Users\snugglebunny\Music,8),Snuggle Bunny,[User])
And, for yourself, you'd add:
Rule Field: User
Value: If(IsEqual([Filename],Users\ABBAlvr78\Music,8),ABBAlvr78,[User])
Substituting your own usernames, of course.
