Connected Media: Difference between revisions
(Created page with "View --> Add View --> Library View --> and then in order: - First Change the Location to (Root), then - Scrowl down the Icon List and select "Empty View" - Give it a Name (eg ...") |
|||
| (11 intermediate revisions by the same user not shown) | |||
| Line 1: | Line 1: | ||
Media Center supports the importing and playback of Web Based media such as Internet Radio Stations. |
|||
== Importing Streaming Radio Stations into Media Center == |
|||
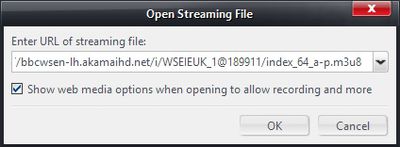
* File --> Open URL --> Paste in your Streaming Radio url |
|||
* Check "Show web media options when opening to allow recording and more" and then Press OK |
|||
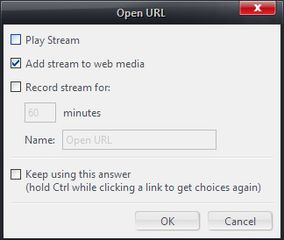
* On the Open URL Dialogue box Check "Add stream to web media" only and then Press OK |
|||
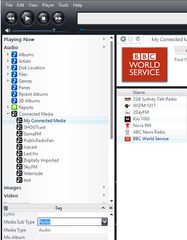
* In MC Navigate to Audio --> Connected Media --> My Connected Media and you should be able to see and playback your Internet Radio Stations |
|||
* You can now update the Tags, Add Coverart etc as with any other Media Center item |
|||
* If you plan to make these visible in a View (as described in the next section) you will need to change the "Media Sub Type" tag to "Radio" |
|||
<gallery widths=400px heights=240px> |
|||
File:OpenStreamingFile.jpg |
|||
File:OpenURL.jpg |
|||
File:MyConnectedMedia.jpg |
|||
</gallery> |
|||
== Setup Media Center Views for your Streaming Radio Stations == |
|||
While you can now see and play these from Media Center's Standard View, you may want to make a View so these can also be used by "Remotes" or in "TheaterView". To do this you first need to create a View. |
|||
View --> Add View --> Library View --> and then in order: |
View --> Add View --> Library View --> and then in order: |
||
* First Change the Location to (Root), then |
|||
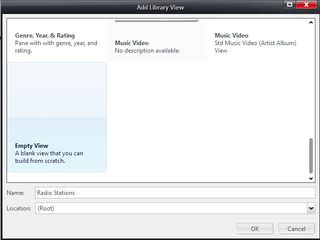
* Scroll down the Icon List and select "Empty View" |
|||
* Give it a Name (eg "Radio Stations") |
|||
You will then be presented a "Customise View" Windows and in this: |
You will then be presented a "Customise View" Windows and in this: |
||
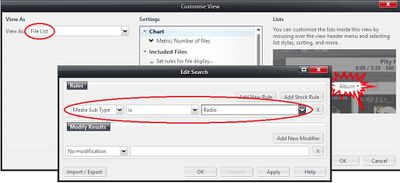
* Change View As: to "File List", then |
|||
* Select "... Set rules for file display" and the "Edit Search Window" will appear |
|||
* Under the Rules Select "Media Sub Type" "is" "Radio" as shown |
|||
| ⚫ | |||
<gallery widths=400px heights=240px> |
|||
| ⚫ | |||
File:AddLibraryView.jpg |
|||
File:CustomiseView_EditSearch.jpg |
|||
File:RadioStations.jpg |
|||
</gallery> |
|||
You can now add this view so it appears in the Remotes (Gizmo/Jremote/EOS etc) and MC will pass the URL to these players and in most cases the local device will be able to play the stream directly from the Web (you device will need to be able to playback these streams natively as they are not transcoded by Media Server). NOTE: If at first you don't see the entries in the new view in the Remotes, you may have to close and restart Media Center and Media Server. They should then appear. |
|||
Empty View and Give it Name such as "Radio Stations" and a Location (Root) |
|||
Latest revision as of 06:04, 5 July 2015
Media Center supports the importing and playback of Web Based media such as Internet Radio Stations.
Importing Streaming Radio Stations into Media Center
- File --> Open URL --> Paste in your Streaming Radio url
- Check "Show web media options when opening to allow recording and more" and then Press OK
- On the Open URL Dialogue box Check "Add stream to web media" only and then Press OK
- In MC Navigate to Audio --> Connected Media --> My Connected Media and you should be able to see and playback your Internet Radio Stations
- You can now update the Tags, Add Coverart etc as with any other Media Center item
- If you plan to make these visible in a View (as described in the next section) you will need to change the "Media Sub Type" tag to "Radio"
Setup Media Center Views for your Streaming Radio Stations
While you can now see and play these from Media Center's Standard View, you may want to make a View so these can also be used by "Remotes" or in "TheaterView". To do this you first need to create a View.
View --> Add View --> Library View --> and then in order:
- First Change the Location to (Root), then
- Scroll down the Icon List and select "Empty View"
- Give it a Name (eg "Radio Stations")
You will then be presented a "Customise View" Windows and in this:
- Change View As: to "File List", then
- Select "... Set rules for file display" and the "Edit Search Window" will appear
- Under the Rules Select "Media Sub Type" "is" "Radio" as shown
You may want to change the Displayed Columns in this new View to suit and to also help with tagging as you are going to need to make sure any imported URL's have a "Media Sub Type" set to "Radio" else they will not appear in this view (change this Tag in My Connected Media).
You can now add this view so it appears in the Remotes (Gizmo/Jremote/EOS etc) and MC will pass the URL to these players and in most cases the local device will be able to play the stream directly from the Web (you device will need to be able to playback these streams natively as they are not transcoded by Media Server). NOTE: If at first you don't see the entries in the new view in the Remotes, you may have to close and restart Media Center and Media Server. They should then appear.
