DLNA: Difference between revisions
| Line 46: | Line 46: | ||
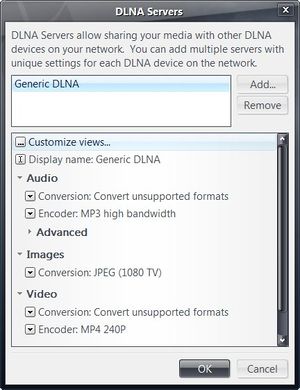
2. Servers can be set in Tools > Options > Media Network. The default "Generic DLNA" will usually work, except if you have a PS3 or XBox. |
2. Servers can be set in Tools > Options > Media Network. The default "Generic DLNA" will usually work, except if you have a PS3 or XBox. |
||
3. On the server, under Media Network, you will find an "Access Key". Copy it down. |
|||
| ⚫ | |||
| ⚫ | |||
| ⚫ | |||
| ⚫ | |||
| ⚫ | |||
| ⚫ | |||
The process is to choose a server to play from, and then to choose the renderer you want to play to. You can use a controller to do this, as well. The controller and the server may be the same device. |
The process is to choose a server to play from, and then to choose the renderer you want to play to. You can use a controller to do this, as well. The controller and the server may be the same device. |
||
When you use Gizmo or JRemote, you can enter the Access Key from step 3 above. This will connect you to that server. |
|||
==Sony Bravia Setup== |
==Sony Bravia Setup== |
||
Revision as of 22:37, 6 September 2014
Introduction
DLNA is an industry protocol for sharing media among devices. It first appeared in JRiver Media Center 14.0. You will need to enable Media Network in MC's Options. In most cases, you can just set the DLNA / UPnP Server to "Generic DLNA". XBox and PS3 are exceptions and selections for these are available in MC15 and above.
DLNA is a super-set of UPnP, which previous versions of MC supported.
Terminology
DLNA Terminology
1. DMS -- Digital Media Server -- where the media resides
2. DMP -- Digital Media Player -- where the media is played
3. DMR -- Digital Media Renderer -- where media is played, but with ability to respond to a controller
4. DMC -- Digital Media Controller -- software control of the renderer -- functions as a remote
UPnP Terminology (similar)
1. A Device (a server)
2. A Renderer (the client)
3. A Control Point (something like a remote control)
Our UPnP Server is a "Device" (#1 above).
More information on UPnP can be found in the article on UPnP Server.
Hardware Known to Work with MC
A list of DLNA TV's
A list of DLNA Boxes
Setup Instructions
MC14 introduced a DLNA renderer and controller, in addition to the previously existing DLNA Server (formerly known as the UPnP Server). The controller can play media from the DLNA server to another copy of MC or to a device.
1. Go to Tools > Options > Media Network and turn on Media Network in each copy of MC.
2. Servers can be set in Tools > Options > Media Network. The default "Generic DLNA" will usually work, except if you have a PS3 or XBox.
3. On the server, under Media Network, you will find an "Access Key". Copy it down.
4. If you want to use MC as the renderer, start the copy of MC that is running the renderer. Or turn on any device you want to use.
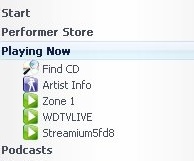
5. Restart the copy that is running the controller and server. In a minute or two, MC will display any renderers it finds under Playing Now. Select the one you want. Then drag a file to it. This should play on the remote device.
6. DLNA Servers are displayed under Playing Now. Once you select one, you can browse its library as if it were a normal MC library.
The process is to choose a server to play from, and then to choose the renderer you want to play to. You can use a controller to do this, as well. The controller and the server may be the same device.
When you use Gizmo or JRemote, you can enter the Access Key from step 3 above. This will connect you to that server.
Sony Bravia Setup
1. Go to "Tools > Options > Media Network > Add and configure DLNA servers..." dialog and click the "Add" button and select "Sony BD/TV".
2. With "Sony BD/TV" highlighted in the top window, select Video Conversion: Always convert and Encoder: MPEG2/DVD PAL stream if your TV is PAL or MPEG2/DVD stream if it is NTSC. Many Bravia TVs work with either PAL or NTSC setting.
3. If you are using PAL in step #2 above, click on "Advanced" and change the "Video DLNA Override:" text to read MPEG_PS_PAL rather than MPEG_PS_NTSC. Dismiss the dialog with Ok.
4. Right-click on the Bravia TV item under "Playing Now" and select "Associate with DLNA server" from the menu and select the "Sony BD/TV" item from the sub-menu.
5. Drag a video file onto the Bravia TV item under "Playing Now" and select "Play".
Using DLNA -- Finding DLNA Renderers and Servers
In MC16 and later, both Renderers and Servers will be found under Playing Now in the tree on the left. It may take a minute or so for the devices to show up.
Media Renderers will appear under Playing Now as zones about a minute after MC is started. In the screenshot below, the WDTV Live and the Streamium are renderers, and Zone 1 is the local machine. When a renderer is selected, any playback will be sent to it. In MC16, both Renderers and Servers are under Playing Now.
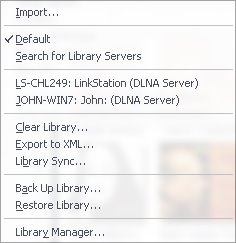
Two DLNA Servers are shown in the list below (from MC15's File/Library). Selecting one will open it as a library in MC.
In MC16, the DLNA Servers will be found under Playing Now, along with the DLNA Renderers.
The Buffalo Linkstation shown is a NAS drive that includes a DLNA Server. Any media moved to the drive will automatically show up in the MC library after the library is opened.
Connected Media - Streaming Web Radio via DLNA
Tutorial thanks to SecondJon from this thread [1]. Note: There seems to be several formats for Streaming Radio and some of these links don't work with all DLNA renderers.
1. You need to find the public Web Radio streaming URL. Sites like these for the US [2] and Australia [3] let you browse the Radio Stations and copy the streaming URL.
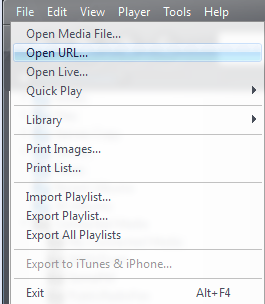
2. JRiver In Media Center 18, click File, Open URL…
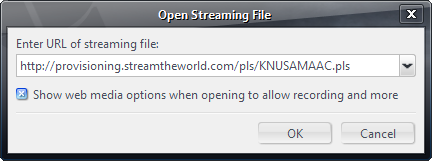
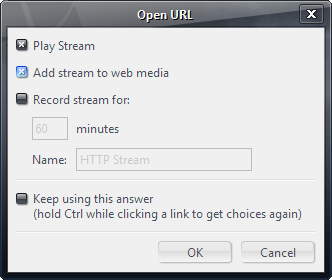
3. Paste the station URL and check the box to “Show web media options…”
4. Check the “Add stream to web media” checkbox, and you may want to check “Keep using this answer.”
5.After a moment the station will begin to play and you’ll see the station listed in the library under Audio > Connected Media > My Connected Media. Right click and click Tag or just Alt+Enter to rename the stream.
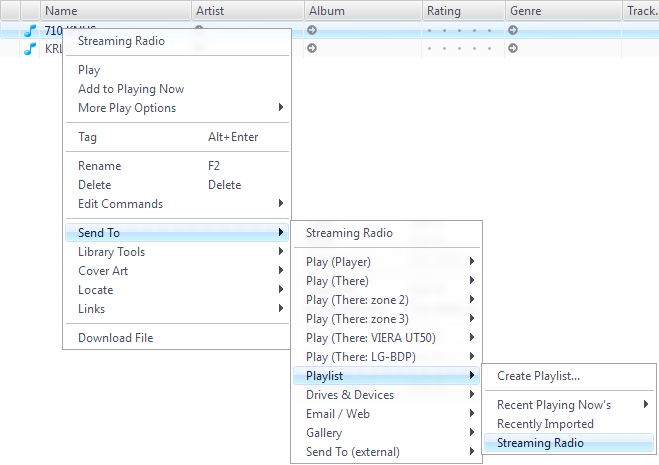
6. Right click and send to a playlist. (note: The first time you can also click “Create Playlist” and created one such as “Streaming Radio” to hold all your streaming radio links. You can also click and drag the item to your playlist.)
7.On Gizmo, connect to the server and select the playback zone. Tap Playlists and select your "Streaming Radio" playlist then the required Streaming Radio. After a moment the Gizmo app will show the Playing Now Screen. You can also push the Streaming Radio station to other DLNA renderers.
Media Network Board on Interact
Issues with DLNA discovery
You may need to turn off Windows Media Sharing services. In Windows 7:
To disable the service, use Computer Management (right click on Computer select "Manage").
Select the Services tree from "Services and Applications", find "Windows Media Player Network Sharing Service".
Right click on the service, select Properties.
Click the "Stop" button to stop the service if is is running.
Set the startup type to "Manual".
Click OK.
